How a piece of flotsam became an asset
Issue 82 : Jan/Feb 2012
One side effect of continually making improvements and upgrades to Sigfrid, our 34-foot 6-inch steel ketch, is that my partner, Magali, and I have become inveterate collectors of good-quality hardwoods. We have recovered mahogany from construction sites, teak from boatyard dumpsters and on one occasion, in Gibraltar, a stray plank that we found floating in the harbor. As is often the case, we picked this plank up without any particular purpose in mind; it simply looked too good to be allowed to drift past.
A closer inspection of our prize, once we had it on board, revealed that it was a length of hardwood decking that was being used to make walkways for a property development. This led to an idea: the nonslip surface machined on one side of the plank made it ideal for a boarding ladder.
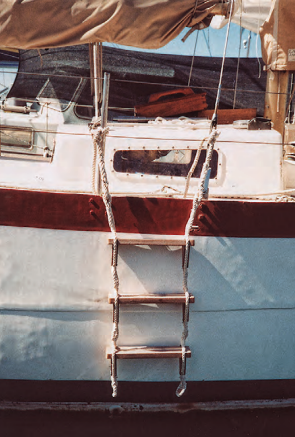
In the past, we’ve tried several boarding ladders for Sigfrid. When we bought her, she had a rather beautiful traditional one, with wooden steps jointed into lozenge-shaped end pieces. It was practical to use, but unfortunately did not roll up and was inconvenient to stow. We also experimented with an all-rope ladder, but although the rungs were of a diameter large enough to be comfortable underfoot, it hung so close to the hull that we felt as if we were climbing on our toes. Some yachts we visited had ladders made of stainless steel, but when we climbed out of a dinghy with wet feet, these always seemed slippery. For several years, we managed without any ladder at all, and simply took a big step up from the dinghy to Sigfrid. This worked for us, but it was not always so easy for visitors.
What we decided to make from our salvaged piece of timber was a rope-and-wood ladder based on the pilot ladders I had seen used on commercial vessels when I worked in the North Sea.
Design
The pilot ladders had wooden treads, about 14 inches long and 2 1/2 inches wide, supported on each side by a pair of ropes. Between the treads, the ropes were seized together. When they reached the treads, they separated and passed through holes in the wooden steps. Small wooden triangles fitted top and bottom between the final seizings and the treads held the treads in place and ensured they could not twist when stepped on.
From our point of view, this design had a couple of drawbacks. When the ladder was in use, the wooden treads would be in direct contact with the hull. This would inevitably damage the paint on the topsides. Furthermore, if the ladder were left deployed at anchor, it would tap the hull when the boat rolled.And although it could be rolled up, it did not form a very compact bundle.
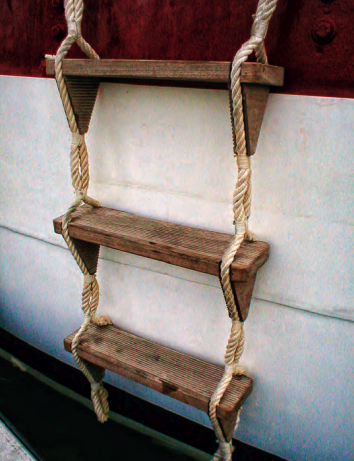
In view of these shortcomings, we modified the traditional design slightly. Each side of our ladder would still be made from two lengths of rope, seized together between the treads, but instead of passing through holes, the ropes would be located in shallow notches cut into the sides of the treads 3⁄4 inch from their ends. Now, when the ladder was in place, the rope, rather than the wooden steps, would be against the hull.
This design change would hold the ropes farther apart at each tread, so the wooden triangles would need to be larger. We decided to dispense with the triangles above the treads on the assumption that the lower ones would now provide sufficient stability. This modification would make the ladder more flexible and easier to stow.
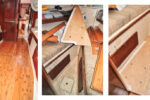
Making the treads
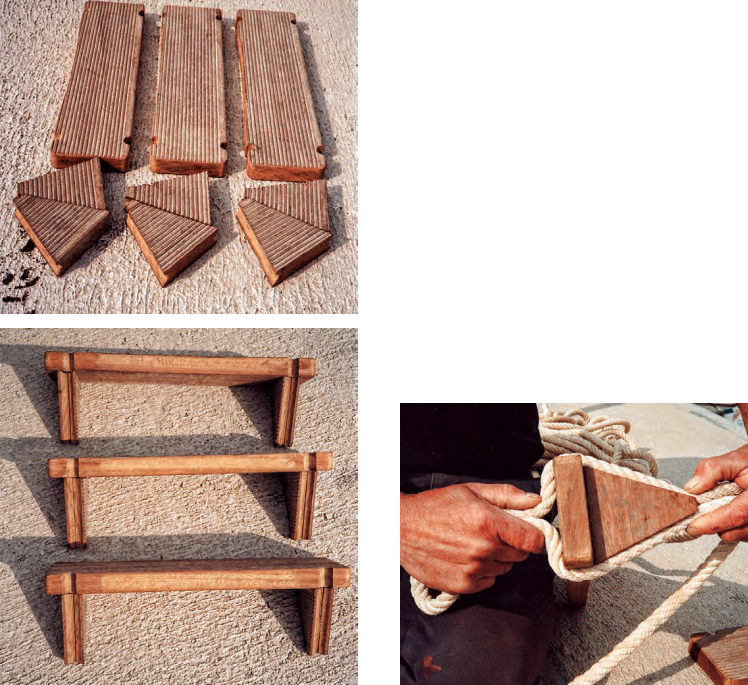
As our salvaged piece of hardwood decking already had a suitably machined top surface, very little work was required to prepare the treads. We simply cut off three 15-inch lengths and made small notches in each side about 3⁄8 inch deep and 3⁄4 inch from each end.
I cut these notches by hand. I first made a small vee with a handsaw, then used a gouge to shape each vee to a semicircular hollow. Then, on the sides of the treads that would be next to the hull, I used a spokeshave to dish them out just slightly between the notches. This was to ensure that, despite the hull’s curvature, the ropes, rather than the steps, would always touch the vessel’s side. I sanded the treads and rounded off their edges slightly to prevent splintering.
I cut the small wooden isosceles triangles from the same salvaged piece of wood. They are 4 inches long and 3 1⁄2 inches wide to match the width of the treads. To ensure that the triangles would be held securely in place by the ropes, I hollowed out their two longer edges to form long channels with a semicircular cross section. To form these channels, I made an initial shallow cut down the center of each face with a circular saw, then hollowed them out with a gouge. I finished them with sandpaper wrapped around a drill bit to make a sort of circular sanding block.
Take great care when using a circular saw to cut small pieces of wood like this. Never push the wood across the blade with your hand; always push it with a stick to ensure that your fingers will be out of harm’s way.
Assembling the ladder
The sides of our new ladder are made from two 8-foot lengths of 3⁄4-inch three-strand rope. We found the centers of these lengths and applied a flat seizing with light eight-plait nylon line to create a small eye with two 4-foot tails.
Taking one of the ropes, we laid the two tails side by side and seized them together again after another 4 inches. Then we separated them to pass around the wooden tread, fitting them into the notches I’d cut.
Next, we placed one of the wooden triangles with its short side against the bottom of the tread. We led the tails of the rope around this, fitting them into the channels formed in the long sides, and applied another seizing just beneath the tip of the triangle.
We carefully adjusted the position of this seizing until the tread and the triangle were held firmly together. Then we repeated this process using the other rope at the other side of the tread.
As long as the seizings are tight and correctly positioned, they will hold the two pieces of wood securely together without the need for glue or any other fastening.
We secured the remaining steps the same way. As we had decided our ladder would be 20 inches long with three steps, we positioned the seizings to hold the treads 10 inches apart. This left us with 4 1⁄2 inches of rope between the bottoms of the triangles and the seizings above the lower tread. This spacing has turned out to be just about sufficient. If the treads were going to be any closer together, it would have been a good idea to make the triangles shorter to ensure that the ladder would roll up satisfactorily.
Before fitting the final tread, we joined the ends of the tails together with a short splice. This created a small eye on each side of the ladder beneath the final seizing. We use these eyes to attach a two-rung rope extension that allows us to use our boarding ladder when we’re swimming as well as for climbing aboard from a dinghy.
Finishing off
The final step was to attach two 4-foot-long lines to the loops left at the top of the ladder. We made these of the same three-strand rope and joined them to the loops with eye splices. We use them to hang the ladder in place by tying them to two of the turn-buckles on the mizzen shrouds.
Our boarding ladder has lived up to our hopes. It stows away neatly, is quick and easy to set up and use, and the shrouds above the turnbuckles form useful handholds as we come aboard. The grooved surface of the treads ensures that we do not slip on wet steps and the triangles are effective at keeping them horizontal.
Richard Toyne and his partner, Magali Bellenger, live aboard their steel ketch, Sigfrid, cruising the western Mediterranean, supporting themselves with Richard’s carpentry work and the sale of jewelry Magali makes on board. They tested their new boarding ladder while exploring Portugal’s Algarve coast.
Thank you to Sailrite Enterprises, Inc., for providing free access to back issues of Good Old Boat through intellectual property rights. Sailrite.com