Improving the galley also improves engine access
Issue 35 : Mar/Apr 2004
It all started with the starter. I needed to replace the old one on Christmas, my 1961 Alden Challenger (see refit article in January 2004 issue). I was changing the alternator, too, and scratching my head as to where to locate a water heater, hoses, new hot-water lines, and a freshwater pump. Engine access is fair to the front and back (through a manhole in the cockpit) but poor on the port side, the side I needed to get to.
My only access to this area was through a tiny door under the counter and the old sink cutout. It was about 12 inches square. I needed a larger access.
Christmas, like a lot of boats of this era and size, has good space under the counters and galley area. The trick is how to get at it. With a tape measure and some masking tape, I marked off a larger hole on the counter around the existing sink cutout. Obviously, structural matters, such as sink and drain depths have to be accounted for. Every boat is different. Finally, after double-checking my measurements, I cut out this section of counter top. I came up with a hole that would solve all these problems.
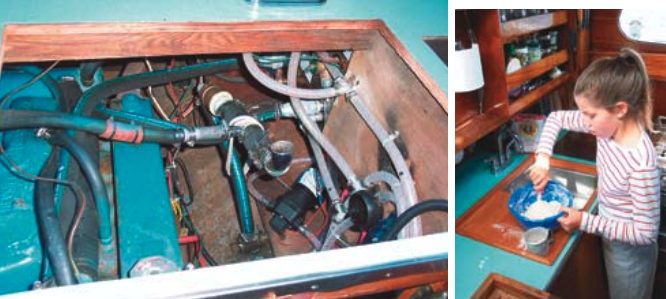
I had easy access to remove the old starter and install the new one. I had great access to the starter wiring, something you need to get to. It made for simple installation of the new alternator, bracket, smart regulator, and wiring . . . all right in front of me for future adjustments. And I had easy engine hose inspection and replacement. For the first time I was able to look down at the oil fill cap. No more funnels with hoses, tape, rags, and so on.
Even better
But that’s not the best part. Behind a locker in the counter and in front of the cabin bulkhead aft, I discovered dead space. I could see it was there, but there was no way to get to it, until now. The space was just a half-inch wider than the 6-gallon water heater and more than long enough. It was about a foot from the diesel and freshwater cooling hoses. The final hole was just large enough to allow the heater to go down alongside the engine and turn into this space. I fastened it in place there.
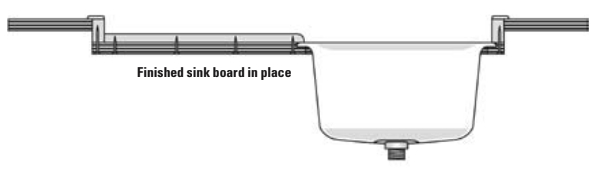
With this equipment installed, it was time to refine and build the sinkboard I had been designing in my head. To improve the galley sink, I decided to recess it under the counter material. A sink mounted under a counter top with a high curb or fiddle would make life onboard easier and cleaner. This board would need an outer lip that would rest on the counter in the new access cutout.
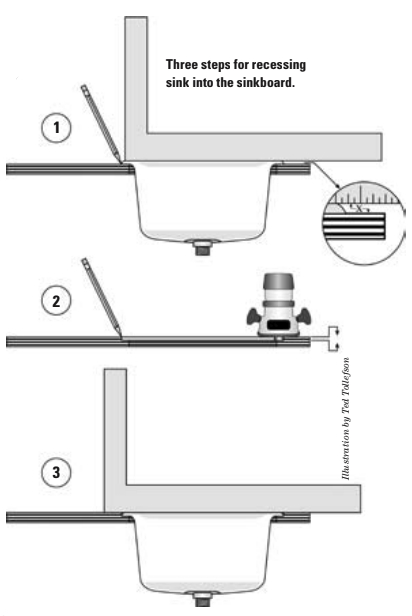
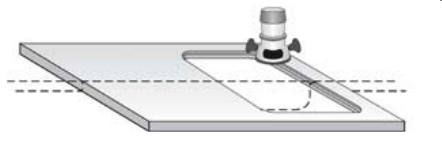
First I cut a piece of 3⁄4-inch marine plywood the size of the new access hole in the counter. I positioned the sink and cutout to the correct size in the plywood sinkboard making sure the flange was flat on the plywood, as if I were mounting it on the surface of the plywood.
Here’s what happened next:
- I traced around the outer rim of the sink and measured how “proud” of the surface the flange of the sink was. I did this by laying a straight edge on it and measuring the distance down to the plywood.
- I set a router with a straight bit to this depth. With some sinks, a straight cutter with a pilot would work nicely. If not, screw guides down around the plywood. In either case, you need to remove the material inside of the line you traced to the depth of the router bit. Make it a little oversized.
- With this step completed, I replaced the sink in the plywood. A straightedge laid across should touch the sink and counter.
Under-counter clamps
On your boat, you may or may not need the under-counter clamps that come with the sink. You can finish the sinkboard in several ways. All will need a curb with a lip to sit on the counter cutout. I used fir for the curb and counter top on my sinkboard.
I ripped a 5⁄4-inch fir board on a table saw to the depth I wanted the sinkboard to rest below the counter. I then cut the material out to leave a 1⁄4-inch by 1⁄4-inch lip that would rest on the new access cutout. This still left a full 3⁄4 inch for easy fastening to the plywood. Thinner stock will work if you are careful. The fir curb was mitered on the corners and attached to the 3⁄4-inch plywood. I drilled pilot holes and drove screws from underneath. I ran the #10 screws through clearance holes in the rim (not shown in drawing). No need for the clamps then. Use a strong adhesive/sealant like 3M 4200 for the curb-to-plywood and curb-to-sink flange joints.
All I had left to do was resaw some fir strips to 1⁄2-inch thick — a full 3⁄4 inch looked clunky. I drilled pilot holes from underneath, and used screws to jig the strip-to-curb joint. This joint should also be sealed with an adhesive sealant since these screws can only engage a fraction of the 1⁄2-inch strip. Alternately, the strip, curbs, and plywood could be jigged with screws or even aluminum nails and fastened with a waterproof glue or epoxy. Or the curb could be notched to form the top strip. There are lots of ways to do this. I put the board into the access hole and hooked up the drain. I added holddowns to the board for safety.
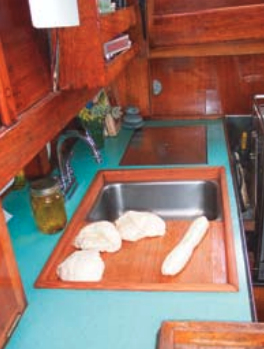
After one year of use, the recessed sinkboard has proved to be very handy. We do a lot of cooking on board. Underway, the recessed board contains spills while food is being prepared. We cut right on the fir, knead bread dough there, and let dishes drain on it. We rub a little cooking oil in to keep it looking bright. The depth of the sink has been effectively increased as well.
What if I need to get to something under there? I grab a large wrench or channel-lock pliers and loosen the nut that attaches the sink basket to the tail piece, catch the rubber washer (keep a few spares), and unlock any hold downs. That’s it. I pick the whole thing up and move it out of the way.
Thank you to Sailrite Enterprises, Inc., for providing free access to back issues of Good Old Boat through intellectual property rights. Sailrite.com