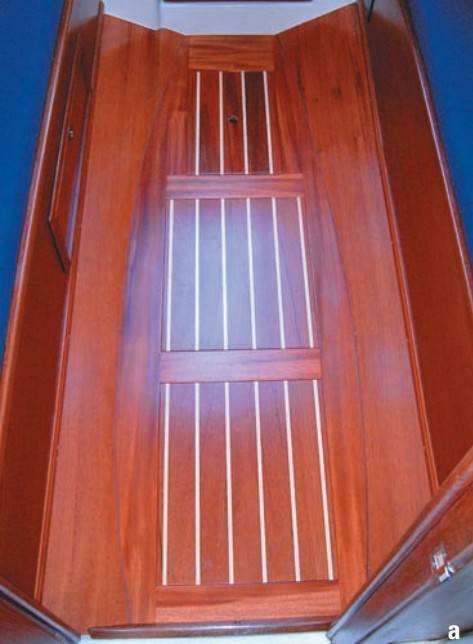
Smart addition to a venerable Cape Dory 27
Issue 44: Sept/Oct 2005
LAST JANUARY I SET OUT TO REFINISH the interior woodwork of Linda Jean, our 1981 Cape Dory 27. Most of the interior woodwork was easy to remove and simply needed to be sanded and refinished. However, the cabin sole was starting to show signs of delamination. My original plan was to re-glue and refinish the teak-and-holly veneer plywood, but close inspection showed that the plywood was too far gone. I got out the pry bar and putty knife and removed the old sole. Fortunately, the old pieces, although badly delaminated, retained enough of their shape to serve as patterns for new ones.
Our cabin sole was built in three sections. The center section was flat and was the classic teak-and-holly pattern. The other two pieces were teak-veneer plywood and were curved and bent into place to form “sides” of the sole. All pieces were held in place with glue and screws along the perimeter.
From my perspective, the new sole had to satisfy the following requirements:
- Classic look
- Durable and rot resistant
- Easy to refinish when worn
- Affordable to build
- Easy to install
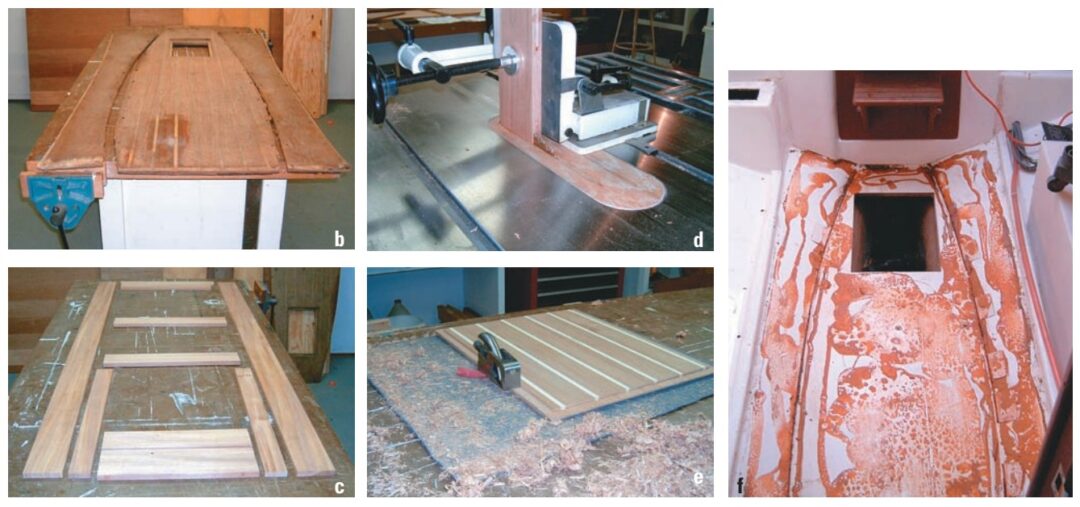
One option would have been to buy teak-and-holly plywood and replicate what was in the boat. I didn’t choose this option because getting the side pieces bent into the proper shape would have been quite involved. The original installers had to “file to fit” the backs of the side pieces and used small pieces of plastic laminate to shim them into place. Furthermore, thin veneer provides limited opportunities for future refinishing and repair.
I had read some articles on rebuilding the cabin sole by gluing solid teak-and-holly boards directly to the fiberglass sole, but this solution didn’t address the curved sides. Another problem is that it doesn’t allow for expansion and contraction of the solid stock; I feared it would eventually buckle.
I decided that a frame-and-panel design would work for the flat part of the sole. The panels could be fitted with holly inlay for the classic look and the frame would allow for expansion and contraction of the panels. I decided to make my own two-ply plywood for the side pieces. I wanted to make the surface ply thick enough to support many years of hard use and subsequent refinishing yet thin enough to be easily bent.
I considered using teak, but it is extremely expensive, doesn’t glue well, and is rough on tools. I decided to use mahogany and holly. It would provide that classic look, water resistance, and a nice contrast to the darker teak interior.
Frame and panel design
The design of the frame and panel section had some unique considerations:
- The dimensions needed to be proportioned so there was visual balance. The panels needed to be large to maximize the yachtiness, yet the frame could not appear dainty.
- The panel layout had to appear symmetrical, given that one of the panels was to be the bilge hatch.
- The frame had to have sufficient glue surface to hold together after being trimmed to size.
The thickness of the stock was increased from the original 1⁄2 inch to 9⁄16 to provide adequate glue surface for the tongue-and-groove joints that hold the frame together.
Side-piece design
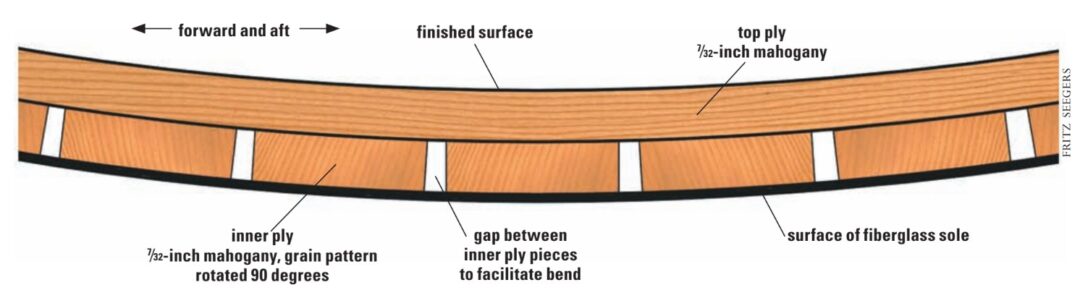
The side-piece design is quite simple: one 7⁄32-inch ply forms the face and a second 7⁄32-inch ply is glued to the first . . . but a gap is left between the pieces that make up the inner ply to facilitate the bend (see illustration below).
Frame construction
The most time-consuming part of this project was milling the rough stock to size with three smooth surfaces (one edge and two faces). I bought the mahogany for this project rough from Lakeshore Hardwoods in Pulaski, New York, which has a wonderful selection of many different species of furniture-grade hardwood lumber that are reasonably priced. The advantage to buying lumber rough is that it is more affordable and you can ensure that it will be straight, square, and smooth after it is finished.
I used a table saw, joiner, and surface planer to mill the mahogany to approximate width and length and a finished thickness of 9⁄16 inch. If you don’t have access to these tools, your best bet is to have the lumberyard mill the stock for you. You will probably have to pay an hourly shop fee. I used biscuit joints to laminate narrower boards into wider ones and tongue-and-groove joints to attach the frame stiles to the rails. The groove was cut on the table saw and is 3⁄16-inch wide by 5⁄8-inch deep. I cut the tongues in the stiles on the table saw using a tennoning jig.
I used waterproof yellow carpenters glue on all laminated joints and to attach the stiles to the rails. This glue is approved for outdoor applications but not for underwater applications. It takes an immediate tack, sets up quickly, and is extremely strong.
Panel construction
The panels were built by laminating 2 1⁄2-inch mahogany strips together using biscuit joints. However, before the final glueup, it was necessary to inlay the holly strips into each mahogany strip. I cut holly strips to a touch larger than 5⁄16 inch by 3⁄16 inch. Each of these strips was then glued into a 5⁄16-wide by 3⁄16-deep rabbet on each mahogany strip. I cut the rabbets on a router table. The extra width and thickness of the holly gave me the ability to plane the holly perfectly flush with the mahogany. Once the holly was planed flush, the panel could be laminated together and trimmed to shape and the tongue cut around the perimeter.
When sizing the panel blank, keep in mind that it needs to be large enough to accommodate the tongue as well as the field (the part you see). Also, the panel will expand and contract in the frame, so it should be sized such that when fitted in the frame there will be a gap of approximately 1⁄16 inch between the shoulder of the tongue and the frame. The same is true for the panel that serves as the bilge hatch.
When cutting tongue joints, I like to tune the joint to the final dimension with a rabbeting plane. The tongue should be planed down so it slips easily into the groove on the frame. If the tongue is too thick, it can split the frame stock that forms the groove. Once the panels were trimmed to size and the tongues tuned, I finished both sides of the tongue with a coat of polyurethane followed by candle wax. I also trimmed the corners of the tongues at a 45-degree angle to the panel sides. This ensures that when the frame is assembled and glued, the panel will not adhere to the frame.
Frame assembly
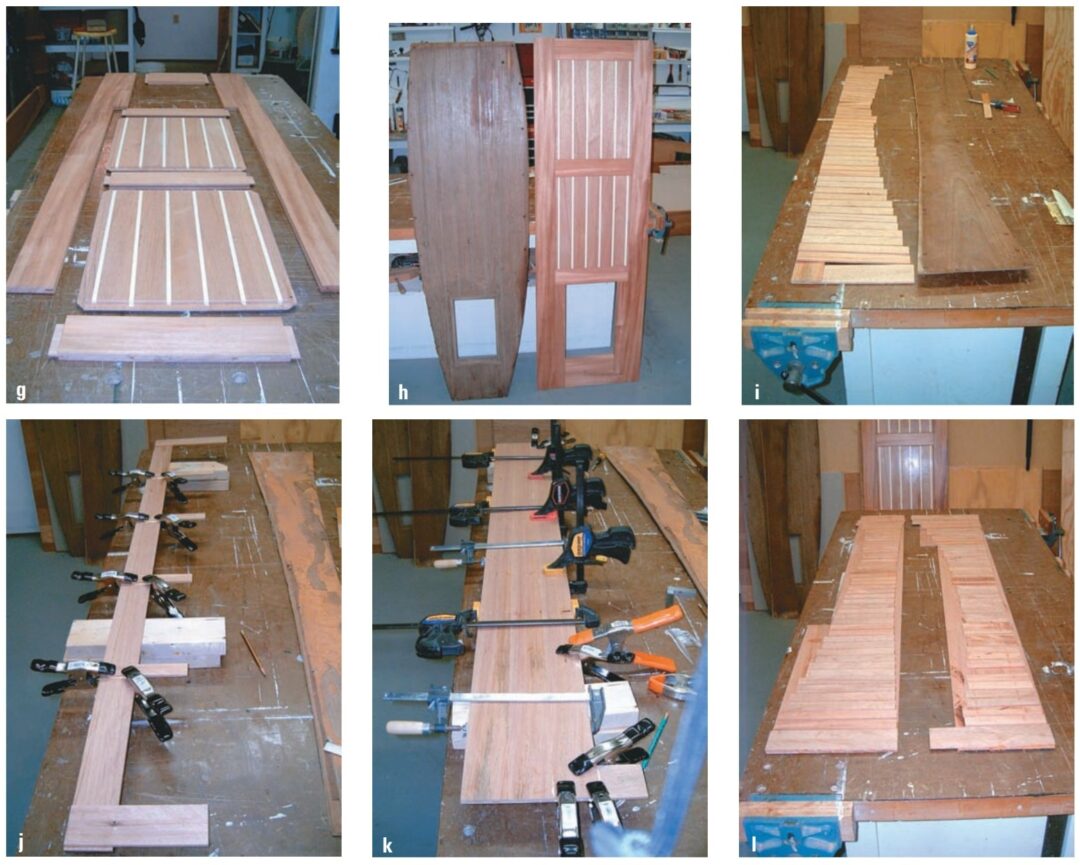
To assemble the frame, I added glue to all glue surfaces, slipped in the panels, and clamped the assembly together. Even without finish, the new sole was already a big improvement over the old one.
Side-piece construction
Construction of the side pieces begins with laying out and numbering the 7⁄32-inch strips that make up the bottom ply. I used the old side pieces as a template. Next, I glued a few strips along the length of the first long finished piece to serve as glue surfaces (tabs) for the finished face lamination.
Then I applied glue to the edge of the first long finished piece and the tabs. I set the second long finished piece in place and clamped it, ensuring that the seam was properly aligned along the face. I repeated this until the piece was complete.
Trimming and finishing
I used a hand-held jigsaw to trim the sole and a bandsaw for the side pieces. I cut each piece about 1⁄16 inch from the line and sanded to the line with a hand-held belt sander. I finished all pieces, front and back, with multiple coats of semigloss polyurethane.
The bilge-hatch frame
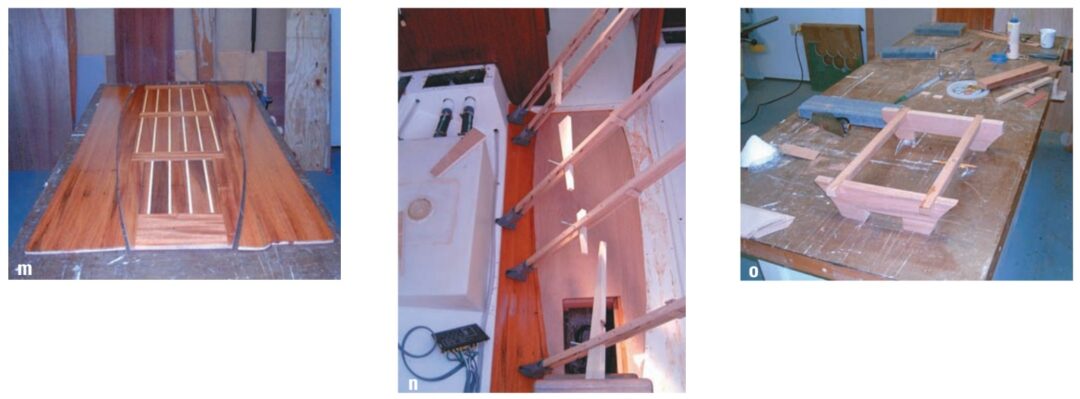
In the original sole, the bilge-hatch cover sat in cleats that were screwed to the plywood sole. When you stood on the bilge hatch, the weight of your body was essentially hanging on the hatch from the plywood sole. I believed that with 9⁄16- inch solid stock, there was some risk of the mahogany stock failing due to this loading condition. My alternative was to build a free-standing frame assembly to support the weight of the bilge hatch and anyone standing on it. In this design, the frame transfers all of the load to the bottom and sides of the bilge.
This frame was built by carefully scribing the bilge radius onto plywood patterns, trimming those patterns until they fit properly, and then building the frame members from those patterns. The longitudinal members of the frame are let into dados such that the frame was installed and screwed together after the new sole was installed.
Sole installation
Installation of the new mahogany sole was straightforward. First, I prepared the fiberglass surface in the boat by scraping all the old glue off with a razor blade. Next, I cleaned the surface with soap, water, and an abrasive pad.
I chose polyurethane construction adhesive to hold the new sole in place. It holds really well, is waterproof, and remains flexible for years. I applied polyurethane construction adhesive to the underside of the mahogany sole by running a bead or two along the perimeter of the frame and one bead along the center of the panels (fore to aft). I did not apply adhesive to the sides of the panels where they meet the frame, as the panels must be free to expand and contract across the grain. I set the sole in place and clamped it, using weights.
Side-piece installation
Installing the side pieces required bending the pieces into shape and clamping them. Once again, I used polyurethane construction adhesive, but I had to build special clamps that would expand from the cabin overhead to the sole. Once both side pieces were in place, a bead of caulk in the seams between the side pieces and the bottom piece completed installation.
Expenses
This project was relatively inexpensive. The mahogany cost was between $120 and $140 and the holly cost about $30. The construction adhesive is about $3 a tube, and the cost of a can of finish is about $8. I made the clamps from scrap I had lying around the shop. A budget of $200 is ample for this project.
The finished project
I couldn’t be happier with the way the project turned out. All of my requirements were satisfied, and I enjoyed the work. I believe the result retains a very traditional yachty feel, yet it is distinct from the usual teak-and-holly plywood solution found on many boats.
Thank you to Sailrite Enterprises, Inc., for providing free access to back issues of Good Old Boat through intellectual property rights. Sailrite.com