A propane locker that won’t blow the budget
Issue 78 : May/Jun 2011
A standard propane locker from a marine catalog seemed ridiculously expensive ($650 or more) when I was refurbishing my Cape Dory 27 a few years ago — and pretty darned ugly too. Thinking I could do better in both respects, I went back to my favorite engineering material, wood, for the answer. Soon enough, I succeeded in meeting LPG recommendations and in producing an easily made, durable LPG locker that just about anyone could put together.
The design idea came to me as I was replacing the boat’s battered old teak coamings with new African mahogany trim. I thought: why not have a matching LPG locker at less than one quarter the price of an off-the-shelf, plastic alternative? As laughable as that may sound, I soon found that constructing such a compartment was actually easier than a great many other woodworking projects on boats. But first, I had to get some facts straight.
Liquefied petroleum gas (LPG) is usually a mixture of propane and butane and their kin but is commonly called, simply, propane. Having propane gas appliances aboard a boat still scares the heck out of some owners of older boats. This misplaced fear is based on the extremely rare propane accidents that are sometimes reported, with much fanfare, in the popular boating press. But, as is often the case, the truth behind the screaming headlines is a little different than what you’d expect.
Propane gets its bad reputation from being heavier than air. That means if you have a boat with little or no ventilation belowdecks, and if you develop a leak somewhere in your propane system, the gas will tend to collect at the lowest point in your boat, the bilge. Then, a stray spark in the bilge (typically from the engine’s starter motor) can ignite the propane and create those headlines.
In response to this possibility, the American Boat & Yacht Council (ABYC) has come up with some useful guidelines for LPG installations. Most of the specifications are aimed at LPG lockers built into the boat. Outside the hull, however, there are no guidelines for lockers — mainly because they’re not really necessary. But you still ought to follow ABYC recommendations for getting gas from the locker to the appliance (see sidebar).
A job for veneer
In the workshop, making a good-looking exterior locker became a matter of bending wood, specifically two layers of African mahogany veneer. They would be the “bread” of a sandwich in which the “meat” was several layers of epoxy-saturated fiberglass cloth.
Relative to solid lumber of the same species, African mahogany (sometimes called khaya mahogany) is cheap, usually around $2 per square foot for 1⁄16-inch veneer as opposed to $6 to $9 per board foot of rough lumber (a board foot is 12 inches x 12 inches x 1 inch thick). My 6-pound LPG cylinder measures 13 inches tall and 7 1⁄2 inches in diameter, so I used veneer 14 inches wide to make the locker. Larger LPG cylinders will require wider sheets of veneer. This usually results in paying a premium of about 50 cents to a dollar more per square foot.
At this point, it’s worth noting that veneers of almost any species of wood are available and prices vary according to the scarcity of a given species. Teak will cost more than African mahogany, oak is less, and so on. There are a multitude of veneer dealers nationwide and shipping is a big part of their business. Near large cities, veneers can often be purchased locally, saving you the cost of shipping. Local purchases also allow you to see what you’re getting, although in 30 years of ordering veneer from distant suppliers, I’ve always received exactly what I expected. To find a veneer supplier near you, use your favorite Internet search engine and the terms “veneers, retail.”
Molding on a frame
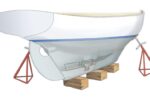
Back at the workbench, the first step in the locker’s construction was to make a frame around which to bend the veneer. Part of the frame becomes integral to the locker but part does not. This is important to keep in mind because, if you’re not careful, that non-integral part of the molding frame could end up becoming part of the locker. Obviously, the two integral parts of the locker should be of the same wood species as the veneer. The non-integral piece can be of any cheap, handy wood. I used some old MDF fiberboard I had lying around, hence the much lighter color than the mahogany.
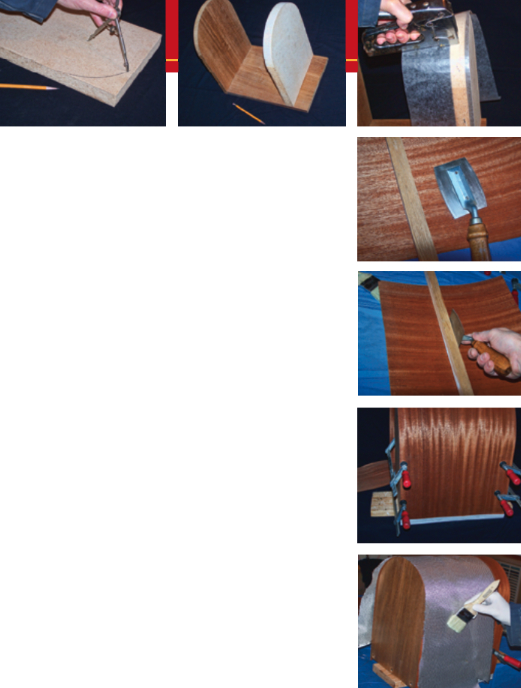
An LP tank doesn’t have to fit hand-in-glove tight in the locker, but it shouldn’t be rattling around in there either. For my 6-pounder, I struck an arc with a radius of 4 3⁄4 inches, which gives a full inch of extra room on either side of the LP tank’s 7 1⁄2 -inch girth. With that radius, the integral part of the frame was 9 1⁄2 inches wide.
Wax paper is essential for the next step. The wax paper is stapled to the non-integral part of the locker’s frame. This will prevent epoxy glue, which can seep through the veneer, from adhering to the non-integral molding frame and locking it in place. Be sure to fold the wax paper back over itself to cover the staple heads. You don’t want epoxy glue adhering to them either.
Cutting the veneer can be accomplished with a utility knife but you run the risk of crushing the wood fibers and developing splits in the veneer edge near the cut. Splits have a nasty habit of becoming bigger splits. You can minimize the splits by applying heavy adhesive tape at the point at which you are making the cut. Better yet, get a veneer-cutting saw and use it to cut the appropriate length of veneer, which for my LP tank locker was 36 inches. Don’t forget to tape the cut ends to prevent splitting.
Stapling the veneer to the integral part of the frame is simple enough. Use nonferrous staples when attaching the veneer to the integral parts of the locker. Note too that the clamps are applied as you work your way around the integral part’s outer edge. Trying to clamp everything in place before you start stapling requires too many clamps, which end up getting in the way of the stapling process. And of course, do not staple the veneer to the non-integral part of the frame.
Once the veneer is stapled in place, it’s time to apply the first layer of fiberglass cloth. The clamps on the non-integral part of the frame are left in place to help the veneer hold its shape until the first epoxy-saturated layer of cloth sets up. Obviously, the cloth is applied up to just shy of the clamps and it’s important not to get any epoxy on the clamp pads.
When the first layer of cloth has had 48 hours to set up, remove the clamps and, after following the epoxy manufacturer’s directions for between-coat preparation, begin applying more layers of cloth. Start by covering the area that was left open because of the clamps, then build up on the first layer. I’ve found three complete layers of epoxy-saturated fiberglass cloth are plenty strong but, if you feel more comfortable with more, lay ’em on. Just be sure to leave at least 48 hours drying time between each layer. And when you’re ready to apply the last layer of fiberglass cloth, be sure you’re ready to clamp another layer of veneer atop the last epoxy-saturated cloth immediately after wetting out the cloth.
Finishing touches
For the final veneer to be properly held in place, have plenty of wax paper and clamps on hand. The entire surface of the finish layer of veneer must be covered with at least one layer of wax paper to prevent the clamp pads from adhering to the veneer. As with the first layer of veneer, epoxy can seep through the wood and the wax paper keeps it from cementing the pads in place. It’s best to do a dry run of the final step to be sure you have enough clamps on hand and have a general idea of where to place them for the best result.
After the fiberglass/veneer layups are complete, remove the non-integral framing member and prepare for filleting. This procedure has nothing to do with carving up fish but it does help reinforce the corners where the veneer meets the integral portion of the frame. The fillet is made of a paste of epoxy and the manufacturer’s recommended filleting powder or, as worked for me, sawdust. Once you’ve formulated the paste, you just trowel it into the corners, dress it with a disposable edging stick (I used a standard tongue depressor), and let it set up for 48 hours.
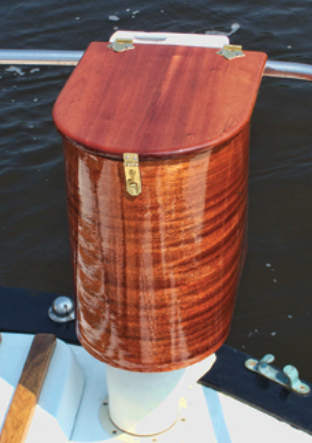
Finish off the LPG locker with a lid made from a solid piece of lumber of the same species you used for the veneer. The lid is cut slightly bigger than the outside edges of the locker sides. This helps prevent rain from running down the inside of the locker walls. But this should not be a watertight lid. To be safe, air must circulate freely in the LPG locker; making it watertight would prevent that.
To bring out the best in the veneer, I varnished it without first applying a clear-epoxy base. I just varnished in the same way I would any bare wood surface. I did, however, have to sand down some epoxy that had seeped through the veneer. Be careful when doing this as it’s easy to sand through the veneer.
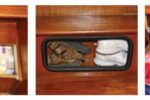
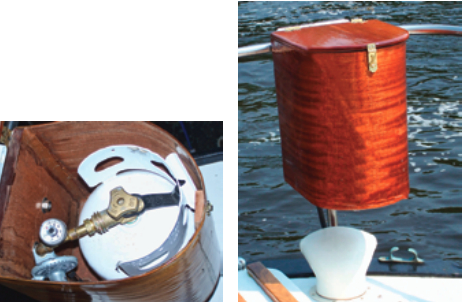
On most boats, where the locker is mounted is a matter of convenience. My boat already had an outboard bracket on the aft rail. The outboard was not included in the sale, so the bracket made a convenient mounting surface. I led the gas hose through a vent cowling already in the aft deck.
Since the locker has been aboard Marie Rose, I rarely visit an anchorage without someone rowing by and saying, “Hey, where’d you get that?” “I did it myself,” I tell them, “for $75.”
Ken Textor has been living on, working on, and writing about boats for 35 years. In addition to Good Old Boat, he’s written for Sail, Cruising World, WoodenBoat, and others, plus books and newspaper columns. He lives with his wife, cats, and dog in Arrowsic, Maine.
Thank you to Sailrite Enterprises, Inc., for providing free access to back issues of Good Old Boat through intellectual property rights. Sailrite.com