Wheels take the weight off a paddler’s shoulders
Issue 94 : Jan/Feb 2014
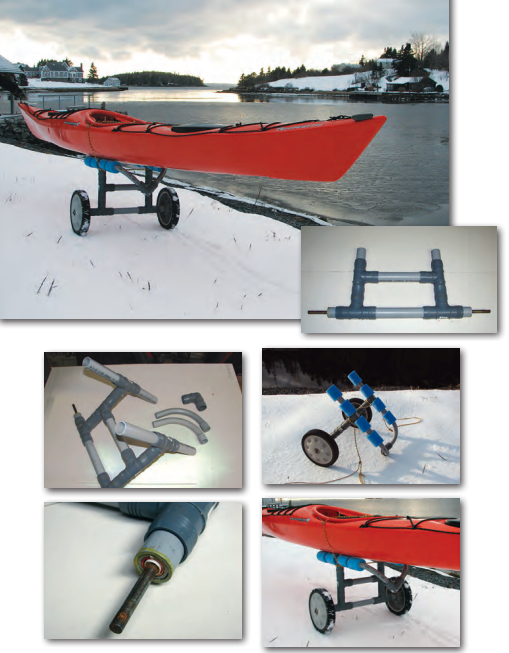
It’s not easy for a sailor to stay occupied with boat-oriented projects when snow covers the ground. Building a cart that simplifies moving a kayak or dinghy around on terra firma is one possible winter project. I cannot take credit for the design; I have seen various versions over the years. I just altered things to suit my needs.
I made our cart fairly large with a wide wheelbase to handle the sloping terrain between our kayak shed and car. We don’t need to transport the cart in or on the kayak, so we gave up compact size in favor of stability. We need to move the kayak about 400 feet uphill if we wish to cartop the kayak, so having the cart support the entire weight of the kayak is very convenient. I made the bunks 14 inches apart and 21 inches long. This easily accommodates even our narrowest kayak, which has a 22-inch beam.
The cart is easy to build using parts found at the local hardware store. The tools you need include a measuring tape, hand saw, and screwdriver (a small cordless screwdriver makes the work a lot easier).
Parts and assembly
- 10-foot length of 1 1⁄4-inch plastic electrical conduit. I used about 81 inches.
- Two 1-inch electrical conduit 90-degree elbows. These are used to make a leg to keep the cart upright when putting the kayak on the cart. They also add rigidity to the bunks the kayak sits on.
- One plastic 2-inch hose fitting with a 90-degree angle. This joins together the conduit elbows to make the leg. I drilled a small hole at the lowest point so it would not hold water.
- Six plastic 2-inch-tee hose fittings.
- One pool noodle.
- One 1⁄2-inch steel rod for the axle. I made mine 29 inches long.
- A few pieces of hose or conduit of different diameters to act as a bushing to make the axle fit snugly inside the 1 1⁄4-inch conduit.
- Two plastic wheels, the bigger the better. Mine were 12-inch wheels.
- Two 1⁄2-inch hose clamps. I used these to keep the wheels on instead of drilling the ends of the axle to take cotter pins.
- A handful of 1-inch deck screws.
The cart goes together easily and the deck screws go through the plastic without the need to drill holes first. The hardest part was making a hole in the pool noodle large enough for it to slide over the 1 1⁄4-inch conduit. I found that by sharpening the end of a scrap piece of conduit with a grinder, I could twist it into the end of the noodle to cut the hole.
I tie the kayak to the cart tightly and keep the cart from slipping back by putting a second line around the forward edge of the cockpit lip. If I had to wheel it over rougher terrain, I would use two tie-downs to make the kayak more secure and to prevent it from twisting on the cart. Webbing and quick-release fastex buckles could be used for a fancier way to secure the kayak.
Ben Doucette and Sue Vey live in Seabright, Nova Scotia. They spend their summers kayaking and sailing the coast of Nova Scotia aboard their Ontario 32.
Thank you to Sailrite Enterprises, Inc., for providing free access to back issues of Good Old Boat through intellectual property rights. Sailrite.com