Proven procedures keep the juice flowing
Issue 103 : Jul/Aug 2015
I joined the Navy right out of high school many years ago and they saw fit to teach me to be an electronics technician. Throughout my first two years of training, one thing that was continually emphasized was the importance of good electrical connections. Make a good electrical connection and it will last decades under even the most adverse conditions. Cut corners and it will soon cause problems, most likely at the worst possible moment.
After my original enlistment period was up, I went on to become an electrical engineer, but the early lessons I learned in the Navy stayed with me. An electrical connection should be strong mechanically, have a low electrical resistance, have the capacity to conduct the intended current, and be protected from corrosion. It is not very difficult to make a connection that meets all these criteria.
Splices
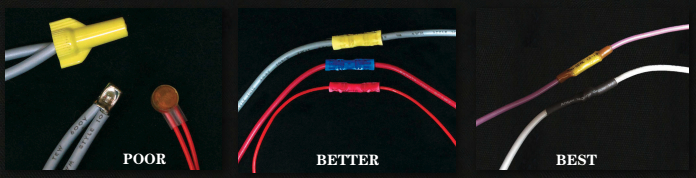
There are several methods for making a splice to join wires together. Wire nuts are commonly used in household electrical circuits, but are totally unsuitable for marine applications. Likewise, household-type crimp connectors should not be used on a boat.
A better method is to use marine-grade crimp butt connectors. Most automotive-grade crimp connectors use zinc-plated steel for the barrel, which will corrode in a marine environment. Marine-grade connectors use tinned copper. Using butt connectors with adhesive-lined shrink tubing will make the connection watertight.
Crimp connectors are color-coded: red for wire sizes AWG 18-22, blue for sizes AWG 14-16, and yellow for sizes AWG 10-12. It’s important to use the right connector for the size of the wire being spliced. Thus, a limitation of crimp butt connectors is that if two different sizes of wire are being spliced, it is quite likely the butt connector will not be the right size for both wires. (See “Marine Electrical Wire 101,” July 2014.)
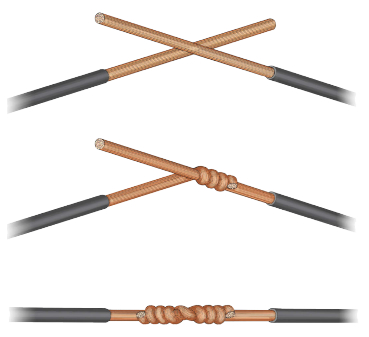
In my opinion, nothing beats a good solder connection. If properly made and insulated, it will last many decades. To make a good solder connection, I first slide a length of adhesive-lined heat-shrink tubing onto one of the wires. The tubing should be about twice the diameter of the insulated wire. Then I wrap the two wires together (see illustration, above). Wrapping the wires in this way makes a good mechanical connection and the result is less bulky than twisting the wires together in a pigtail. I heat and tin the soldering iron, hold it against the connection until the wire is hot enough to melt the solder, and let the solder flow into the connection. After it has cooled, I slide the heat shrink into place and heat the tubing with a heat gun or lighter until it shrinks to size. Ideally, a small amount of adhesive will ooze out of each end of the tubing. (See “Electrical Soldering,” May 2015, for a more detailed look at soldering.)
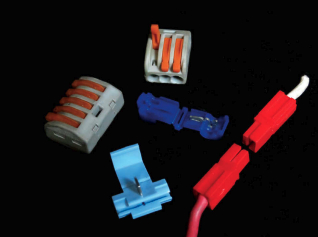
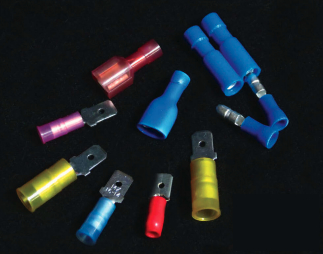
Friction-type connectors are often used to splice wires for equipment that’s disconnected periodically. The most common of these are quick-disconnect crimp terminals. The female half of this type of connector can be purchased with insulation covering only the crimp portion of the connector or with full insulation. Choose connectors that are fully insulated. Snap plugs and sockets are another friction-type connector similar to quick-disconnect terminals except they are round instead of flat. As with butt crimp connectors, friction-type crimp terminals are color-coded for wire size. Since friction-type connectors must meet a number of criteria in order to be acceptable for use on a boat, it is best to purchase marine-grade connectors made by a reputable manufacturer such as Ancor.
A number of other splice connectors are intended for the marine market. I’m somewhat skeptical of the long-term reliability of these connectors despite manufacturers’ claims, but I have very little firsthand experience with them.
Screw-terminal connections
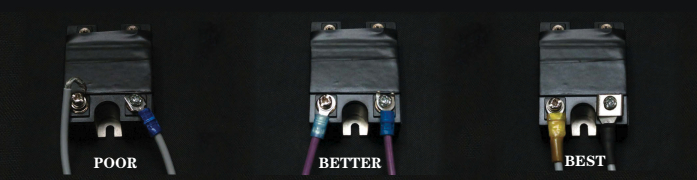
There are several methods of connecting a wire to a screw terminal and some are better than others. In a household circuit, where solid wire is used and the wiring is not subject to movement, it’s acceptable to secure the wire directly with the screw head. On a boat, this is a poor way to make the connection. A flat forked terminal is only slightly better, as it is quite likely to come free if the screw loosens the least bit.
A much better method is to use ring terminals or captive-fork terminals. If the screw loosens, the wire will stay in place, although the connection might be intermittent.
The best method is to use a crimp ring terminal with adhesive-lined, heat-shrink insulation.
Even better, I use an uninsulated ring terminal and crimp the wire in place. Then I solder the wire to the terminal, and finally seal it with heat-shrink tubing.
Observe the following points to ensure reliable connections:
- Screws, nuts, and washers used with these terminals should be corrosion-resistant and galvanically compatible with the conductor and terminal. For example, aluminum or unplated steel are not suitable.
- No more than four wires should be connected to a single terminal screw.
- Ring and fork terminals should be sized correctly for both the wire and the screw diameter.
Friction terminal connections
Many electrical components on a boat — such as breakers, switches, and relays — use blade-type terminals for the electrical connections. These blade terminals are intended to be used with female quick-disconnect crimp connectors. Marine-grade connectors will be more resistant to corrosion and will fit tightly enough to stay put. Unless the connection is for a ground circuit, the connector should be insulated. The connector should be the correct size for both the blade and the wire being used.
Setscrew connections
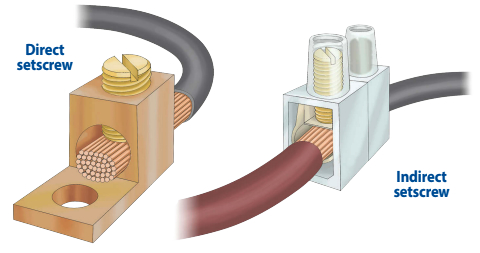
In another type of screw terminal, a setscrew bears down on the wire to hold it in place (see illustration, below). The wire makes the electrical connection. There are a few considerations with this type of connector:
- The connector is usually suitable for a range of wire sizes, and only wire within this specified range should be used.
- An indirect-bearing type is preferable to a direct-bearing type.
- If the terminal is a direct-bearing type, the connection may be more secure and reliable if the strands of the wire are first soldered together.
Insulation
An electrical connection in the marine environment should be insulated to prevent shorts and to seal out moisture. Insulating a connection with plastic electrical tape doesn’t work well on a boat as it will inevitably unwind, leaving a sticky, uninsulated mess. There are other, much better methods.
Heat-shrink tubing – Slide this tubing over the wire before making the connection. Once you have completed the connection, slide the tubing back over the connection, then heat it, so it shrinks and forms a tight fit over the wire and connection. The better tubing, such as Ancor marine-grade, will shrink to a third or less of its original size and has an adhesive lining. The heat causes the adhesive to melt and, once the tubing has shrunk and cooled, the adhesive will create a water-tight seal. Using the right size of tubing is important. If it’s too large, it won’t shrink enough to form a good seal. If it’s too small, you won’t be able to slide it back over the connection or terminal.
Heat-shrink tape – Wrap this tape tightly around a connection so each wrap overlaps the one before it by about 50 percent. Hold it in place temporarily with a couple of cable ties, then heat it. As it becomes warm, the tape shrinks and each layer fuses with the one beneath, forming a tight, waterproof seal. Its advantage over tubing is that the tape will conform to a connection or wire of just about any size and can be added after a connection is made. The disadvantages are that it is expensive and somewhat difficult to work with.
Self-amalgamating tape – This is a non-sticky silicone-rubber tape (usually black, gray, or white) that, when stretched and wrapped around an electrical connection, melds itself into a strong, seamless, waterproof layer. Self-amalgamating tape is sold in rolls and has a plastic backing that is removed as it is applied. The backing prevents the tape from melding to itself while on the roll. It is UV- and weather-resistant. It remains soft and pliable, is relatively easy to remove, and leaves no residue. The only shortcoming of self-amalgamating tape is that it isn’t very resistant to chafe or abrasion. I use this type of tape for insulating and weatherproofing outside connections or just about any connection for which I can’t use heat-shrink tubing.
Tools
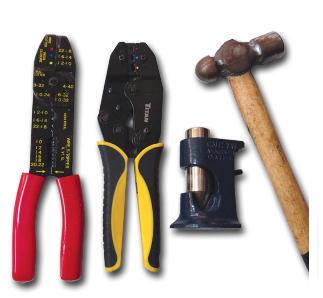
Unless you will be doing considerable electrical work on your boat, you needn’t invest a lot in specialized tools, but you should have the basics. For much less than the cost of an hour of an electrician’s time you can buy all the tools you will need for doing most of your own work. If you will be doing a lot of electrical work, invest in better tools.
Electrician’s multi-tool – Versions of this tool, which can cut, crimp, and strip, can be found in every chandlery, automotive parts store, and hardware store. It is the essential electrical tool every boat owner should have. The price will range from less than $10 to $30. I have an inexpensive model that has seen a lot of use over the years. It works well for stripping wire and crimping terminals. In my experience, however, the cutting blades become dull and useless after only a few cuts.
Wire cutters – I have several wire cutters intended for use with wire ranging in size from tiny AWG 30 wire to 3⁄8-inch stainless-steel rigging wire. My favorite and most-used wire cutter, however, is my 8-inch wire cutter. This works well for the most common wire sizes.
Wire shears – To cut larger wire than AWG 8, you can use a hacksaw or rotary tool with a cut-off wheel, but wire shears will do a faster and cleaner job. These are more expensive than normal cutters but can be used for a wider range of wire and produce a better cut.
Ratcheting crimper – I do a lot of electrical work and have invested in a ratcheting crimper. The advantage of this tool is that it will not release until the terminal has been crimped the correct amount. These range in price from $20 to $75. I bought a double-crimping model that crimps both the barrel and the sleeve.
Heavy-cable crimping tool – For making heavy cables, such as battery, starter, or windlass cables, I use a larger, heavy-duty crimper. There are several types available that make the crimp when squeezed in a vice or struck with a hammer.
Soldering tool – I have several soldering irons, guns, and torches I use for various applications. If I had to choose just one, it would be my butane soldering kit. It has tips and settings that make it useful for everything from shrinking heat-shrink tubing to soldering AWG 8 wire on a windy day. Plus, I can take it up the mast or solder a connection when boat power is low.
Heat gun – A heat gun is by far the best way to shrink heat-shrink tubing and tape. Hair dryers don’t get hot enough, and lighters and torches may melt the insulation on the wire. (Heat guns are also great for removing varnish and paint before refinishing.) The downside is that they take a lot of power, so I only use ours when on shorepower.
Wire quality
I can use the best terminals, attach them using the best tools, and fully insulate them, but if the wire I start out with is corroded, the connection will soon fail. The wire should be bright and shiny. A small amount of verdigris can be cleaned off, but if the wire is heavily corroded, it should be replaced.
David Lynn was an electronics technician in the U.S. Navy for six years before getting his BS and MS in electrical engineering. He and his wife, Marcie, have lived aboard Nine of Cups, their 1986 Liberty 458 cutter, since purchasing her in Kemah, Texas, in 2000. They have sailed her more than 80,000 nautical miles and have just completed their rather meandering circumnavigation around the five great capes. They are currently en route from Cape Town to the U.S. Find them on their website at www. nineofcups.com or their daily blog at www.justalittlefurther.com.
Thank you to Sailrite Enterprises, Inc., for providing free access to back issues of Good Old Boat through intellectual property rights. Sailrite.com