Follow these instructions to give your deck a sparkling new life
Issue 23 : Mar/Apr 2002
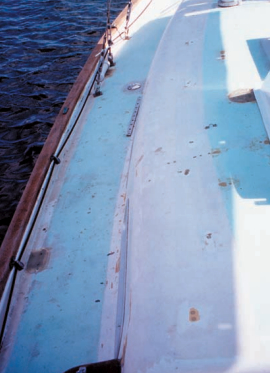
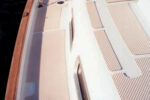
The very first day a new boat is rolled out of the shop, the sun (or rain, or sleet, or hail, or hobnailed boots) beats down on the deck while at least half of the hull is sheltered. This defines the disparate lives of deck and hull. Ergo, the deck of a sailboat typically needs refinishing long before the hull, a need that largely goes unattended by most sailors.
Why? Because painting the deck is hard.
I cannot make it easy, but I can prevent you from making it even harder. And if you follow my guidance, your efforts will be richly rewarded.
Choosing your paint
As with painting the topsides (see Good Old Boat, January 2002), the best method for painting the deck is the roll/tip method. However, the deck is not a free expanse like the topsides, and you are going to find a lot of your deck area inaccessible to a roller. Because of this, a lot of sailors elect to paint the deck with a single-part polyurethane. One-part paints have a much longer “open” time for brushing them out around obstacles like stanchion bases and grab rails. In general, it is easier to get a nearly stroke-free finish on the restricted areas of the deck with a single-part paint.
To me, however, this is not a compelling argument. In the first place, a two-part paint will last two to three times as long as a one-part, and painting the deck is not something you will want to do again any sooner than you have to. Secondly, the majority of the deck is nonskid, where brush strokes are not an issue and the thinner consistency of two-part paint has less tendency to smooth out the texture. As for the smooth surfaces, a two-part paint gives a clearly superior finish where you can roll and tip. The logic of sacrificing this advantage for the majority of the deck to the promise of better results in the restricted areas eludes me. Besides, with a little forethought, you can get around most of the problems presented by the shorter open time of two-part paints. The result is usually a better finish over the whole of the deck.
All the prep work is the same no matter which paint you choose, but I urge you to plan on using a two-part polyurethane for the top coats. As you will see, we are going to paint the deck in sections, so if you are disappointed in your initial results, you can simply switch paints. However, I am confident that if you try it, you’ll find it easier to get good results from a two-part paint than you imagine. And if you don’t curse me now, you will bless me when you are sailing rather than repainting three years from now.
The nonskid issue
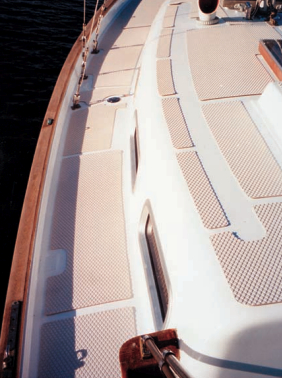
A major concern when repainting the deck is that you do not compromise the anti-skid surfaces. If the molded-in texture is aggressive, a coat or two of milk-thin polyurethane should not be significantly detrimental. Unfortunately, the best thing you can say about the “nonskid” texture on many older boats is that it is less slick than the untextured surfaces. Even that may not be true after you paint it.
If you don’t want your deck to offer poorer footing, you have three choices: you can mix grit in with the paint, you can sprinkle grit onto wet paint, or you can eschew paint on the nonskid areas altogether and glue down a rubberized overlay. Your choice influences exactly how you will paint the deck.
Of these three, rubberized overlay has the clear advantage as far as secure footing goes, but it’s expensive and relatively heavy. Mixing grit into the paint is the easiest, and may be your best choice when the textured surfaces are a different color from the smooth surfaces. Sprinkling the grit requires an extra step for a two-color deck, but generally gives a more attractive result. On a one-color deck, the sprinkling method is preferred.
Preparation
Preparation for painting always begins with cleaning. The schedule is the same as for cleaning the hull; that is, a detergent wash (Wisk) followed by degreasing with MEK (or acetone) followed by dewaxing with a dewaxing solvent (Interlux 202 or equivalent). An unpainted deck will still have traces of mold release, so you must dewax the surface before you paint. I like boxed wipes for cleaning smooth surfaces, but use a brush for scrubbing and clean terry cloth for wiping textured surfaces.
High-gloss polyurethanes — single-part and two-part alike — do not hide flaws; they accentuate them. If you are trying for a flawless finish, you must be painting a flawless surface. The implications of this axiom depend on the condition of your gelcoat.
Where the gelcoat is simply dull, but in good condition, you only need to sand the surface with 120-grit paper to prepare it for paint. The gelcoat provides a fine base for the paint, so no primer is required.
More often, the deck is showing its age with scratches, gouges, “breakouts,” and perhaps crazing. Crazing has the look of a cracked eggshell and occurs over large sections of the deck. Do not confuse this with stress cracks that typically emanate from beneath stanchion bases or show up as parallel cracks in molded corners. Stress cracks require corrective measures beyond the scope of this article.
Repair gouges and break-outs with an epoxy filler and sand them fair. Prime the repaired areas with epoxy primer (Interlux 404/414 Epoxy Barrier-Kote Primer). Epoxy primer alone is the cure for crazing.
One “trick” to getting a professional finish is to remove as much deck hardware as practical. When you don’t have to brush around some fitting on the deck, you lower the likelihood of having visible brush strokes in the finish at that location. This eliminates edges where the paint fails, since the new coating will extend under the reattached hardware. Think of painting the deck as the ideal opportunity to rebed deck fittings. The more deck hardware you are willing to remove before you start painting, the better your paint job will be.
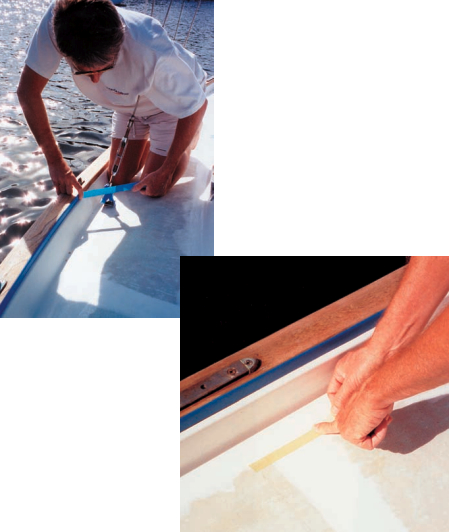
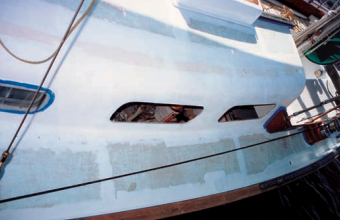
All adjoining surfaces, including all hardware that you elect not to remove, will need to be masked prior to priming the deck. For separate surfaces, such as cleats, handrails, portlights, and toerails, blue Long Mask (3M #2090) is a good choice. To divide the deck surface into sections, use only Fine Line (3M #218) masking tape.
Priming
If your deck repairs are extensive and widespread, you will get better results by priming all of the smooth surfaces. Priming is also required where the gelcoat has become porous. Sand all surfaces to be primed with 100-grit paper. Much of this sanding will have to be done by hand. It is essential to remove all gloss and to give the entire surface a good anchor pattern.
Allow mixed epoxy primer to sit for about 20 minutes before adding thinner, then thin according to the instructions on the can: about 25 percent by volume if you are using Interlux 404/414. You can simply roll the primer on with a foam roller, but you should get a smoother surface, which reduces sanding time, by tipping it with your badger-hair brush as though it were a finish coat. Epoxy primer does not take long to set up, so you must work quickly, rolling only a small area and tipping it immediately.
Crazing generally requires a second primer coat. Sand with 100-grit between coats. Sand the final coat of primer with 120-grit paper to prepare the surface for painting.
Textured surfaces should not be primed (repair areas excepted) unless you will be using grit in the paint to enhance the nonskid properties. If that is the case, they are primed separately from smooth surfaces. If you are not priming textured surfaces and especially if you will be painting both smooth and textured surfaces the same color, you can simply “cut in” the primer around the nonskid panels without masking. Otherwise, mask their perimeters before you prime the smooth surfaces, placing the tape on the texture side of the smooth/texture border.
Keep in mind that while priming hides flaws, it can also introduce them. Allocate an entire day to do nothing but sand the primed surfaces to rid them of brush or roller tracks. The smoother you get the final primer coat, the better you can expect the top coats to turn out.
If your entire refinishing job takes place over a couple of weeks, it is possible to let the masking you do for the primer coats to also serve for the finish coats. However, there is some risk that the build-up of paint on the edge of the tape will get strong enough to lift the adjacent paint when you finally do peel the masking. It is better to remove the masking before you sand the final prime coat, then remask for the finish coats.
Priming nonskid
Primer will fill the texture of the non-skid areas. Consequently, you should not prime the nonskid surfaces unless you will be using the primer to adhere grit to the deck.
The process is quite simple. Mask the nonskid panel, this time with the tape on the smooth side of the texture/smooth border, and quickly roll on a coat of epoxy primer. If the texture is deep, you may need a roller cover with a short nap (rather than foam). While the epoxy is wet, cover the whole surface with grit sifted through your fingers or from a shaker. When the primer is dry, sweep off the loose grit (save it to reuse) with a soft brush. When you encapsulate the adhered grit with a top coat of polyurethane, you will end up with a painted surface with excellent nonskid properties.
Your grit can be a so-called nonskid additive, typically polymeric spheres, or it can be sand. Sand provides better footing but is harder on skin and sails. If you decide to use sand, you want #36 foundry sand or sandblasting sand. The impurities in beach sand make it an inferior choice. If you choose synthetic grit, it should be the coarsest you can find. It need not be from the same manufacturer as the paint.
You can skip the primer step and simply add grit to the paint, but I find that this results in an irregular dispersion that is less pleasing to my eye than sifted-on grit. To avoid your own disappointment, do a test application both ways on a scrap of plywood. This test will also allow you to decide if your selected grit is too aggressive or perhaps not aggressive enough.
Divide and conquer
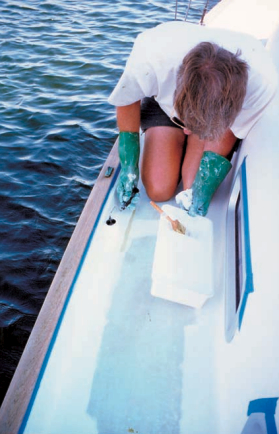
If you have stayed with me this far, here comes the payoff. To get a sprayed-on look on the deck’s smooth surfaces you must limit the roller application to a single wet edge, but how do you do this when the smooth surface branches, then branches again as it surrounds the nonskid panels? The answer is that you paint the deck in sections, masking off the branches.
For example, you might start by painting just the area between the toerail and the outside edges of the deck nonskid. Nonskid panels will be painted separately (and last) for reasons I will share momentarily. Consequently, the textured areas are either masked if you are going to paint them or, as in my case, simply unprimed because they will be covered with a nonskid overlay.
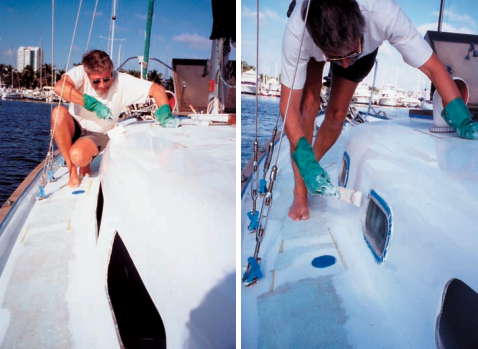
To limit your wet edge, put a strip of Fine Line masking tape across the end of every branch of the smooth surface that separates nonskid panels. In other words, you extend the outboard edge masking of the nonskid sections right across the smooth strips that divide them. What you are trying to do is create a narrow, continuous strip of smooth surface, without any branches, that continues right around the deck. If you start painting at one corner of the transom, you can roll and tip this strip all the way to the bow, then back to the transom on the opposite side of the deck, and finally across the transom to end up back where you started. You paint this section dealing with a single wet edge, which is the secret to a stroke-free finish.
Next, perhaps, you isolate the smooth surface between the inboard edge of the deck nonskid and the outboard edge of the nonskid on top of the cabin. This much wider strip includes the cabinsides, and unless the portlights have been removed, it necessarily branches around them. However, if you roll on the paint right to the end of the portlights, you can make this less like two wet edges and more like a middle section that does not need tipping.
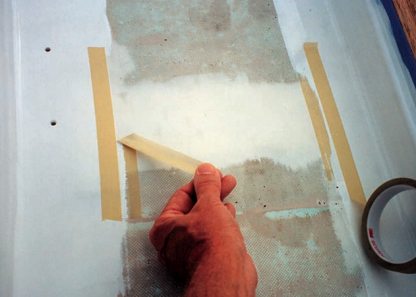
Wait until the next day to paint the remaining smooth sections. Lay fresh tape edge to edge and on the painted side of the tape strips separating painted from unpainted, then peel up the old tape (see illustration on Page 76). This should give you a number of short, mostly athwartship sections, and perhaps a couple larger areas around a mast or hatch opening that need to be painted. Brush or roll and tip these areas one at a time. When they are dry, peeling up the tape separating them from the sections you painted the previous day leaves a nearly invisible joint line — much like a mold mark. You will have eliminated virtually all application delays — the primary cause of brushstrokes in the finish.
Painting the nonskid
It is obvious that nonskid areas get painted separately when they will be a different color or when you plan to use grit in the paint, but it may be less obvious that they should be painted separately even if they are the same color as the smooth surfaces. Consider this: if the molded texture is bold enough not to need grit added to the paint, it will be too deep for the foam roller you are using on the smooth surfaces. You could paint smooth and textured at the same time when painting over primer-adhered grit, but painting the nonskid separately makes it easier to divide the deck into easily manageable sections. Keep in mind that there is no need to tip the nonskid surfaces, so painting the smooth surfaces separately allows you to focus your effort where it will show.
Always paint the textured panels last. This is so the final masking is on the smooth surface, which will give a crisper line. Also, if you are painting the nonskid a color, the color covers any weepage of the white better than the other way around.
Weather
You can do the prep work in almost any kind of weather, but apply the top coats only in mild temperatures of between 50°F and 80°F. And as with painting the hull, the air must be dry. Don’t paint too early in the morning or too late in the afternoon. Don’t paint when rain is a threat. Don’t paint when the humidity is above 70 percent. Break any of these rules and the paint will refuse to flow out for the stroke- free finish you are after.
Lighting is also an issue. In my experience, about half the time when you are painting a white deck, it is nearly impossible to get the light at the right angle to see how the paint is going on. In this case, you have to rely on routine. Get the rhythm down, and you will get a great finish even with limited ability to assess it as you go.
About the paint
Follow the mixing and thinning instructions on the can. For deck painting, I tend to use the maximum recommended thinner: about 40 percent by volume. The deck’s mostly horizontal surfaces are very forgiving, and the paint tends to level out nicely. Watch closely for runs on vertical surfaces, particularly beneath portlights. If you get a run or sag in the first coat, you are going to sand it out. Give trouble spots greater care for the final coat.
There is much to recommend using a flattening agent (Interthane 2317) in deck paint. Sun reflecting off a mirror-like surface is hard on the eyes. If you are about to leave for a cruise, you will ultimately be happier if you tone the finish down to a low luster. However, for a boat that sits at the dock most days, it can be hard to give up the sparkle of a high-gloss finish. Whether you let practicality or vanity rule is up to you.
It’s still a sprint
As with painting the hull, the quality of your finish is greatly influenced by how quickly you can roll and tip. Roll a short section (not more than two feet) then tip it immediately with your “dry” brush. Work quickly, urging yourself to go faster.
For painting a narrow strip, such as inside the rail, cut a foam roller cover to an appropriate length. Paint stores sell adjustable trim handles that can accommodate narrow covers.
In addition to your badger-hair tipping brush, spring for a narrow (1 1⁄2-inch) badger-hair brush for painting the restricted portions of the deck. Do not use a cheap brush. A badger brush will give you a finish in these areas that will be indistinguishable from rolled and tipped surfaces.
Do it again
After your smooth-surface first coat has had 24 hours to cure, wet-sand it entirely with 320-grit wet-or-dry paper. Block-sand any runs or sags to remove them. Note: sanding polyurethane produces a tenacious scum that you must scrub and flush away with plenty of water.
Remask the smooth surface branches and solvent-wipe (2333N) the surfaces to be painted. Apply this coat just like the first one, over two days. Two coats should be adequate, but if you think you can improve the results, you can repeat the process one more time.
After the smooth surfaces are finished, mask them and roll a coat of paint on textured portions of the deck. You won’t need a brush except perhaps to help get coverage in the deep corners of the texture. If you are not enhancing the nonskid with grit, apply no more than two coats to the textured surfaces. A single coat is better if the coverage is satisfactory.
Peel the tape, reinstall the hardware, and you are done.
Don Casey co-authored Sensible Cruising: The Thoreau Approach and became the authority on boat fix-it projects with This Old Boat. He is the author of a series of books in the International Marine Sailboat Library and of Dragged Aboard — A Cruising Guide for the Reluctant Mate. He and his wife, Olga, cruise aboard their Allied Seawind. They’ve done all the work themselves with no adult supervision.
Thank you to Sailrite Enterprises, Inc., for providing free access to back issues of Good Old Boat through intellectual property rights. Sailrite.com