Give your boat’s name a facelift with vinyl letters and graphics
Issue 23 : Mar/Apr 2002
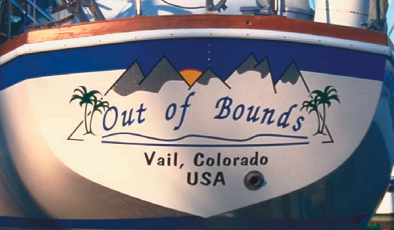
Your boat’s name probably reveals a bit about you. How that name appears on your boat can also reflect on you. So take pride in your boat’s name. Show it off, jazz it up, add your own personal touch. Today’s computer-aided drafting techniques make adhesive-backed vinyl lettering easier and less expensive than you’d imagine.
Vinyl letters and graphics are more durable than painted ones. In a side-by-side comparison, the vinyl still looked bright long after the painted lettering had faded and worn. Tests done under harsh Florida sun showed vinyl lettering to have a five- to seven-year lifespan . . . about twice as long as that of painted letters. The adhesive-backed vinyl can be used on fiberglass, painted or varnished wood, and on metal-hulled boats.
Vinyl lettering gives you the option of applying your name and graphics yourself. This can save the do-it-yourself boater about 50 percent of the total cost. Add the superior durability, and it’s easy to see that vinyl lettering is the way to go.
Your local sign company is one place to look for vinyl lettering. Most sign companies have the computer equipment to design your boat’s name and graphics. Prices vary across the country but are generally competitive with those of mail-order companies. A local company, however, gives you the ability to deal with someone face-to-face. This can help when you’re not sure what size letters or placement will work best on your transom layout, for example. (Jeff Schuster of The Vinyl Image http://www.thevinylimage.com cautions buyers to ask for “high-performance,” rather than “intermediate,” vinyl. The 2-mil holds up better than the 3-mil product, he notes, but there’s a price to pay for the better material. –Ed.)
Reasonable prices
Prices vary, but by applying it ourselves, the entire cost for lettering and graphics for our boat was around $40. (Prices vary around the country. Others suggest $50 to $75 might be a ballpark figure. –Ed.) Of course the end price will depend on a great many factors, such as how complicated your graphics are, the size of your lettering, whether your name and graphics appear on two sides of the boat, versus just one name on the transom, and how much time the sign company spends designing your graphics.
If your local sign company doesn’t offer vinyl lettering, there are a number of mail-order companies which will be happy to serve you. Once you’ve found a company to do your lettering, the next step is to create an idea.
Creating an idea may be as simple as choosing a style and color for the lettering, or it may be more complex as you add borders, shadows, arcs, and, of course, graphics. Choosing the graphics that are just right for your boat will take some thought.
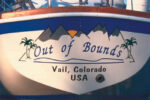
Our boat received its name from one of the favorite places my husband and I liked to ski. Former Vail ski instructors who were trading in our skis and our mountain life to live aboard a sailboat, we held on to a bit of our old life by naming our boat Out of Bounds, not the name of an actual ski run but rather what skiers call the back-country area you enter when you leave the ski area’s boundary. For us, this name meant even more than a place to ski. It meant adventure, it meant going to places that might be considered out of bounds for most people.
Graphic ideas
Once you think about your boat’s name, ideas for graphics generally present themselves. I knew I wanted mountains behind the name. Although I’m no artist, I do sometimes feel creative. Starting with my mountain idea, I scribbled on a piece of paper and came up with an idea I liked. To me, palm trees signified sailing to paradise, to someplace out of bounds. Our sign company took these scribbles and came back with a drawing I thought was perfect. I especially liked their suggestion of bringing the mountain peaks up into the boat’s top stripe. If you have an idea in your mind (or already in scribbles), they can add the finishing touches to make it look professional. If not, they can start your design at the beginning. But the more you can do yourself, the more money you’ll save.
Remember any Coast-Guard documentation specifications that apply (4-inch or higher letters for name and hailing port, for example). Also take into consideration the size and shape of your transom or the area along the sides of your boat, depending on where your name is to be placed. Chainplates, exhausts, and ladders can affect the placement of your letters and graphics.
Many sign shops will let you see a computer drawing of your name and graphics in full color. This gives you a chance to make any final changes. Then the computer will draw and cut your letters and graphics on adhesive-backed vinyl.
Easy to apply
Applying your new name is a fairly easy task. It can be done while your boat is in the water, although this will require the use of a fairly sturdy dinghy or a swim platform on a calm day. It certainly is easier to apply the name while your boat is in dry dock. Choose a day with temperatures above 60°F.
The first step is to strip off any wax and thoroughly clean the surface. Fresh paint must be allowed to dry a minimum of one week. Follow any specific directions given to you with your lettering.
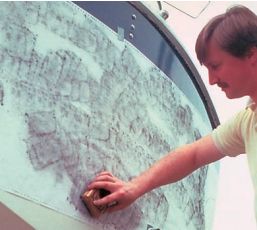
Start by taping up your pounce pattern (if you have one). This is a sheet of paper with hundreds of tiny holes punched in the pattern of your design. Gently pat the pounce pad across the pattern (see top photo this page). Removing the pattern will leave you with a temporary design on your hull. This gives you a chance to check for proper alignment. Once aligned, make light pencil marks on key areas for correct placement of the vinyl lettering.
Now thoroughly clean the graphite from the pounce pad off your hull, leaving only your pencil marks.
Depending on the size of your lettering and graphics, you may have just one or several sheets of vinyl lettering. Each sheet comes with the vinyl lettering or graphics sandwiched between two protective liners.
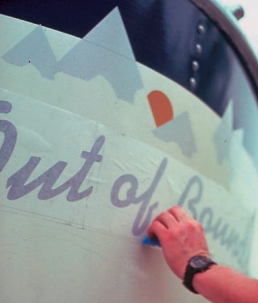
Tape it up
Line your first sheet up with your pencil marks and tape along the top edge only, allowing it to drape down onto the hull. Lift the entire sheet up and lightly spray the hull with your adhesive spray. If you were not given an adhesive spray, use a solution of one-quart of water to which a drop of liquid dishwashing detergent has been added (or follow specific instructions given to you). Now pull off the bottom protective liner, exposing the back side of the vinyl. Lightly spray this exposed back side and carefully place the vinyl back down against the hull.
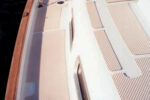
Using a squeegee, squeeze out all air bubbles and wrinkles (see center photo). Allow this to dry for several minutes. Now untape the top protective liner and pull it slowly toward you and down, leaving your vinyl lettering attached to the hull (see bottom photo). If any air bubbles or wrinkles remain, place a piece of the liner over the area and squeegee again. Repeat the entire process with any remaining sheets of vinyl lettering. Be sure to clean off any spray adhesive that has dripped down the hull before you start on your next sheet.
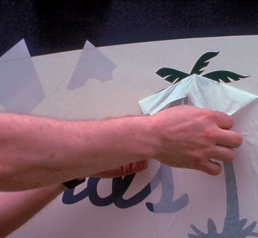
Now it’s time to sit back and admire. Oh yes, and listen to the compliments. When it comes time to give the boat a cleaning, treat your vinyl lettering just as you would your boat’s hull, with your usual cleaning solution, water, and a non-scratching brush. Your vinyl lettering will give you many years of satisfaction.
An added bonus of using vinyl lettering is that the design can be stored on computer for future use. The lettering is also easy to remove. Simply heat the letters with a heat gun or hair dryer and peel them off.
When we bought our boat, she needed a lot of spit and polish along with some major upgrades. We found that applying vinyl lettering and graphics was an easy, inexpensive project that greatly enhanced our boat’s appearance.
Barbara has spent more than 10 years living aboard Out of Bounds with her husband, Tom, and daughters, Kate and Kenna. They have cruised the Great Lakes, the East Coast, the Bahamas, and the Northwest Caribbean.
Thank you to Sailrite Enterprises, Inc., for providing free access to back issues of Good Old Boat through intellectual property rights. Sailrite.com