New through-hulls require diligence, forethought, and technique
Issue 63 : Nov/Dec 2008
It’s not unusual for sailboats to need a new hole in the hull as a consequence of interior modifications, such as installing a holding tank overboard pump for use offshore, or perhaps an air-conditioner installation in the sunny South. When I relocated the head and built in a holding tank on Magnolia, my previous boat, a Cheoy Lee Offshore 27, I needed two new holes in the hull. Being frugal, as self-respecting sailors are, I undertook the job of installing the through-hulls and seacocks myself, rather than having the boatyard do it. All that is required is diligence, forethought, and technique.
Cutting a hole in an otherwise watertight hull is serious business, and it is, therefore, important to put it in the right place the first time around. The right place may seem too simple a concept to give much thought to. But it isn’t. The tailpiece on the seacock is going to be connected to something else, usually a pump, with a length of hose. Especially in the case of 1 1/2-inch sanitation hose, that hose is difficult to manipulate, so the routing must be carefully considered. Will holes in bulk-heads between compartments have to be cut in order to have the pump in one compartment and the seacock in another? If the through-hull is for water intake, does it need to be underwater when heeled? What about room to turn the handle?
For through-hulls and seacocks, I like plastic or, more specifically, Marelon, which is fiberglass-reinforced DuPont Zytel. This material works well, is strong, and isn’t subject to electrolysis. And parts made from it are cheaper. Just be sure to exercise the seacock from time to time, or it can become difficult to turn off and on. When out of the water, smear a little water pump grease on the ball and work the handle back and forth.
Thoroughly clean and sand the inside of the hull where the seacock will be located. All paint must be removed with nothing but bare, clean fiberglass remaining. Then add a reinforcement consisting of layers of fiberglass cloth or mat about 1/4-inch thick, applied with epoxy or polyester resin. When this has cured, sand it flat by using coarse sandpaper wrapped around a short piece of 1 x 2. Some builders use plywood for this reinforcement, but I worry that if ever a small leak were to occur, the plywood would rot, which might cause a large leak.
Installing a flush-head through-hull
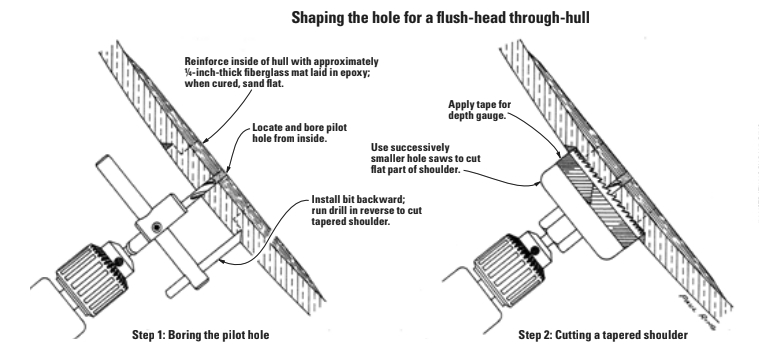
In the center of the reinforcement, and from the inside, bore a pilot hole for the cutter or hole saw to be used to cut and shape the hole for the through-hull. The illustration below depicts a method for shaping the hole needed for a flush-head through-hull, so popular with racing sailors. This is the trickiest part of the job and is where that technique comes in. (The circle cutter shown below in Step 1 is available from sears for 19.99. After you have one, you’ll find many uses for it and wonder how you ever got along without it.)
As shown, install the bit backward, so it will cut a hole with a beveled, instead of square, edge. That means you will have to run the drill in reverse, which means you have to tighten the chuck extra hard or it will loosen itself. Then adjust the cutter bar so that the outside diameter of the bevel will equal, or just slightly exceed, the outside diameter of the through-hull flange. Be fussy about this adjustment. It is better to make this cut a tad oversized than undersized. When satisfied, insert the pilot bit into the previously drilled pilot hole with the drill turning very slowly. You might want to try a practice run on a piece of plywood first. It won’t be quite the same thing, because the hull is curved and fiberglass is harder than plywood. But it will give you a feel for “leveling out” the drill so the bit cuts evenly all the way around.
Hold the drill firmly. Slowly advance it until the cutter hits the hull lightly in one place. Then carefully and minutely adjust the tilt of the drill until the cutter hits in two places directly opposite from one another. Keep going until the bit hits another spot and again adjust the tilt until the bit hits an opposite spot. As you begin to level out, gradually speed up the drill, holding tightly and steadily. I find that the depth of the bevel on the cutter is just about the same as the thickness of the through-hull flange. But check yours and compare.
You will want this cut to be just a tad deeper than the shoulder on the through-hull is thick. When you reach that depth, you will have finished the most difficult part of this job. In the illustration on the facing page (Step 2), notice the flat part of the shoulder that you will cut using hole saws of successively smaller sizes. The first (largest) hole saw should fit just inside the bevel you just cut with the circle cutter. Before beginning to cut, carefully wrap a piece of tape all around the hole saw to mark just how deep to cut. As with the circle cutter, carefully advance the hole saw and make minute tilt adjustments until you have “leveled out.” As you advance the hole saw, frequently check your tape “depth gauge.” Continue like this with each successively smaller hole saw until you get to the one that is the diameter of the through-hull. Then, of course, cut all the way through. There will be ridges between each hole-saw cut. Use a small chisel to cut and scrape these away.
Even though you were careful, your through-hull will not fit perfectly in the shoulder you cut. It is much better for the shoulder and hole to be slightly larger than the through-hull. Presuming they are, the way to a perfect fit is simple. Apply paste floor wax to the surfaces of the through-hull that will mate with the shoulder and hole you just cut. Then mix up a small batch of liquid epoxy and “paint” the shoulder and hole. Stir colloidal silica into the remaining epoxy until it is the consistency of mayonnaise. Apply that to the surfaces of the through-hull that will mate with the shoulder and hole, putting on enough to ensure there will be no gaps. Carefully avoid getting epoxy in the threads of the through-hull. Push the through-hull into the hole, just far enough so that the outer face of the through-hull is flush with the surface of the hull. After the epoxy has cured, pop the through-hull back out. This is the reason for the wax. Just the same, it may take a sharp whack with a hammer, cushioned with a block of wood, to knock it out.
Now temporarily install the through-hull and the seacock. Notice that inside the through-hull there are two “ears” opposite each other. These make it possible for an inserted tool to aid in screwing the through-hull into the seacock. A file of the right size makes a good makeshift tool and a crescent wrench slipped over the file will provide the necessary leverage. When you screw the through-hull into the seacock, you will probably find the threaded portion of the through-hull to be too long. Note how much, then disassemble them and cut the excess, plus just a little, off the through-hull. Use sandpaper to remove the burrs from your cut. Now reassemble them and note whether the seacock rests flush against the hull reinforcement. You may have to do a little more trim sanding on the hull reinforcement to get a good fit.
When satisfied with the fit between the seacock base and the hull reinforcement, orient the seacock so the on/off handle is easy to operate and no boat parts interfere with full movement. Then drill the holes in the hull for the machine screws that will secure the seacock in place. Drill from the inside and use the holes in the seacock flange as a guide. A helper with an eye for “square” can help you drill straight. Then from the outside, cut the countersinks.
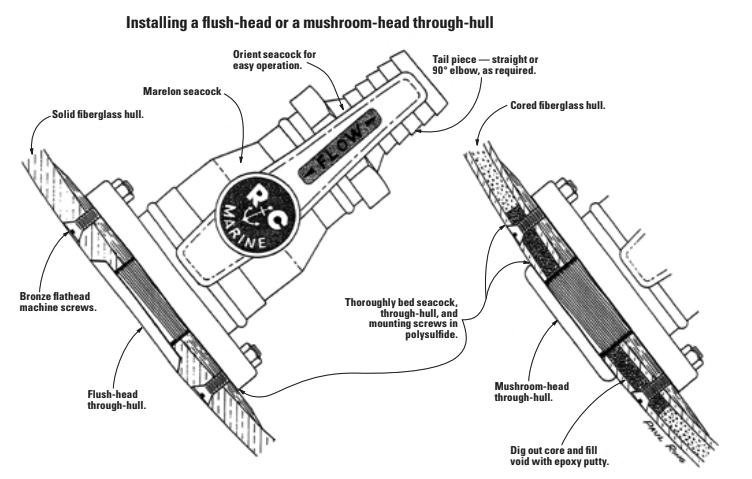
You are now ready to permanently install the through-hull and seacock (see illustration on page 25). Thoroughly bed the through-hull, seacock, and mounting screws in polysulfide. Don’t over-tighten; a good, snug fit is all that is necessary.
Bedding compounds such as 3M 5200, Sikaflex, or BoatLIFE, as well as others that are equally suitable, are recommended for use with Marelon. While polysulfides are not recommended as a bedding compound for some plastics, Marelon isn’t included in this proscription. In my experience, Marelon through-hulls were unaffected by BoatLIFE polysulfide. Silicone works with almost anything, although I don’t like it below the waterline because of its weak adhesive properties. If you do use silicone, be aware that there are two types: one that can be used under water and one that can’t.
There are some additional steps for installing flush-head through-hulls in cored hulls. As above, reinforce the inside of the hull with fiberglass and resin and, when cured, drill the pilot hole. Now it gets different: from the outside, using a hole saw the same diameter as the threaded portion of the through-hull, cut a hole through the outer skin and through the core, stopping just as you feel the hole saw hit the inner skin. Pry out the disc of outer skin and dig out the core material. This is usually balsa but may be some kind of foam. Continue to dig out the core until it is thoroughly evacuated beyond where the seacock flange machine screws will go through. Do a good job on this, using whatever tool works best. I’ve used flat-bladed screwdrivers with the shank bent at a 90-degree angle.
When all of the core is dug out, from the outside, put a piece of masking tape over the pilot hole you drilled earlier. Now, mix up a batch of epoxy and thicken it with colloidal silica to a mayonnaise consistency. Pack this epoxy putty into the space left when you removed the core. Work carefully to prevent voids. When the space between the inner and outer skins is filled, continue to add epoxy putty until the entire hole is filled. After the epoxy has cured, go back inside the hull and extend the pilot hole all the way through to the outside. At this point, proceed just as though you were working with a solid fiberglass hull, as previously described.
Using a mushroom-head through-hull
For the cruisers, it’s simple. Most of us are willing to sacrifice that 1⁄1,000 knot of speed and go with the mushroom-head through-hull. The illustration on page 25 shows a mushroom-head through-hull installed in a cored hull. Of course, a solid hull installation is similar and even simpler: locate the best position for the seacock, apply the hull reinforcement, drill the pilot hole from the inside, cut the through-hull hole from the outside, and install the through-hull and seacock using plenty of polysulfide.
To connect the seacock to a hose, a tail piece is required. Choose either a straight one or one with a 90-degree elbow, depending upon the direction of the hose run. Use either plumber’s dope or Teflon tape on the threads to get a watertight joint. Use two hose clamps to attach the hose to the tail piece.
Filling an unwanted hole
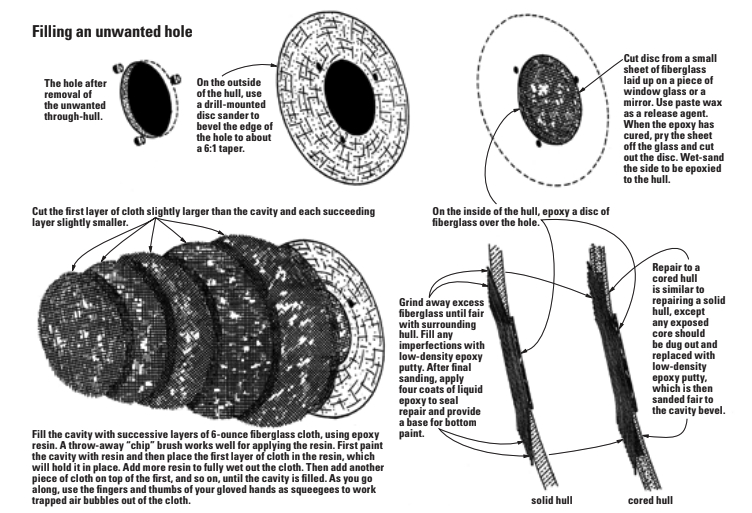
By the way, if this seacock is replacing one in another location, don’t forget to fill in the original hole before launching the boat (see step-by-step illustrations below). A good method: from the outside, grind a bevel in the sides of the hole to about a 6:1 taper. It will look like a shallow funnel. An electric drill with a coarse sanding disc works well. On the inside, epoxy a disc of fiberglass over the hole. The disc should be about double the diameter of the hole. This disc can be cut from a small sheet of fiberglass laid up over a piece of window glass or a mirror. Apply paste wax to the mirror as a release agent, then simply lay up several layers of fiberglass cloth using epoxy resin. When the epoxy has cured, pry the fiberglass sheet off the glass and cut out the disc. Wet-sand the side that goes against the hull.
When the epoxy holding the disc to the hull has cured, fill the hole from the outside with successive layers of fiberglass cloth, using epoxy resin. The cloth will readily conform to the shape of the hole. Begin with a layer that will bridge the cavity from edge to edge. Then by cutting each succeeding layer slightly smaller, there will be less excess to grind away when fairing the repair. After the patch is ground fair, fill in any imperfections with a low-density epoxy putty and, after it has cured, sand it fair. Three or four coats of liquid epoxy on top of that will finish the job, making the repair ready for bottom paint.
(For more information about filling a hole, read “Fill That Hole,” by Barry Hammerberg, in the November 2005 issue. –Eds.)
Paul Ring is a contributing editor with Good Old Boat. He has sailed, repaired, modified, restored, and built boats for the past 42 years. Magnolia, his restored Cheoy Lee Offshore 27, graced the cover of Don Casey’s book, This Old Boat. Paul currently sails his Nonsuch 260 with first mate, Barbara Brown, on Mobile Bay.
Thank you to Sailrite Enterprises, Inc., for providing free access to back issues of Good Old Boat through intellectual property rights. Sailrite.com