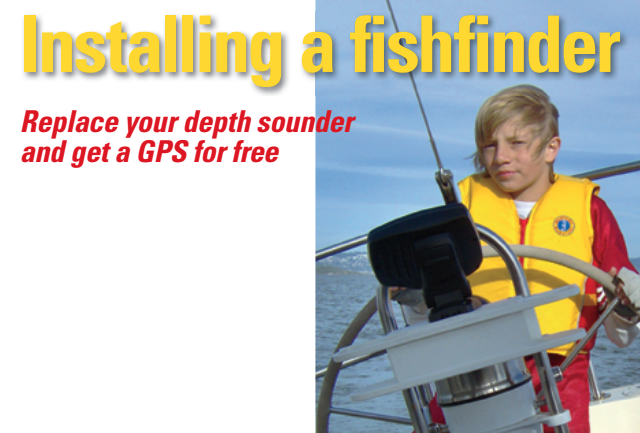
Replace your depth sounder and get a GPS for free
Issue 63 : Nov/Dec 2008
Sometimes sailing can seem like it was intended for those few folks with high standards and even higher budgets. Since that sometimes presents a problem for “the rest of us,” it’s always satisfying to find a way to beat the system a little bit by getting extra features for fewer dollars.
When we bought Clio, our Cal 31 based in the San Francisco Bay, her depth sounder was past its prime. When the unit finally gave out less than a year later, we knew we would need to replace it. Our boat is in a charter fleet, and there are just too many shoal areas in the San Francisco Bay to sail her without accurate depth information. The matching knotmeter on the boat was also ready to go, but given our limited budget, its replacement seemed less crucial.
As I began to investigate my options, I began to suspect that there was no inexpensive depth sounder on the market. I explored a variety of brands, looking at new units and at used equipment available on the Internet. My heart sank as I found myself preparing to spend several hundred dollars simply to receive one little piece of data. That seemed like a lot of money for just one number. (Needless to say, my hopes of replacing our knotmeter in the same fell swoop were fading fast. “Maybe next year,” I told myself.)
Eventually my search brought me to the array of fishfinders that are on display in every marine supply store. As I poked around those displays, an idea began to take shape. What if I were to install a simple fishfinder instead of a depth sounder on Clio? These units were much less expensive and seemed to offer not only accurate depth information, but a lot of other information as well. Undaunted by the dubious looks from salespeople, I began asking more questions. Here’s what I found.
The great divide
I learned that there is more than one side to the marine electronics industry; what happens on one side doesn’t necessarily carry over to the other. Historically, the sailing electronics industry has had little crossover with the fishing electronics industry. They have two separate market bases. But the needs of the boaters in each group are not entirely different. And when it came to depth-sounding devices, the fishing electronics folks seem to have found a way to become much more cost-effective.
My new question was this: how much electronic gear could I get for the cost of a replacement depth sounder? I figured I’d pay at least $250 to get a traditional depth sounder. What kind of fishing gadget could I get for that amount?
The answer was that in that price range I could not only get useful real-time depth information but also water temperature and even the type of bottom below the boat. And by adding a GPS and primitive chart plotter, I could get my speed, distance to go, and other basic navigation aids. Furthermore, I could use National Marine Electronics Association (NMEA) output to connect to other electronics I might use. Oh . . . and I could also start watching the fish. Sounded good to me.
Fishfinder basics
I learned that, like depth sounders, fishfinders are sonar units that are aimed toward the bottom of the bay in order to identify the bottom. Like a depth sounder, they consist of a main unit and a transducer. The transducer broadcasts sonar waves that then bounce off the bottom or other objects in the water and return to the surface as an echo. The instrument then listens to these sonar echoes and calculates how long it took for the waves to return. From this information, it calculates how far away the bottom is.
So, a fishfinder can do exactly what a depth sounder does. And more: by calculating from numerous signals, it can begin to put together a simple picture of whatever else is underneath the boat, creating a graphic display that can show the hardness of the bottom as well as fish or other objects in the water.
In addition to the main unit and the transducer, a fishfinder may be part of a larger system that offers additional features. Optional GPS receivers are available, as well as cables to attach to a handheld GPS. Transom-mounted paddle wheels can provide speed information as well.
For our boat, I chose a Humminbird Matrix 12 fishfinder. It provided a good balance between cost and features and had received good reviews on websites I’d consulted. In addition, I liked the larger display compared with some of the other units in the same price range. I purchased the optional GPS receiver, which usually retails for around $100. My total cost still came within what I figured I would have paid to replace my original depth sounder.
Now it was time to install these gadgets.
The installation
Before I could start drilling holes or stringing cables, I needed to fi gure out how this system would best fit on our boat. Fishfinder units are designed to fit on a small dashboard, like those found on many fishing boats, with the transducer mounted nearby through the hull. A sailboat installation was going to present a few new wrinkles in this otherwise straightforward project. My boat had no dashboard or electronics panel at the helm. Furthermore, my sailboat has a 3,300-pound keel sticking several feet down into the water — would this get in the way of the sonar waves? Clearly, I had some decisions to make.
First decision: where to mount the main unit? I concluded that the unit needed to be mounted in sight of the helm, since I sometimes single-hand my boat. That ruled out the nav center in the cabin. I considered using a bracket to mount the main unit on the forward bulkhead in the cockpit, but I was concerned about having an unobstructed view (especially if a crew member sat in front of it) and about the possibility of damage from something snagging the unit. The way I saw it, a broken fishfinder was no better than a broken depth sounder.
Humminbird offers an optional in-dash mounting kit for the Matrix series of fishfinders. This allows you to cut a hole in your dashboard the shape of the unit and provides a trim panel to cover the edges. I thought about using this method to mount the unit either in the bulkhead or somewhere in one of the coamings, but once again I was concerned about being able to see it when others were in the cockpit. Besides, I just don’t like cutting big holes in my boat anywhere. As a rule, I prefer that my mistakes be reversible.
Ideally, I concluded, the unit should be mounted somewhere on the steering pedestal. This would provide optimal visibility for the helmsman. In addition, the pedestal guardrail would help protect the instrument from damage. I considered buying a GPS bracket for the pedestal guard, but an additional $100 to $150 for a bracket would have altered my conservative budget for the project.
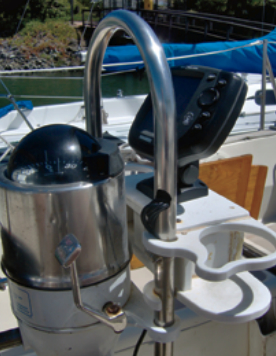
I started eyeing the cup/binocular rack already attached to the pedestal. When I bought the boat, it already had a simple Snap-It cup-holder rack attached to the pedestal guardrails. I began to sketch some ideas and was soon convinced that I could create a mounting surface that would provide excellent visibility and protection. Most importantly, this option would cost very little. My decision was made.
I was eager to start installing the unit in the cockpit. But I realized that installing that unit would actually be the final step in the installation. To allow for accurate routing of the various cables, I would need to install all the various peripheral components first. Once they were in place, I could start to accurately run the various cables. And once the cables were in place, I could begin to set up the main unit.
That led me to the transducer.
Transducer trepidation
A transducer is a deceptively simple device. It’s small, usually made of plastic or bronze, and has no moving parts. It has a single cable extending from it. Yet any information from the fishfinder leaves and returns through that mysterious little device. And that’s what I needed to install next.
Humminbird now offers a variety of transducers. A fishing boat application may involve use of a through-hull transducer, a transom-mounted transducer, or an in-hull version in which the transducer sends and receives signals from inside the hull. During the sailing season, it’s a lot of work to install a through-hull transducer on a sailboat unless the boat is stored on a trailer or scheduled for a haulout. The transom-mounted version also poses problems because the transom is not always in contact with the water when the boat is under way, especially in high winds or rough water. Naturally, this would disrupt the accuracy of readings.
I decided that the ideal application would involve an in-hull transducer, mounted low enough in the hull so it can maintain constant sonar contact with the bottom. In addition, the transducer should be mounted forward of any hull structures, such as keel and prop, which might cause bubbles or other disturbances and confuse the sonar readings. My unit came with a standard transom-mounted transducer, but rather than cutting a hole in the transom, I planned on mounting it to function as an in-hull model instead. This has worked fine.
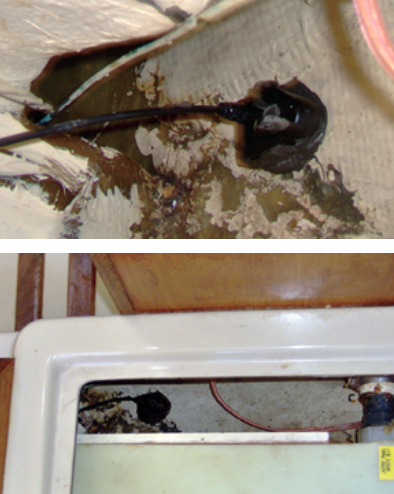
I selected a location near the bilge beneath our starboard settee. This would be near the leading edge of the keel and low enough that it wouldn’t leave the water when the boat was heeled. (I figured if the boat ever heeled far enough for the keel to start surfacing, knowing the water depth would be the least of my concerns.)
It amazed me to learn that a transducer could send and receive sonar waves through a fiberglass hull, but that’s exactly what it does. Apparently, fiberglass allows the signals to pass right through. It is important, however, that the transducer be mounted securely to the hull with absolutely no air bubbles or other imperfections to disrupt the transmission. I learned that embedding the transducer in some kind of silicone sealant makes an airtight seal.
It’s recommended that you test your transducer location before permanently embedding it in your hull, which only makes sense. To do that, you need some kind of temporary gel substance that can provide an adequate seal between the transducer and the hull — and is easy to clean up afterward. I found that a generous puddle of hair gel worked well. This allowed the transducer to settle securely in place but also provided for easy cleanup after the test was done. After jury-rigging a power source to the main unit and stringing the transducer cable over to the main unit, I was delighted to see that I was getting a reading on the bottom. Let the installation begin!
It didn’t take long to clean up the hair gel and prepare for the permanent installation. I tested the transducer cable to make sure it could reach the helm from this location. Then I prepared for the permanent installation. I applied a pool of silicone sealant and set the transducer securely in the middle of the sealant, wiggling it gently to make sure there were no voids or air bubbles beneath it. I weighted the transducer down lightly to make sure it stayed secure while the sealant cured. I then routed the cable underneath the settee and nav center, through the engine compartment, and up to the pedestal in the cockpit.
At last it was time to mount it in the cockpit.
GPS receiver
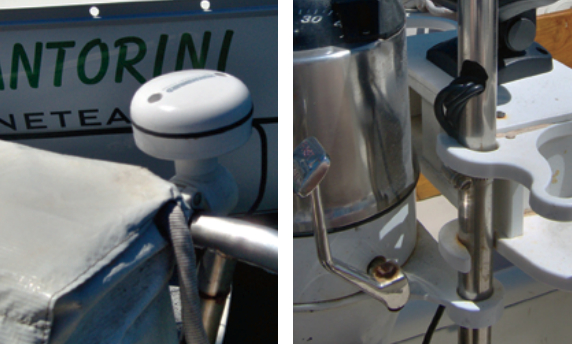
Installing the GPS receiver was actually one of the simplest aspects of the job. The receiver is a small mushroom-shaped device that mounts to the deck or some other surface. I arranged to clamp mine to my pushpit rail with a simple VHF antenna bracket. I tucked it behind my LifeSling case to protect it from getting bumped. It has a cable that must be routed to the main unit. I ran the cable through an existing hardware opening in the coaming and then beneath the cockpit sole toward the pedestal.
The Matrix 12 also allows for NMEA data output from the GPS. With the help of a data cable, the GPS unit communicates navigation data to other electronics, such as my ST4000 autopilot. Someday I hope to connect this NMEA output to my laptop, but that will be another season’s project. In any case, the NMEA data added another cable to be accounted for in my preparations.
Modifying the cup-holder rack
My next step was to prepare the existing cup-holder rack to serve as a mounting base. The rack had a center area intended for storing a pair of binoculars. My design called for adding additional panels to the top, front, and sides of this area, creating an enclosed box in this space to support the display unit and hide the wiring. This design would still leave two cup holders available for use. I went down to the marine store and purchased some white high-density polyethylene “marine lumber” to match the cup-holder rack.
I then sketched out and cut the panels I would need. I used a sander to round off the rough edges and match the contours of the rack. Using a hole saw, I also created an opening in the center of the top panel for the various cables to reach the display unit (this hole would be hidden underneath the base of the main unit). I then fastened the panels in place with stainless-steel screws and used a white marine sealant to provide smooth, attractive seams.
The end result was an attractive instrument display with two cup holders. It was simple, it didn’t really look homemade, and it hadn’t cost very much. All good.
Now for the wiring.
Getting wired
I was lucky in that a previous owner of our boat had already created a small opening in the stainless pedestal guardrail at the right spot for routing cables. If that hadn’t been there, I would have needed to add a hole. This would not have been an easy task, given the strength of the stainless used in those rails. My other option would have been to use zip-ties to run the cables down the outside of the rails and then through an opening in the cockpit sole. This would have been a bit unsightly, but it would have worked.
For the power source, I wired the unit directly into an unused switch on our electrical panel. I then joined the power cable, the transducer cable, the NMEA cable, and the GPS cable together and threaded them up the pedestal rail until I could see them appear through the little hole. Using needle-nosed pliers, I fished around until I could pull each cable through the opening. Since each cable ends in a different proprietary plug for connecting to the unit, it became increasingly difficult to get them all through the hole. I was also afraid I might damage one of the plugs, rendering that cable useless. I tried using a drill to enlarge the hole in the rail. This was when I discovered just how strong those rails really are. Eventually I had all the cables out in daylight, ready to be plugged in. Breathing a sigh of relief, I prepared for the final steps.
The main unit
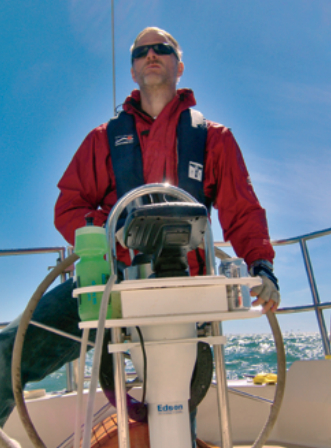
Now for the easy part. The Matrix has a simple mounting bracket that fits easily over the hole I’d created in the cup-holder rack. The four cables plug into that base and the main unit then slides down onto the base. I plugged all four cables in place and screwed the base down. I slid the main unit onto the base and turned on the power.
Houston, we have contact!
The unit powered up, recognized the transducer, and started looking for GPS satellites. I configured it to reflect my needs (time zone, salt water vs. fresh, depth offset, and so on) and I was set to go.
I took care to configure the depth offset for the unit carefully. Since the transducer won’t be right at water level in most installations, there is a setting to create a positive or negative offset for the depth readings. I wanted to set the depth offset so the depth display would read actual depth under my keel, not depth under the transducer. I wanted things to be as simple as possible; in an emergency I didn’t want anyone to have to mentally calculate whether a reading of 3 feet meant they had plenty of room or whether they were about to run aground. This step is necessary with any depth sounder.
This calculation took a little doing, since I couldn’t precisely identify the waterline from inside the cabin. Using drawings and photos of the boat, I estimated that just over 3.5 feet of my 5-foot draft would still be below my transducer, so I set the depth offset at 3.7 feet. Then, using a weighted dockline, I measured the actual depth of the water in my slip and used that information to test my calculations. Close enough. The unit now gives a nice simple display of how much room we have before we touch bottom.
As I viewed the display, I realized that, due to the location of my cup-holder rack, the display was sitting a little lower than I would have preferred for easy viewing from the helm. I was able to easily fix this with a small stainless-steel hose clamp. Since the rack was clamped onto the guardrail, I found I could slide it up easily. So I slid the rack up to the height that I preferred and attached a clamp to one of the guardrails just under the rack. When I tightened the hose clamp, it held the rack at the new height.
Results
I’ve really been happy with the results. I now have a simple, unobtrusive unit that provides a lot of important data that I need at the helm. Using the quick-connect feature of the unit, I can rotate and tilt the display as needed — for instance, to watch the depth readings while hoisting or lowering the mainsail. I can also easily remove the unit for cleaning or security. The display can be adjusted for contrast and for various levels of backlighting for nighttime use.
Depending on configuration, the unit makes it possible to toggle through a half-dozen views, providing a variety of data displays. Most of the views show me the depth, of course. That’s what I paid for, after all.
But as I toggle through the displays, I can also see the various extras that came “free” with my depth sounder purchase: my current speed, average speed, distance to go, trip odometer, and so on. The unit also provides a simple chart plotter showing waypoints. (This function does not display actual charts, but rather a scaled portrayal of waypoint locations. It works for my needs.) There is also a bird’s-eye view that portrays the boat (unfortunately portrayed as a powerboat!) traveling toward the selected waypoint. Once, in a sudden patch of heavy San Francisco fog, I found myself steering briefly with this view, as if using a video game. While I don’t recommend it, it sure beat sailing blind.
And, of course, I can see fish. The system identifies small, medium, and large fish, based on the size of the air bladders inside them. An astonishing number of fish swim in our bay, and it’s fun to “watch” them pass underneath our boat.
One extra plus: the sonar display allows me to get a sense of what the bottom is like, an added feature that can be helpful for anchoring. A clear, sharp bottom outline on the display indicates a hard bottom, while a thick gradient display points toward a soft, usually muddy, bottom.
As mentioned, I’ve also connected the GPS’s NMEA data output to my ST4000 autopilot. This has been very helpful on occasion. In the San Francisco Bay, we often have strong currents that can run several knots. It’s not unusual to see a navigation buoy creating a wake. In those conditions, an autopilot can become confused, since it only measures which way the boat is facing, not which direction it is actually traveling. However, aiming the GPS toward a certain waypoint, then prompting the autopilot to follow the GPS, will bring the boat right to the mouth of the channel or whatever other waypoint I’ve defined. It makes things easier.
Depth. Speed. Distance. Navigation. Fish. Not bad for a simple depth sounder.
Ron Vanderwell has been sailing ever since he first talked his in-laws into buying an old boat with him near Lake Michigan. He now lives in Sacramento, California, with his wife, three sons, and two dogs. He pastors a new church that meets in a movie theater, unless he’s out sailing his 1979 Cal 31, Clio, on the San Francisco Bay.
Thank you to Sailrite Enterprises, Inc., for providing free access to back issues of Good Old Boat through intellectual property rights. Sailrite.com