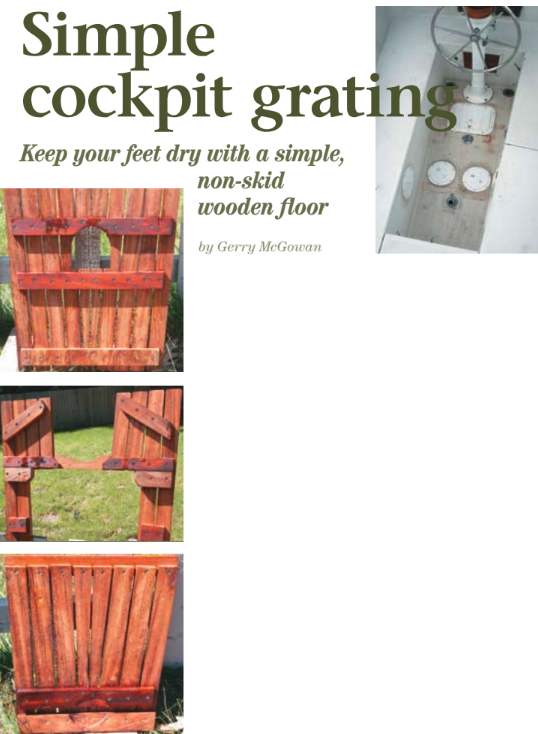
Keep your feet dry with a simple, non-skid wooden floor
Issue 35 : Mar/Apr 2004
Our boat, a 1979 Nor’west 33, came with a very beat-up, warped, and decrepit cockpit grating. During our trip home with the boat I discovered its utility. When the boat heeled, a small amount of water would enter and slosh around the corner of the cockpit. The grating kept our feet dry and provided secure footing. After replacing some of the screws holding the grating together, it provided functional service for another year.
One of the major shortcomings of our boat was the limited, or rather impossible, access to several key components aft of the engine, namely the stuffing box and steering quadrant. Access was very poor in the beginning, and accessories added over the years had essentially blocked that portion of the boat off for anyone except a tiny contortionist, who might reach these components after disassembling portions of the boat.
When we found water up to the floorboards on our first cruise, I didn’t really have time to disassemble the boat. The leak was traced to the rudder stuffing-box hose, which I could see only by hanging upside down in the sail locker. I was just able to reach the hose clamps to snug them up and decided that I must provide better access to this area. I installed a pair of 6-inch access ports in the cockpit sole, one on either side of the rudderpost and just in front of it. This provided good access to the rudder, and I was able to remove the steering quadrant and replace the rusted hose clamps easily the following spring. I also added an 8-inch pop-out port in the cockpit sole over the stuffing box.
A few months later, I replaced this with an 8- by 12-inch plastic hatch so I could get both arms through to work on the stuffing box and shaft coupling. The original grating had to be cut in half and large chunks routed out of its underside to access these ports and allow the grating to sit evenly on the cabin sole. Finally, I decided that it was time for a new grating.
Twenty years old
The original grating had been made of Philippine mahogany and had served well for as long as 20 years perhaps. It was a simple grating with 2-inch-wide slats running the length of the cockpit screwed to cross members that sat on the cockpit sole. Only the cross members supporting the grating showed any sign of softness, although the long slats had warped in some cases.
It was very difficult to remove, since it covered the entire cockpit sole and I had to rotate it and lift it clear of the steering pedestal and rudder post while I was lying on the cockpit seats. It was not something I wanted to do in the middle of Puget Sound if water started rushing in through the stuffing box. This was not a theoretical problem, since we had encountered it a few months previously, but that’s another story.
I toyed with the idea of a traditional dovetailed cockpit grating but discarded the idea because of the number of obstacles on the cockpit sole and the desire to make a lift-off section in order to get to the essential access ports in a hurry. It would have been a lot of additional work and would have used a lot more material. Besides, I was just going to walk on it, scuff it up, and allow it to sit exposed year-round to rain and occasional sun and snow. A work of art was unnecessary.
Teak, the traditional material for cockpit gratings, is wonderful, but its cost is prohibitive. A trip to the local wood store revealed iroko (also known as “poor man’s teak”) selling at less than $5 a board foot compared to teak at $13 a board foot. The durability of iroko is similar to that of teak, although its grain is a little coarser and somewhat less attractive. I returned home with $50 worth of 1-inch nominal (1 3⁄16-inch finished) iroko and a box of 1 1⁄4-inch #8 stainless, flat-head, square-drive screws.
Narrow slats
I ripped the iroko into narrow slats about 2 inches wide. The exact width, chosen to minimize wastage on the boards I bought, ended up at 11 5⁄16-inch. For cross members, I used whatever scraps of suitable hardwood (mahogany) I could find, along with leftover pieces of iroko and marine plywood. All these were resawn to a thickness sufficient to clear the obstructions on the cabin sole, 5⁄8-inch thick. The cross members were cut away or had recesses cut into them to clear the obstructions where necessary. I carefully laid out cross members at locations that avoided the cockpit sole obstructions, provided for water drainage, and allowed for the location of a removable center section.
I began cutting the slats into the required shape, mitering the ends to correspond to the taper of the cockpit sole and rounding the top edges using a 1⁄4-inch roundover bit in a router. I didn’t spend a lot of time sanding the slats as I was just going to walk on them anyway. I worked in pairs, from the outer edge in, fastening the slats to the cross members using a single screw from the cross member into the bottom of the slat.
This way, no screws are visible when the grating is in place. Because of the tapered shape and many cross members, the grating was quite rigid. If the shape were rectangular, diagonal braces would have been required to prevent racking. The second and all additional pairs of slats were installed using 1⁄4-inch plywood spacers placed temporarily next to the installed slats to establish uniform spacing.
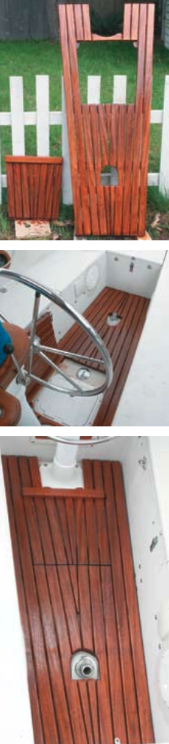
The spacers were removed after the slats were screwed in place. The inner slats were made in three sections to allow the center portion to be assembled as an easily removable hatch. The aft end of the center hatch has a cross member that rests on the sole, while the forward end has a member that rests on top of the grating. The rather complex cross member arrangement apparent in the photographs on Page 46 is due to the limited clear cabin sole available to support the grating.
Three tapered slats
The inner three slats were tapered using a taper jig on the table saw and fitted using the same 1⁄4-inch plywood spacers. Several small partial cross-members were necessary to hold everything together and clear the
obstructions present. While it looks like a jigsaw puzzle, the actual construction was not particularly difficult. I would estimate the total construction time at less than eight hours.
When it was fully assembled, I took the grating to the boat and, with some trepidation, dropped it in place. Amazingly, it fit perfectly. I took it home again and brushed in two generous soaking coats of teak oil. After drying it for about a week, I installed it in the cockpit and left it there for a very wet winter (Pacific Northwest type). The next spring I brought it home, power-washed it, and brushed in another coat of oil. The pictures were taken after the winter exposure, and it looks none the worse for wear. It will probably outlast me.
It was a pretty simple project, and for less than $70 — including the screws and a pint of teak oil — a very cost-effective and attractive cover-up for a particularly ugly cockpit sole. The only problem is that it looks too pretty to walk on.
Thank you to Sailrite Enterprises, Inc., for providing free access to back issues of Good Old Boat through intellectual property rights. Sailrite.com