Protecting cored laminates from failure around fittings
Issue 71 : Mar/Apr 2010
Though most older fiberglass boats have hulls of solid laminate, their decks normally are built of two thin skins of fiberglass enveloping a different material. This “sandwich” construction has big structural advantages. Cored laminate is much lighter and stiffer than solid laminate.
As early as the 1950s, builders realized this was a better way to build a deck, as the extra stiffness makes it unnecessary to support it with beams underneath. Further, weight saved in a high part of a boat’s structure helps lower its center of gravity and improve its sailing performance.
Two important provisos should be respected, however, when dealing with cored deck laminates, both of which affect the installation of deck hardware such as winches, cleats, pad-eyes, genoa tracks, travelers, stanchion bases, and the like.
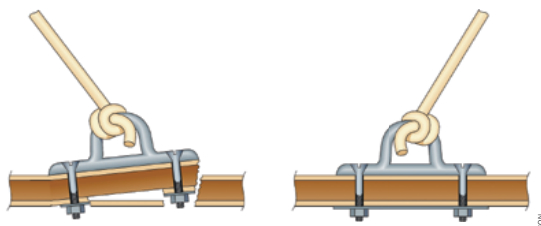
First, the core should not be crushed when hardware fasteners are dogged down or when the hardware is loaded while in use.
Second, the core should not be exposed to moisture, as is very apt to happen when water sloshing about on deck creeps down fastener holes.
Core materials
By far the most common deck-core material found in older boats is balsa wood. Originally, the balsa was installed as planks, with the grain oriented lengthwise. By the early 1960s, builders had discovered that an end-grain orientation, where the grain is perpendicular to the deck, works much better. End-grain balsa is stiffer, resists water migration better, and is less compressible. Still, balsa is a soft, absorbent wood that needs some protection when used as a core material, however it’s oriented.
This is particularly important because of the way end-grain balsa core is manufactured. The wood is cut into squares (usually about 2 inches on a side) and attached to a scrim, which allows the core to conform to curved surfaces. Unless this core material is laid up very carefully so all the kerfs (the gaps between the blocks) are completely filled with resin, the kerfs become highways within the core along which water can travel very quickly.
A few older boats were built with plywood-core decks. Plywood is much heavier than balsa but it is much less compressible. It’s not very moisture resistant, however, and because the plys are cut with the grain running lengthwise, water migrates easily through it.
The common practice when building decks today is to replace the core under hardware with an incompressible water-resistant material, such as high-density closed-cell foam or solid laminate. In the early days of glass boatbuilding, the assumption seems to have been that a core would not be crushed if nuts and bolts were not dogged down too hard, nor would it become saturated with water if the hardware was well bedded in sealant. This was wishful thinking. Heavily loaded hardware will crush a core even if its fasteners are only finger-tight, and even the best sealant, liberally applied, will break down over time, allowing moisture to sneak past it.
Core concerns
The state of health of a deck’s core should be a primary concern of anyone who owns or acquires an older fiberglass boat. In the worst of cases, where the entire core is saturated and much of the deck has delaminated, major surgery is required. One of the laminate skins must be cut away and all of the wet core removed. Then a new core must be bonded in place and skinned over with a new layer of glass. Doing this sort of work yourself takes an enormous amount of time; paying others to do it will likely cost you dearly.
More commonly, you’ll find a deck core that’s saturated in just a few spots. These problems are more easily addressed. The affected area can be ventilated by drilling a series of holes through the outer laminate skin. The core can then be dried out with a shop vac and heat gun or flushed with acetone (which will wick away moisture then quickly evaporate itself). Once dry, the core can be rebonded to its skin with the injection of thickened epoxy into the holes in the laminate. Or if the core is too wet or rotten to save, you can cut the skin away just in the affected area and replace that one bit of core.
Once you’ve cured your wet-core problems (or if you are lucky enough to own an older boat that already has a dry deck), you want to be sure it stays dry. If you are lazy, you can try to do this the same way the builder did by simply rebedding each piece of deck hardware with a liberal dose of sealant. If you are conscientious, however, you need to treat every fastener hole for every piece of hardware so the core in the area of the hole is sealed against moisture intrusion and protected against compression.
Decompress the core
One way to secure your core is to drill out a grossly oversized hole for each fastener, fill each hole with a plug of epoxy paste, wait for the epoxy to cure, then redrill a proper-sized hole through each plug (see diagram A). The plugs in this case seal off the core, protecting it against moisture that might work its way past the hardware’s bedding of sealant. They also act as compression posts to prevent the deck and core from being squashed together.
Another way is to drill a proper-sized hole for each fastener, ream out the core around the perimeter of the holes with a bent nail or router, then fill the cavity so created with epoxy paste. Again, the epoxy seals the core and resists compression loads (diagram B).
Yet another alternative, rarely seen, is to drill just slightly over-sized holes, seal them with epoxy resin, then insert metal compression tubes to bear compression loads (diagram C).
Note that if your boat’s deck has a plywood core, you need not worry about the compression loads. Each fastener hole, however, should still be sealed against moisture with epoxy resin.
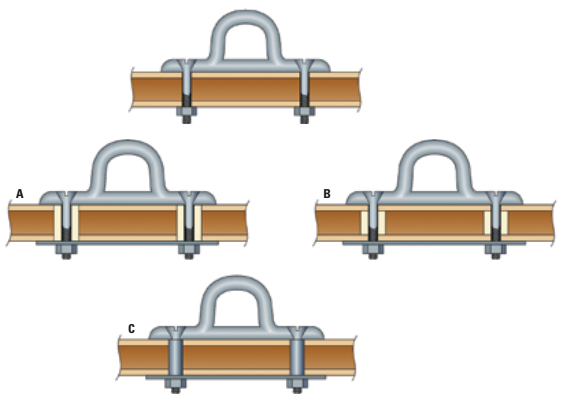
The core can be sealed against water and protected from compression loads in several ways.
Spread the load
The discussion above assumes we are dealing with heavily loaded deck hardware secured with threaded through-bolts with nuts on the end. Traditionally, this is the only reasonable option.
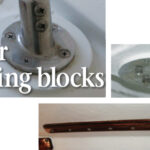
In addition to being through-bolted, all loaded hardware should be supported beneath the deck by substantial backing plates that have generous margins extending beyond the hardware above. This helps spread loads over a much larger area. In the past, builders did not always install backing plates under deck hardware, believing large fender washers would be sufficient to keep fasteners from ripping through decks. This, alas, is a fallacy (still adhered to, I’m afraid, by some contemporary builders) as the point loads imposed on fasteners can be very large. For example, I’ve seen a cleat secured with fender washers torn clean out of a deck (my own, regrettably) by the common shock loads imposed when a passing boat wake causes a docked boat to jerk hard on its docklines. In most cases, again, it is up to the boatowner to address deficiencies after the fact. If you are going to the trouble of sealing off fastener holes, it is usually only a little more effort to install backing plates as well.
Metal plates are best. Stainless steel, bronze, or aluminum all work well. Aluminum is the easiest to work with, as it is relatively soft and can be shaped and drilled with hand tools. Plywood is also acceptable, if large fender washers are installed. It’s a good idea, too, to seal the edges of plywood backing plates, including hole perimeters, with epoxy resin. StarBoard, which is both stiff and water-resistant, is another excellent alternative.
One area that sometimes presents difficulties when installing backing plates is along a deck’s perimeter. There is less room to work with in this area and the surface of the underside of the deck may be very uneven and irregular, depending on how it’s joined to the hull.
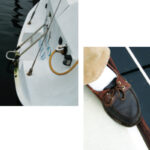
You must resist the temptation to just punt and rely on fender washers here. Stanchion bases in particular, because they are often subject to abusive side loads when crew grab on to stanchions while boarding, need lots of support. If full-sized backing plates will not fit along the edge of the deck, it’s better to use long metal strips, rather than washers, to back hardware. Also, it’s worth the trouble to make the underdeck surface flush and square by adding spacers or bosses as needed. This ensures that loads are evenly distributed.
Coping with liners
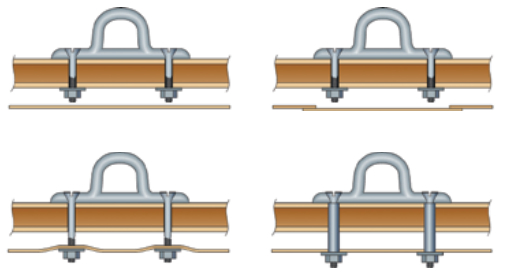
Some production boats (old and new) have comprehensive one-piece deck liners covering all the overhead area in the cabin space (see diagrams on next page). The problem with such liners is that they restrict access to fasteners on the underside of the deck. Some thoughtful builders went to the trouble, when installing the liner, to cut small access hatches with removable covers so fasteners can be reached easily. Often, however, you will need to cut access holes yourself so you can remove old hardware to rebed it, treat fastener holes, and install backing plates.
Alternatively, fasteners may penetrate the liner, spanning the gap between the liner and deck. In such a case, the liner should not be bearing any load. A backing plate should be installed between the deck and the liner, bridging the gap between them and carrying the load on the fasteners.
Ultimately, it is much more convenient if there is no deck liner. On some boats you’ll find instead a series of removable overhead panels covering the underside of the deck. These are often held in place by pieces of trim that are relatively simple to remove. They may be secured with Velcro strips. Removable panels provide much easier access to under-deck fasteners and should be preferred if you have any choice in the matter.
The optimal arrangement, really, is to have no liner and no overhead paneling at all. A few boats were actually built this way, and some enthusiastic owners go so far as to permanently remove liners and panels to save weight and improve access. To be sure, this is cosmetically inferior, as all your deck-hardware fasteners are exposed to view. But you will be intimately familiar with their status (leaks, for example, will be much easier to spot) and will more likely go to the trouble to treat them properly. The bottom line is very simple: the fewer obstacles there are between you and your deck-hardware fasteners, the healthier your deck will be.
Charlie Doane is the author of The Modern Cruising Sailboat, published by International Marine/McGraw-Hill. He blogs about cruising sailboats at www.wavetrain.net and sails a Tanton 39 cutter and lives in New Hampshire.
Thank you to Sailrite Enterprises, Inc., for providing free access to back issues of Good Old Boat through intellectual property rights. Sailrite.com