Valuable tips for upgrading deck hardware
Issue 71 : Mar/Apr 2010
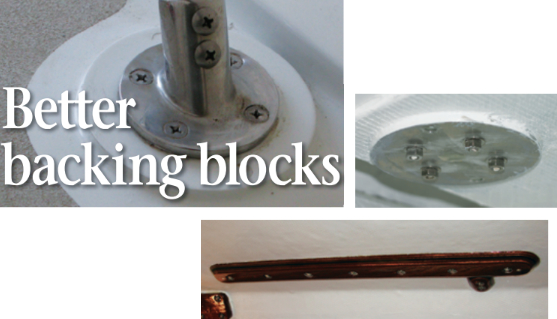
I have not spent a lot of time crawling around the hidden spaces of high-end luxury yachts, but the vast majority of the fiberglass production boats I’ve looked at have pathetic backing blocks that often fail to do the intended job. I am proposing a much higher standard for backing blocks than what has been the normal practice for the builders of most good old boats. The trouble with this plan is that it may be too high a standard to be affordable in a production boat built to a price today.
In the case of your boat, however, the choice is yours. You have the advantage of years of field-testing on your own boat. You can look at your backing blocks and decide just how far you should go toward upgrading them. If your boat has leaks and damaged core, you obviously will have to do something. If you have bent bolts, washers, and even bent metal backing blocks, you may want to go further in upgrading. On the other hand, you can decide that all this bent stuff has served for 20 or 30 years and is good enough.
Likewise, if you have fasteners protruding into the accommodation space, you can leave them, put acorn nuts on them so they are more attractive but still deadly, or go a little further and make really high-end backing blocks as described here.
Preserve the core
Sealing the deck and preventing it from being crushed is fundamental to installing any deck hardware. If you skip this step, as many builders did, you will likely regret it. Drill oversized holes twice the size of the bolts or screws and fill them with filled epoxy. Then re-drill the fastener holes through the epoxy. Now the core is sealed and cannot be crushed. This is slow work, but absolutely necessary.
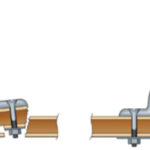
A fastener bends when the surfaces under the head and under the nut are not parallel. Screws and bolts were not intended for this kind of fastening. Each thread on a screw or bolt is a stress concentrator and a bent bolt has already been taken to a stress level beyond its elastic limit. It is difficult or impossible to reuse bent bolts.
The way to make the top and bottom surfaces parallel is to tap threads in the backing plate and pull it up to the underside of the deck with filled epoxy between the plate and the deck. Take care to pull the plate up evenly. Spray the bolts with non-stick food spray before installation so you can remove them once the epoxy has cured. This is easier with wooden backing blocks but it will work well enough with aluminum plates if they’re at least 1/4 -inch thick.
After the epoxy cures, it’s tempting to just put nuts and washers on the bolts, but it’s better to back the bolts out and drill clearance holes through the plates. There are several reasons for this extra step. First, when you put nuts on and tighten them, they tend to loosen the screws in the backing plate threads. Second, the bolts function better if the tension from tightening the nut is distributed across the entire clamped span. And third, there is less tendency to break the bolt from over-tightening if you drill out the threads in the backing plate. Don’t ask me how I know.
Aluminum plates
There are several choices for backing plate material. On my project boat, the trailerable Mega 30, I used 1/4 -inch aluminum plates above and below the deck when I mounted the bow pulpit and mooring cleat. I also added a layer of 1/4 -inch marine plywood to the foredeck above and below the fiberglass skins. There was clear damage from the mast hammering on the bow pulpit while towing, the original mooring cleats were too small for the mooring lines I had in mind, and the deck was too thin to hold a serious cleat. Thick aluminum was a good choice for these areas. Minimum thickness for aluminum plates is probably 1/4 inch. Thinner plates will be bent and crushed.
Perhaps a better backing-plate material is marine-grade plywood. Better yet is marine-grade plywood
faced with Masonite. It is better if the plywood is a harder wood, like sapele. Okume is probably a bit too soft. No wood, including plywood, has sufficient crush-resistance across the grain. Wood is like a bunch of soda straws glued together. It has good tensile strength along the axis of the straws, but it has very poor compression strength to resist clamping forces cross-grain.
Try an experiment in your shop. Clamp up a piece of good plywood with a 1/4-inch bolt, nut, and washers. Note that the washers crush into the wood, cutting the fibers. Now make another sample with a thin layer of Masonite on one side. The washer will not cut into the Masonite. Cross-grain, the Masonite has significantly better crush-resistance. If you make your backing blocks from a sheet of marine plywood to which you have glued a layer of Masonite, you’ll have a block that will not crush. If the wood does not crush, the washers will not bend and distort, and the nuts will have a proper bearing surface when under load.
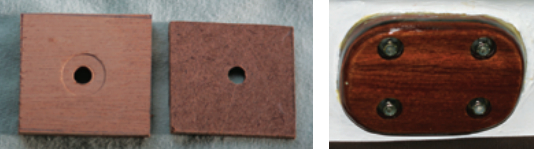
Masonite sandwich
You can go one more step and make a sheet with a layer of marine plywood, a layer of Masonite, and then a layer of marine plywood over the Masonite. When you are making your backing blocks for accommodation spaces where the crew may come in contact with the blocks, drill into the backing block with a Forstner bit just deep enough to expose the Masonite. You’ll then have a good crush-resistant surface for the washer and a wooden shield for the end of the bolt and nut formed by the outer casing of plywood. Naturally, you’ll have to cut each screw or bolt to length so it doesn’t protrude beyond the layer of protecting plywood.
In his book, Boat Strength, Dave Gerr says backing blocks should have 1.4 times the area of the fittings they’re backing. I have no quarrel with this, but I try to make my backing blocks much larger. If a fitting measures 2 x 4 inches, I double both numbers so the block is more like 4 x 8 inches. This will result in an area about four times larger than the base of the fitting. I often taper the edges of the block at 45 degrees or run it through a roundover bit to make the sides of the block less of a hazard to bump into. This takes away from the strength of the block. The way I see it, area may not be the figure of merit in all cases. In some situations the perimeter of the backing block may be what matters. Where that might be the case, doubling the length and width of the fitting makes a block perimeter that is only twice the perimeter of the fitting. If you follow either rule, there will be places where large blocks such as these simply won’t fit. Winches are often mounted on coamings that won’t take such large blocks. In those cases, I do what I can and take some solace in the inherent strength of the coaming and the structure often built into it for holding winches.
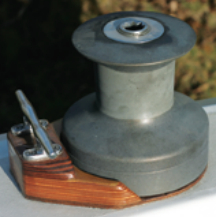
Deck pads
I never see any mention of putting pads between the deck and the fitting, but there is sometimes good reason to do this. If you mount a fitting onto a surface that has aggressive non-skid, you’re setting it on a bunch of peaks which may be crushed when the fitting is tightened. Putting a softer plywood or Masonite pad under the fitting will let the non-skid dig into the pad while providing a flat surface for the fitting.
Such top pads can be made to serve two other purposes.
First, some fittings, such as winches, need drains added at the bottom or they’ll fill with water. You can solve this problem with washers under the winch base, but a better way is to make a pad with drain-channel grooves cut into it. Some winches have drain channels cut into them, but others do not.
Second, it’s bad practice to mount a flat fitting on a curved surface. This is a common problem where winches are to be mounted on the top of a cabin trunk. The surfaces available are often curved in two planes and, if a winch is mounted directly to the cabin trunk, both the winch and the mounting surface will be distorted when the bolts are tightened. This problem can be solved by setting a flat pad on the curved surface in a mush of filled epoxy.
Installed properly, a deck or hull fitting should be held by bolts that are not bent and washers that are not bent nor have dug into the underside of the laminate. The cored deck around the fasteners should be filled with epoxy slugs that prevent crushing and preclude the seeping of water into the core if the sealant should fail. The backing blocks should be large and strong enough for the fitting to be loaded to the point of failure without the deck or hull structure failing too. If you work to this standard, you will probably have backing blocks that are of a higher quality than those found in some very high-end boats.
Jerry Powlas had careers in the U.S. Navy and as an engineer before he met and married Karen Larson. Together, they founded Good Old Boat. They now have two boats, one for sailing and one for practicing their restoration skills.
Thank you to Sailrite Enterprises, Inc., for providing free access to back issues of Good Old Boat through intellectual property rights. Sailrite.com