It takes more thought but saves time (and face)
Issue 83: March/April 2012
“Do it right the first time?” I tend to learn more from not doing it right the first time. Then again, in boatbuilding there are degrees of “right,” as the definition varies based on the standards of the builder . . . and everyone has an opinion after the fact!
While building an 11.99-meter catamaran, I’ve learned a lot about a number of operations. At least one discovery on this adventure seemed like it might be of interest to good old boaters who wish to make an occasional alteration or repair due to the age of the vessel, the standards of the builder, or simple boredom (what with winters and all).
Most of the readers of Good Old Boat have production sailboats of cored composite construction or with solid hulls and cored composite decks. The core might be one of a variety of materials, the most common among them being PVC foam or (shiver me timbers) balsa. Balsa is great for stiffness but it demands particularly high standards of care in working, and the other materials need to be treated with respect as well.
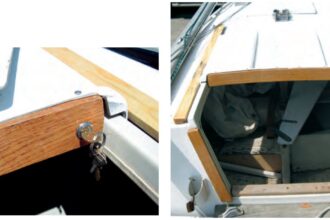
One of the great pastimes of boat owners is cutting holes in perfectly good decks. Among these, hatch installations demand the most care, in my humble opinion, as I found out.

A core issue
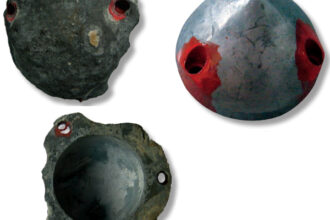
My boat’s decks are cored with balsa in some areas and with PVC foam in others, due to a change of taste mid-project. As the hatches I was fitting were in the balsa sections and reasonably close to supporting structures, I felt I could get along with the minimum standard: remove enough balsa core to include the area where the hatch-base fasteners will be and fill the cavity with epoxy mush, or what we down under (in Australia) call “bog.”
But first I had to cut the hole. I made a template out of light ply, traced the hole with a marker pen, and used a jigsaw mounted with a blade intended for cutting ceramics — it’s faced with carbide instead of teeth. Fiberglass will turn a toothed blade into rubbish in a couple of minutes’ work, but these things will last for a long time.
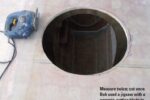
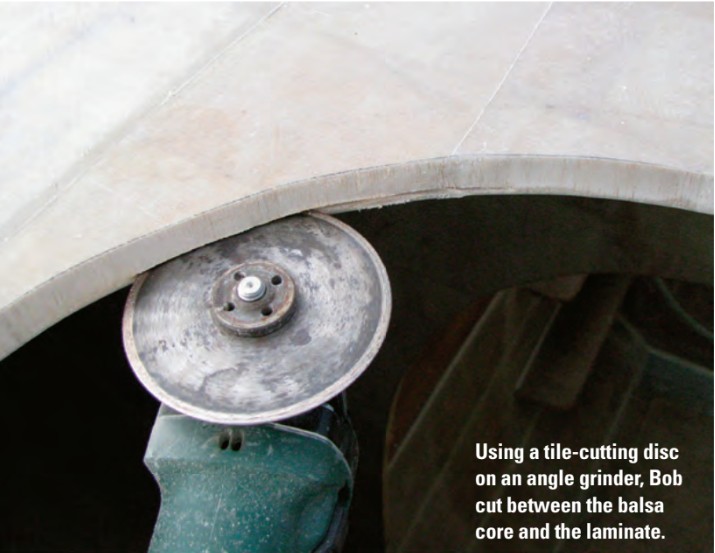
Next, I wanted to remove the core from around the perimeter of the hole. My first approach to that job was to use the tool anyone must own to qualify for boat ownership: an angle grinder. We’ll call that “Bob’s law.” (A quick trip to the hardware store and $5 or $10 later, you can also own a tile cutter, a 4-inch steel disc with a little diamond in it. Of course, you already have a 36-grit sanding disc.)
I mounted the tile cutter to the grinder and carefully cut into the balsa under the laminate, all around, then used a wood chisel to remove the balsa to the most uniform depth possible.
The next step was to clean off any stray balsa clinging to the edge of the laminate. I didn’t want water wicking into the core through those fragments. That’s what the sanding disc is for.
Then it was time to mix up the bog.
A stiff mush
For a job like this, I use a 50-50 mix of fumed silica and glass bubbles or microspheres (don’t confuse these with phenolic microballoons, which are a different material), brand names of Cab-O-Sil and Q-Cell respectively. Cab-O-Sil makes a sturdy mix that is hard to sand. Q-Cells just take up space and impart little support but sand easily. So I split the difference. The mush should be the consistency of, say, peanut butter: pretty darned thick.
Epoxy is really the best resin for this purpose. You could use the same resin that’s in the laminate — if you know what it is. If you don’t, epoxy is essential as it will adhere to any resin, where other resins might not adhere perfectly if mismatched. Epoxy is also the least permeable, and the whole idea is to keep water out of the laminate.
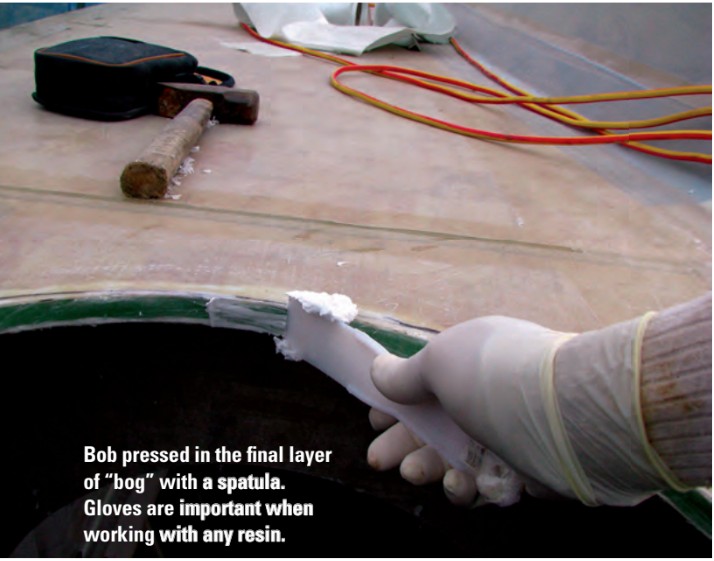
I like to use my well-protected palm for pushing the mush into the space. I trim off the excess with a small spatula and wait for it to go off. It won’t reach full strength for several days, but by the next day it’s sandable, and I prefer to sand it then as it’s so much easier. I always protect myself from breathing grinding dust and particularly the dust from material that isn’t fully cured.

A weakness
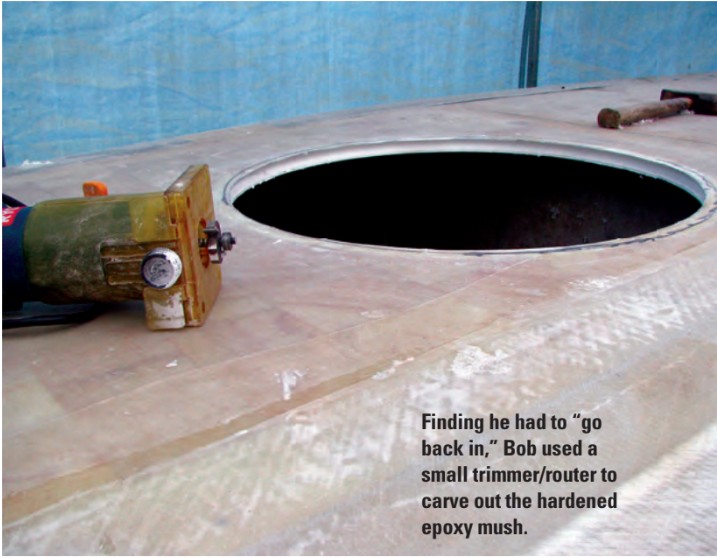
Once I had gone this far with my hatch hole, I decided it wasn’t strong enough. Using my patented impact meter (fist against panel) it rated a 3 on a scale of 10. So I did what every good boatbuilder does in a crisis: I went to a neighbor and borrowed a tool.
The little trimmer/router I bludged (an Aussie term for borrowed or begged) worked a treat, but I wonder, in the age of the nanny state, how anyone can buy and use such a thing and yet be forbidden to let their kids play with a 12-gauge shotgun after school. Anyway, I succeeded in cutting a groove all around in the mush and can still count all 10 fingers. The bit my neighbor had wasn’t the ideal depth or thickness (I’ll have to advise him to upgrade his selection of bits) but I found that by starting at the top and working down, it worked reasonably well. Starting at the bottom and working up, the little wheel at the end of the bit has no purchase to follow.
I just happened to have a roll of unidirectional fiberglass tape. This may be a little uncommon for most boat owners, but it is readily available from marine suppliers. First, I cut the tape to fit with tapered and overlapping ends and fitted it dry to the cavity to check the fit. I then mixed a small batch of mush and, with my protected fingertip, pushed a light layer into the cavity to fill any irregularities and to help the tape adhere in position.
Next, using a cheap paint roller, I wetted out the tape on a plastic-covered table. I rolled up the tape on the table as neatly as I could without wasting time and carried it to the job, where I carefully fitted the rolled tape into the cavity. Once the uni tape had gelled, I mixed up another small batch of mush and covered the tape with a layer of that, using a spatula to fill and protect the finish so it could be sanded fairly flat.
After three days, the aperture more than passed the patented impact test; it was very rigid. As the fasteners will penetrate only solid mush, the core will be protected and the cured mush will bear the compression from the fasteners without collapsing.
And 10 years from now (or many more we hope), the hatch will perform well and not leak from distortion of the deck it is mounted on and the deck, still firm and trouble-free, will be preserving what will be, by then, our good old boat.
Additional notes and tips
I found it useful to explore both techniques for core removal. With the tile-cutting blade on an angle grinder, it is possible to gain much more depth than with the router. This has the advantage of allowing a wide enough field of mush to be able to drill through it later for the mounting screws without further work. If the mounting screws are outside the field of mush, you are in for much more work removing the core and back-filling with mush around every fastener hole. (Note: For more ways to deal with reinforcing cored decks for fasteners, see “Hardware on Soft Decks,” March 2010, and Mail Buoy, May 2010 –Eds.)
For spatulas, I prefer the white plastic ones. They are usually made of polypropylene and resins can’t stick to polypropylene. Simply set the spatula aside after use and the next day flex the tool — the hardened resin will pop off.
As most deck surfaces are not perfectly flat, some fairing may be needed to ensure proper mounting of hatches or other gear subsequent to the work described here. If the mounting arrangement includes a doubling material, like a wooden frame, the aperture may not need the extra reinforcement of the unidirectional tape, but applying the mush sealer is still good procedure.
Besides deck work, I have used this technique on all exposed edges of composite panels. On my project, that meant enough use to justify buying my own router.
Anytime you are working with balsa, consider the ambient temperature. Balsa is light because it is mostly air. Because the cells of the material are not enclosed, when the temperature is rising, the internal gases are expanding or outgassing. This may cause pores to form in your mush as the expanding gases force their way through the mix prior to hardening, leaving an entry into the core. It is best to be safe and do the filling on a falling thermometer when the contracting gases will help you get good wetting of the facing balsa and ensure the best seal. Even with other core materials that may be less prone to gassing, it can’t hurt to follow this procedure.
A final note: using any resin in direct sunlight is a mortal sin.
Bob Norson and his wife, Kay, both grew up with boats in North America but discovered liveaboard cruising in Australia where they now live and publish a boating paper devoted to the lifestyle. Between publishing The Coastal Passage and building their own 12-meter cruising cat, they stay busy but hope to languish in boredom soon.
Thank you to Sailrite Enterprises, Inc., for providing free access to back issues of Good Old Boat through intellectual property rights. Sailrite.com