A better way to mount deck hardware
Issue 67: July/Aug 2009
No doubt the builders who installed the original deck hardware on your boat took the easy way, and later owners who added further hardware probably did the same. I have not spent a lot of time on really high-end boats, but I’ve observed that on the average good old boat, the methods employed were often too simple and the quality of workmanship was dismal.
It would take a chapter in a book to explain how to do a really high-quality job of mounting deck hardware, but it all begins with a pattern of holes. If you can transfer that pattern exactly from the item of hardware to the deck where it’s to be installed, you’re off to a good start.
Any fitting with more than two mounting holes may already have a problem built into it, and seemingly identical parts may not be interchangeable. We expect that any wheel on our car can be put on any corner of the car and can be mounted in five or six different positions relative to the studs. Furthermore, those same wheels can be likewise mounted on a few million other cars with equal success. This kind of standardization has made us accustomed to interchangeability in our lives, and we assume it exists in most places. Be careful here. Interchangeability does not come with all deck hardware.
Winches illustrate this point well. Some winches are interchangeable, but many are not. Many cannot even be rotated around seemingly symmetrical hole patterns because the patterns only appear to be symmetrical. This lack of symmetry and interchangeability makes it necessary, when removing deck hardware, to label each item as to its original location and also as to its orientation on its mounting holes.
This is not a problem rooted in the past. Two brand-new Lewmar 30s on my workbench are not interchangeable in any respect. The one smaller Anderson 18 seems to be symmetrical about its six mounting holes and comes with a paper pattern for drilling the holes, so maybe these winches are interchangeable. Until you prove otherwise, however, assume that no piece of deck hardware is either symmetrical or interchangeable with its apparent twin. Each hole pattern will be unique.
A recipe for drilling errors
The typical method for installing deck hardware is to place the part on the deck and use the holes on the part as a guide for drilling the mounting holes in the deck. This never works very well, although the technique can be salvaged by drilling excessively large holes to compensate for the errors it introduces.
First, the drill point is ground at an angle, so the drill is not constrained by the part until the hole is already started. Further, the fitting often has oversized holes that are countersunk for flathead screws, so it makes a very poor drill guide anyway. Drill five or six holes in this manner for mounting a winch and they will need to be grossly oversized if all the screws are to fit.
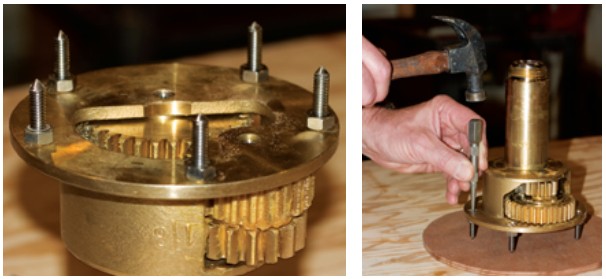
A better way is to make a set of punches that will allow you to center-punch the deck with precision. The base of my winch was drilled for five fasteners, so I needed five punches.
Precision with punches
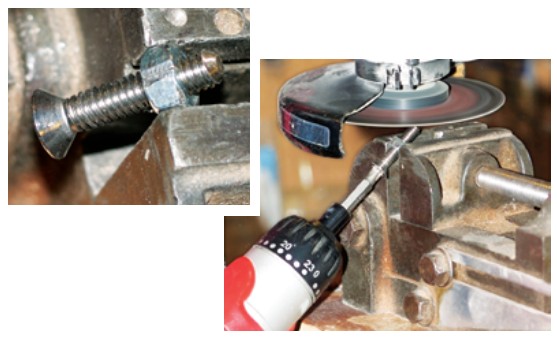
Take ordinary flathead machine screws, the same diameter as the fasteners you will need for the part you’re installing, and make punches out of them by grinding the end of each one to a point. To ensure the punch center is at the screw’s axis, mount the screw in a nut held in a vise and rotate the screw with a power screwdriver while you grind the end.
If you are working with a long screw, you can use two nuts in the vise to keep the screw centered. If the screw is short, you can use a split nut — a nut cut halfway through lengthways — and tighten it with the vise to grip the screw more tightly.
Make the split nut by flattening a point of the nut with a file and, with a hacksaw, sawing through that flat. The reason for not sawing through an existing flat on the nut is that you want the cut to be parallel to the flats you clamp in the vice. You will appreciate having a collection of split nuts for other purposes, such as chasing threads after you cut off a screw or bolt to a shorter length.
When you grind these points, try to make each pointed screw the same length. Start with screws of the same length and grind until you’ve formed a point. The points need not be pin sharp; you want to make a center punch, not a needle.
Mount the pointed screws on the hardware item and lock them tight with nuts underneath. Both the countersink and nut-bearing surfaces should be clean. Position the hardware on the deck in the exact location you want to install it and use a fine-tipped punch like a nail set to punch each screw point into the deck. Take care that the part does not move as you continue around the bolt circle.
A center drill provides a nice way to enlarge the hole concentric with the center punch, but a brad-point drill will work as well or, in many cases, better. Always start with a small drill and increase the hole size in at least two steps. If you have access to a drill press, make some drill guides out of wood or plastic to help you keep the drill perpendicular to the deck’s surface.
There you have it: a hole pattern that actually fits the part. This method is so precise that you can mount hardware that has five or six holes and actually tap threads into the base material and all will fit up very well.
There is much more to mounting deck hardware. The deck must be strengthened and sealed against water entry and the backing block below must spread the load. Grist for another article.
Jerry Powlas brags that he has cruised halfway around the world twice (same half each time) courtesy of Uncle Sam’s Navy. Later he discovered sailboat racing and got into Flying Scots in a big way. He didn’t discover cruising sailboats until he met and married Karen Larson. Together, these two founded Good Old Boat magazine in 1997.
Thank you to Sailrite Enterprises, Inc., for providing free access to back issues of Good Old Boat through intellectual property rights. Sailrite.com