Raid the hardware store, not your wallet

Issue 84 : May/Jun 2012
When I went shopping for a telescoping whisker pole, I came away with sticker shock. Like a lot of other small cruising sailboats, my 28-foot Catalina doesn’t really need a monster pole . . . just a pole to hold the genoa out there when the wind behind us needs a little help. The least-expensive ready-made pole I could find online was about $100. Really serious whisker poles, however, can top $4,000. Instead, I made a light-duty whisker pole for about $50 by modifying both ends of a telescoping pole made for a paint roller.
For the outboard end, I fashioned a spike that fits into the genoa’s clew cringle to keep the sail extended. On the inboard end, I used a small spinnaker-pole end fitting that snaps onto a mast ring.
The major parts
First, I had to decide how long I wanted the pole to be. It doesn’t need to be any longer than the foot of the headsail. Shorter — depending on the boat and the sail — will probably work well. A telescoping pole is always better because it takes half the storage space and can be adjusted to sailing conditions. Choosing a non-telescoping alternative will really cut the cost of this project.
If you haven’t painted a house lately, you’ll be surprised at how much telescoping poles for paint rollers have improved. For this project, most sailors will probably settle on either a 4- to 8-foot or a 6- to 12-foot model.
I chose a 4- to 8-foot pole with the larger, handle end of the tubing made of fiberglass. It seemed stronger and lighter than comparable all-aluminum poles. The locking mechanism was easy to twist and appeared to have the muscle it would need to hold the pole at any length it was set to. The pole cost $23 at Home Depot. There were other models for less.
The best selection of hardware I found for fittings for the inboard end of the pole was at Annapolis Performance Sailing. You’ll find parts from a number of manufacturers under “hardware/spinnaker poles” and “accessories/spinnaker-pole end fittings” (many fittings for spinnaker and whisker poles are identical). Forespar’s Lexan snap-on hook cost $18.
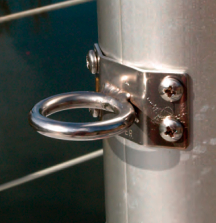
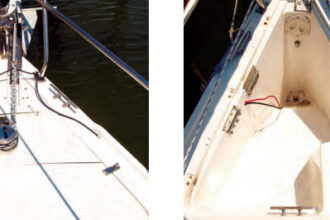
The hook attaches to a ring mounted on the forward side of the mast. The ring set me back $22. You’ll need one of these, no matter what the whisker pole costs. I tapped threads for screws to hold the ring in place. Pop rivets would have been easier but I thought the screws might be a little stronger.
To adapt my painter’s pole, I had to assemble two modules, one that would fit to the inboard end and the other to the outboard end.
Inboard module
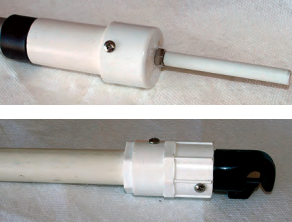
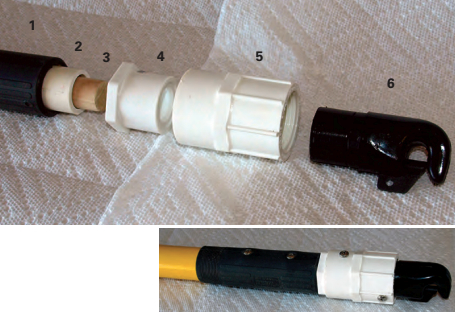
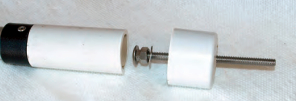
If you use a different pole-end fitting from the Forespar model I used, you might need a different collection of parts with which to join it to the pole. I used five components to make the inboard module, which then fit into the fiberglass end of the pole. Refer to the numbers on the photo above.
- Paint-roller extension-pole handle
- 4-inch length of 3⁄4-inch PVC pipe
- 4-inch length of 3⁄4-inch hardwood dowel
- 3⁄4-inch to 1-inch PVC adapter
- 1-inch PVC barrel connector, slip at one end, threaded at the other
- 6 Forespar Lexan snap-on fitting, model FP404002 (.9-inch OD)
(Note: Forespar apparently now sells this fitting only in a kit with a spike for the outboard end. The part number is 300026. –Eds.)
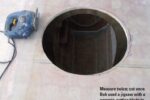
The dimensions of all of these parts are determined by the inside diameter (ID) of the handle for the pole you select. When I cut away the end of my painting pole’s rubber handle, I found the ID of the fiberglass tube was 1 inch. That meant I needed a length of 3⁄4-inch PVC pipe, which has an outside diameter (OD) of about 7⁄8 inch and would slip into that portion of the pole. Since the fit was not as snug as I’d like, I wrapped the PVC pipe with electrician’s tape.
Keep in mind that PVC pipe sizes are designated by ID. This means that 1-inch pipe has an OD of about 1 1⁄4 inches, so 1-inch pipe fits very nicely inside 1 1⁄4-inch pipe. These are the only two sizes that slip together like this. Fittings for these two pipe sizes can be adapted for most whisker-pole fittings.
The ID of a threaded female PVC fitting is slightly smaller than the ID of a “slip fitting” designed to be installed with glue. As it turned out, my Lexan snap-on fitting was so snug inside the PVC threads it threaded itself into the fitting. I could screw it very tightly into the threaded adapter.
The 4-inch length of 3⁄4-inch hardwood dowel strengthens the assembly and holds it tightly together once all the screws are in place. To make it fit inside the 3⁄4-inch PVC a little more snugly, I wrapped the dowel with electrician’s tape.
I used a hammer to drive the PVC pipe into the PVC adapter and then drove that adapter into the barrel connector. You don’t need to glue them.
With all the parts assembled, I used 3⁄4-inch #8 stainless-steel screws to hold everything in place. All the screws except those that pierce the Lexan fitting reached the hardwood dowel. I made sure when I drilled into the Lexan fitting that the screws would not interfere with the spring-loaded clip mechanism.
Outboard module
I designed the outboard module to screw onto the male, threaded end of the extension pole. One end of the module contains a female threaded socket that I took from a wooden paint-roller extension I purchased for $4. (This 3-foot wooden extension is in three parts that screw together using two plastic threaded couplers that are female at both ends. If I messed up, I had a spare.)
The other end of the module is a spike that slides into the clew grommet of the headsail. Most of the parts are PVC fittings.
The dimensions for the elements of your outboard module will depend on how the male threaded fitting is mounted on your telescoping pole. The male threads on the pole end are designed to fit the female socket on a paint-roller handle. The same size threads are used on poles for brooms and mops.
First, I screwed one of the threaded wooden dowels into one of the female plastic connectors, then screwed that tightly onto my pole. With that in place, I slid a short length of 1-inch PVC pipe about 2 inches down the wooden dowel until it was seated on the end of the telescoping pole.
The next step was to measure the distance from where the PVC pipe seated on the pole to the outer end of the plastic coupler plus 1⁄4 inch. I marked the wooden extension and cut the wood at that point.
The distance from the PVC contact point to the outer end of the plastic coupler, plus 1⁄4-inch, was 2 3⁄4 inches, so I cut a piece of 1-inch pipe that length. I tapped the pipe onto the plastic coupler and threaded wooden stub. To make it fit better against my telescoping pole, I used a Dremel tool to taper the inside of the PVC pipe.
If you’re doing something similar, you may need to adjust the length of the PVC pipe so it’s flush with the wooden stub or so the wooden stub is slightly inside the pipe. You’ll find the plastic coupler fits very nicely inside the PVC pipe.
With the wooden stub and coupler screwed tightly onto the pole, the PVC pipe should be firmly seated against the end of your extension pole. If not, tap the pipe or the coupler until it is. Or cut another piece of PVC pipe that’s a better fit.
In use, the force should be on the extension pole itself with the PVC pipe pushing against it. The threaded wood and plastic coupler maintain the connection but are not strong enough to handle the compression force when the whisker pole is deployed.
To finish the outboard module, I drilled a 1⁄4-inch hole in the center of a 1-inch PVC pipe cap. I then inserted a 3 1⁄2-inch, stainless-steel, 1⁄4-inch hex-head machine screw into the cap from the inside. The screw needs to be threaded its entire length. I put a nut on the screw on the outside of the cap and tightened it.
When I tapped the cap onto the PVC pipe, I made sure that the head of the screw was against the wood in the plastic coupler and that the cap was properly seated on the pipe. If you don’t get a firm fit, it may be necessary to slightly adjust the length of the PVC pipe.
Next, I put two sheet-metal screws through opposite sides of the cap. These screws must be long enough to go through the PVC pipe and into the wood inside the plastic coupler. I covered the threads of the machine screw with a length of 1⁄4-inch-ID plastic tubing so they wouldn’t chafe the sail.
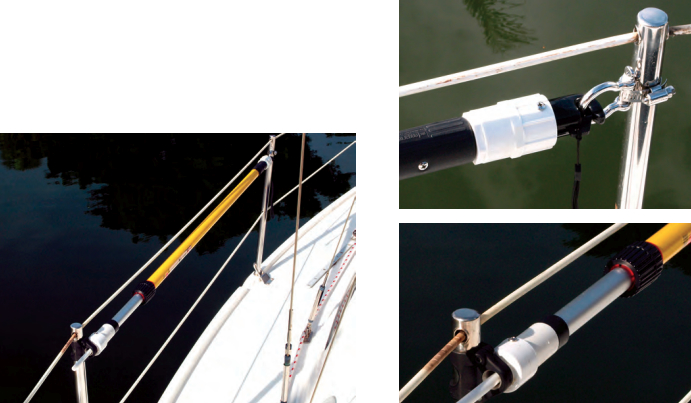
The pole in use
To use the pole, I put the spike through the sail’s clew cringle where the jibsheets are attached. With the pole’s telescoping friction loose, I clip the inboard end to the mast ring. I extend the pole to the desired length, tighten the telescoping lock, then adjust the jibsheet.
The outboard end of the pole could be designed with another snap hook, but I’ve found the spike to be easier to connect and disconnect.
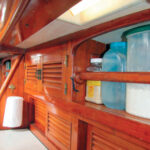
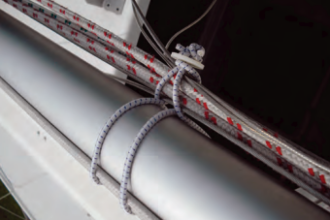
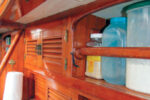
I stow my pole on deck between two stanchions. It’s easy to get to when needed. The outboard spike end goes into a line eye made to attach to a stanchion. The inboard fitting snaps onto a stainless-steel anchor shackle attached to the stanchion with a stainless-steel hose clamp.
Clarence Jones is a writer, news-media consultant, photographer, sailor, tinkerer, and inventor. He and his wife, Ellen, live and work on and sail their Catalina 28 from Anna Maria Island at the entrance to Tampa Bay. Part of the joy of sailing for Clarence is creating and building inexpensive enhancements for his boat.
Thank you to Sailrite Enterprises, Inc., for providing free access to back issues of Good Old Boat through intellectual property rights. Sailrite.com