A plan for the future and a project for today
Issue 84 : May/Jun 2012
When I was in high school, a friend of mine and his father were working to restore a Jaguar Roadster. Anytime I asked when they were going to get it finished, he would simply say, “Someday.” Only when I undertook my own restoration project did I finally understand what he meant. Sometimes the journey can be as rewarding as the destination. This certainly was my experience in rebuilding the Vera May. The best part is that the journey continues right on through to new destinations as well!
My journey actually started during a long drive to Calgary, Alberta. I was thinking about my plan for retirement. Although it was 10 years away at the time, I’ve always been one to think ahead. Yes, I was saving for it, but to what end? All my life I’ve had business objectives to accomplish and I realized that, without a goal or mission, retirement might not be that enjoyable. I wanted something that would be challenging and fulfilling at the same time.
The idea of cruising around the world came to mind and a dream was born. To do that, I was going to need a boat. As I didn’t want to go into debt, I initially thought I was going to have to build one myself. Then one lazy Saturday morning, I was searching the used-boat listings on the Internet and found what I was looking for within my limited price range (dirt cheap). She was a 1970 Hallberg Mistral 33. She had a good pedigree but suffered from the neglect that comes with having been left on the hard for at least three years. She was obviously going to need work, but I had some experience with building a small wood and fiberglass sailing dinghy so I took the plunge. (Note: The Vera May, in “mostly finished” condition, was the feature boat in Good Old Boat’s September 2011 issue. –Eds.)
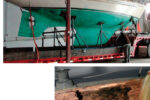
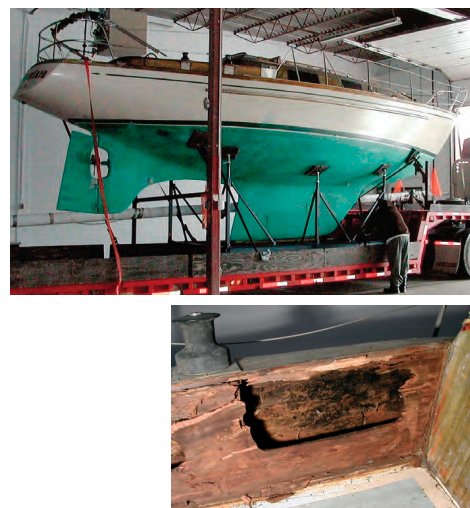
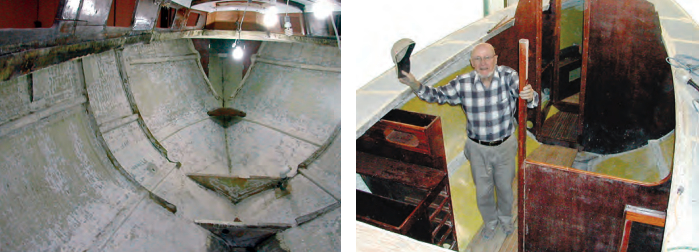
She was in Halifax, Nova Scotia, and I had her trucked to Edmonton, Alberta, where I was fortunate to have a heated warehouse. She arrived on a November morning frozen solid with 2 inches of ice above the interior floorboards. She had to thaw out before I could even drain the bilge. Most of the wood above deck had rot damage, but she was mine! When I looked at her, I saw my retirement dream. Others saw her a little differently. I was told that my friend’s son had asked, “Does Uncle Stephen know he bought a rotten boat?” I didn’t mind. I had a dream, a plan, and time. This is perhaps the first of a number of lessons I learned during my journey: restoring a good old boat is a real joy as long as there are no deadlines. I believe impossible deadlines cause many rebuilds to be abandoned.
Not restore but rebuild
What I thought would be a touch-up-and-refinish project was going to be a complete disassembly and reconstruction. A previous owner had practiced the out-of-sight-out-of-mind mahogany-maintenance program. Any time he discovered wood damage, he covered it up with stainless-steel sheeting and sealed the moisture in with silicone. But no matter, I was originally thinking of building my own boat anyway. This way I had a good fiberglass hull and a quality design. Besides, I would know everything about the boat when I was finished.
The first thing I did was to measure everything I could. I also took plenty of pictures to record my progress and for later reference. As you work you learn, and as you learn you begin to notice more. It’s amazing the things you see in a picture you never noticed previously. The answers to questions are often right before your eyes.
I soon settled into a pattern of researching, reading about other people’s rebuilding experiences on the Internet, and planning the work during weekday evenings. Then I spent weekends working on the boat.
I wanted to keep as much of the original design as possible but still incorporate some of the better innovations that have occurred since 1970. A lot of things needed doing that I knew very little about, and that led me to another lesson I learned on my journey: the actual process of restoring the boat will lead you to develop the skills you need then and in the future. I knew very little about boat construction, DC wiring, marine heads, or seacocks, for example, but I learned as things went along.
The solid wood construction of the interior that had been glued andscrewed together had all become loose over time. It was easy to tell the difference between the original Hallberg workmanship and that of items added by previous owners. I gained a good appreciation of the boat’s heritage. I completely disassembled the interior so I could restore the components and reassemble them like a giant jigsaw puzzle. Remember those pictures? I stripped her down to the bare hull and tore out all the old wiring and plumbing. I cut the rotting cabintop into pieces and removed them but I was careful to keep the overhead beams as templates.
From a bare hull
Once the destructive phase was completed — with everything removed, cleaned, identified, and set aside — I began the reconstructive phase of the journey.
Since I had taken everything down to the bare fiberglass hull, it was easy to epoxy Kevlar cloth to the inside of the hull from the companionway bulkhead forward. I like to think she’s now bulletproof.
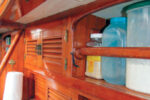
I changed the original anchor locker design to drain externally, rather than into the bilge. I refinished most of the original bulkheads and re-installed them to the fiberglass tabs on the hull using stainless-steel bolts and 3M 5200 adhesive. A couple of the bulkheads had suffered significant rot and had to be replaced with new plywood. It took some doing, but by sanding with a Scotch-Brite pad between applications of two different colored stains, I was able to stain the new okoume marine plywood to match the original Honduras mahogany bulkheads. (See the article in Good Old Boat, March 2008.)
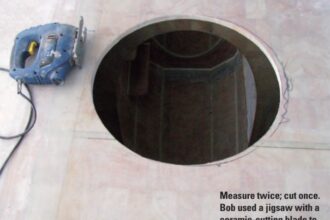
Soon the interior was taking shape again. However, there was a little spongy spot on the foredeck. I thought that it might be separation between the Divinycell foam core and the upper layerof fiberglass. I was originally going to inject thickened epoxy into the deck but thought better of it. Instead, I cut out a piece of the upper layer to inspect it. The core was sopping wet! I wound up cutting away the entire upper deck surface to expose wet core. A previous owner had removed the original teak decking without sealing the screw holes. He just painted over them with a thick paint with a non-skid additive. I ordered core material from the local boat store and learned about re-decking a sailboat.
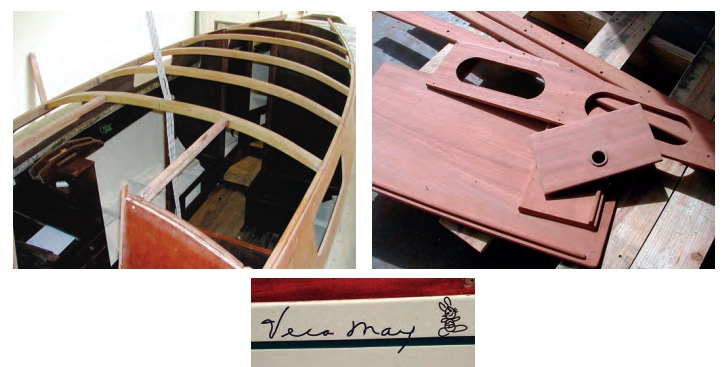
I reconstructed the new cabintop by measuring the pieces of the original and using the existing fiberglass mounting flange on the deck. I laminated the beams out of 3/4-inch plywood and encased them in fiberglass. I covered the top with two layers of 3⁄8-inch plywood and four layers of fiberglass cloth.
Now it was time for painting. Boy, do those small imperfections ever stand out when you put glossy paint on them. Sand and paint, putty, sand and paint. Repeat. However, this is what really makes or breaks your rebuild. Nothing says “I did it myself” like a poor paint job! Take your time, do the preparation work, and use a number of thin coats. The modern paints help a lot too. Get the good stuff!
Lessons for life
The woodwork continued as I rebuilt the cockpit coamings and added new toerails. (See the article in Good Old Boat, March 2011.) It seems like a lot of work and maybe it was, but I found it very enjoyable. I was fulfilling a dream, it was what I wanted to do, and it was a creative release. I began to see this project as a culmination of skills I had gathered previously in life. Thoughts of my father showing me how to fix things and many of my mother’s life lessons came to mind. I remembered her saying, “Stephen, we can accomplish almost anything in life if we just put our minds to it.” At that moment, I decided to name the boat after her. She would be the Vera May.
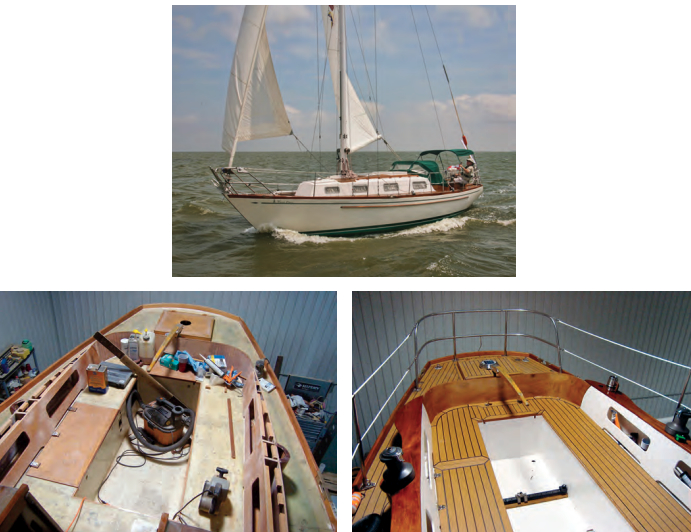
I told myself (and talking to yourself will become a habit if you restore a good old boat) that, if the cabintop came out looking halfway decent, I would spend the extra money and apply a teak or synthetic teak deck, rather than painting it with a non-skid coating. I chose Tek-Dek and was glad I did. It was easy to work with, simple to apply (kind of like arts and crafts meets boat restoration), feels good underfoot, and looks great.
I tried to keep the monthly budget down to about $500 for the first two years. However, in the third year it was closer to $750 and even in the range of $1,000 as I was finishing things up in the fourth year. Throughout this process, however, I had a great time researching the products or systems I would use in the restoration. I even enjoyed having the local chandlers order special things for me. That way I got the pleasure of buying them several times (first, when I selected them from the catalog or Internet; second, when I ordered them at the store; and third, when they came in and I paid for them. Nor can I overlook the pleasure when they were installed and when I got to use them). Another lesson I learned was to purchase the higher-quality products. I tried used parts from eBay, but soon realized you get what you pay for.
I rewired the whole boat with modern LED lighting, circuit breakers, and localized fuse boxes. I changed all the through-hulls to bronze seacocks. (See the article in Good Old Boat, November 2009). I redid the plumbing
and scuppers system and installed a new Volvo Penta diesel engine.
I finished off the underside of the cabintop by insulating it with two layers of Styrofoam. The first layer added thickness and helped hide the electrical wires. I bonded the second layer with Sunbrella to create an attractive surface.
Looking back on this whole journey, I am struck by the fact that after 54 years of messing things up, I seem to have finally mastered the fine art of leaving well enough alone. Oh yes, there were many times early in the process that I just couldn’t resist adding a little more paint so that it would run, used too much sealant, or worked a little too late and then sat on the cabintop I had just fiberglassed. But lately, I’ve been able to walk away after hearing that little voice say, “that’s well enough,” and enjoy coming back to it later.
Rewards
Finally, though, after four years of restoration, that “someday” came, and the Vera May was ready to be launched. Part of me didn’t want the journey to end, but another part of me couldn’t wait to sail her. Restoring a good old boat is a rewarding experience. You will discover many things about yourself and your boat that can only be learned by doing. I thoroughly enjoyed the journey as much as I am enjoying the initial destination. Retirement is still a few years away, but I’m well on my way to realizing a dream. Thanks, Mom.
Stephen Thompson is a professional mechanical engineer. He sailed on inland lakes as a boy, and, at 50 years of age, he successfully built a small sailing vessel from scratch and caught the bug once again. Over the past few years, he has undertaken the complete restoration of a 1970 Hallberg Mistral 33 in Houston Texas.
Thank you to Sailrite Enterprises, Inc., for providing free access to back issues of Good Old Boat through intellectual property rights. Sailrite.com