A confirmed tinkerer adds muscle to his foredeck
Issue 85 : Jul/Aug 2012
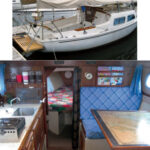
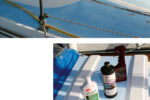
After a difficult anchor retrieval, the first mate and I decided it was time to bring another deckhand aboard Prime Time, our 2002 Catalina 28 Mark II — an anchor windlass.
I chose a Lewmar V700 for its size, good reviews, and price. West Marine matched the lowest price I found online ($625). The installation required some fairly complex carpentry. It can be done with hand- held power tools, but my table saw, drill press, and router were extremely helpful. I learned that you can download the entire owner’s manual for the Lewmar V700 at the Lewmar website. I did this to get a better idea of what it would take to install it, and to make sure it was right for my boat.
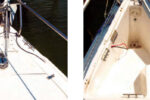
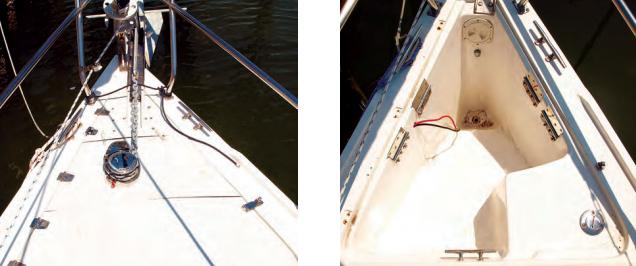
One of the major issues for vertical-drop wind-lasses is having enough room belowdecks to store the anchor rode as it comes in. Lewmar says this model needs at least 12 inches below the windlass. The anchor locker on the Mark II is 15 1⁄2 inches at the back and slopes down to a depth of 24 inches at the most forward point, where the drain is located. The slope is gradual for 24 inches, then drops sharply into the 24-inch well at the front. The lid is 36 inches, front-to-back.
Adapting the locker lid
I cut the lid of the anchor locker laterally (port to starboard) into three 12-inch pieces, mounted the windlass on the center section, and fitted hinges to the forward and aft sections so I can open them independently. This gives me access to the locker from either end for installation, maintenance, and to undo any tangle in the rode.
Each of those opening sections should have two hinges to maintain their alignment. I was able to find exact matches for the hinges at a local marine-surplus store for $4 each. I added the new hinges to the forward and aft sections before I even cut the lid. Two hinges, even though they look alike, may not swing the same way. If I had not found two hinges exactly like those that came from the factory, I would have used the hinge on the forward section as the second hinge on the aft section.
I ran into a problem with the new aft hinge on the forward section. My Catalina 28 has a metal backing plate embedded in the fiberglass there for the bow cleat. I was unable to drill into the metal, so the forward section has only one functioning hinge. I left the second hinge for the sake of appearance. Normally, I will only open the forward section if there is a problem with the anchor rode.
I cut out the top of the original chain chute so the new chain would not scrape on it. Because I was concerned with the section maintaining its strength, I screwed a section of 1⁄2-inch cutting board underneath to strengthen it.
To cut the lid, I made some adapters to hold it straight for my table saw. The lid is convex, which makes it difficult to cut a straight line. A hand-held circular saw might work better, but the cut would have to be very straight. The cut exposed the balsa core in the fiberglass sandwich that forms the lid. I weatherproofed that cut with a coat of epoxy.
Reinforcement
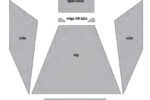
I used 1 1⁄2-inch-thick StarBoard to build a reinforcing pad under the middle section of the lid where the windlass was mounted. This is critical to ensure strength. There will be major force pulling the windlass toward the bow. Because the locker space is triangular, if the reinforcement pad fits properly, the pad below the locker lid becomes a wedge in that triangle, and the side walls of the locker, rather than the mounting screws, will take most of the force. Note that on the Catalina 28, the locker sides are part of the deck molding. On a boat where the inside of the hull forms the locker, a rather different approach would be needed for installing the reinforcement pad.
I cut my pad 13 inches wide, fore and aft, so it extends 1⁄2 inch under both forward and aft sections of the lid when they are closed. The pad also serves as a water barrier for the cuts between sections. I chose StarBoard for the pad because it’s strong, easier to work than wood, and will not rot or warp.
The thickest StarBoard I could find was 3⁄4 inch. I cut two pieces and screwed them together to make my pad 1 1⁄2 inches thick. Another fine point that adds strength is that the sides of the anchor locker are tapered. My anchor locker’s walls are slanted inward at 9 degrees off vertical. Cutting the pad to fit that side angle (as well as the horizontal triangle) will achieve maximum strength by giving the pad more surface pushing against the side walls.
I clamped the lid and the two pieces of StarBoard together to make sure they fit and the forward and aft hinged sections would be clear to open and close. In my anchor locker, about 1 inch of the 1 1⁄2-inch pad is down in the locker space, lodged against the side walls. Like all cabinet work, this job required a lot of trial fitting and slight trimming to make everything fit as tightly as possible. The pad was not exactly flush with the walls of the locker on one side, so I filled the space with a shim.
Installing the pad
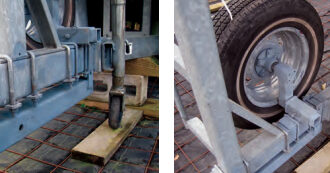
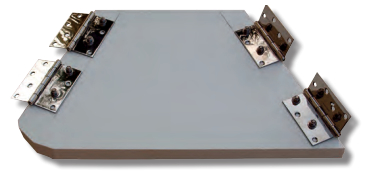
The bulk of the force on the windlass will be from straight ahead, but there will also be some upward force when the windlass is in operation, so the reinforcing pad had to be anchored strongly to the locker sides. A ledge on each side of metal angle (aluminum or stainless steel) is the obvious way to do this, but it won’t fit the tapered walls very well. I have not had much luck changing the bend in 90-degree metal angle. Instead, I came up with a better way. I used 4-inch stainless-steel door hinges with 1⁄4-inch bolts and locknuts. They’re very strong and they swing to fit exactly the angle between the horizontal reinforcement pad and the tapered side walls of the locker. To mark where I needed to drill for the mounting bolts, I put the pad in place and then clamped the middle section of the locker lid to it just as it would be installed.
Once I was sure everything was positioned properly, I held the hinges below the pad so they were flush with the bottom of the pad and sides of the locker and marked the screw holes for the bolts that would secure the hinges to the pad. I did not mark the holes for the side walls at this time.
I removed the pad and drilled the screw holes carefully. A drill press or a portable-drill accessory that ensures vertically plumb holes is essential for this step. It is impossible to drill vertically plumb holes freehand, and they must be plumb for the windlass and mounting bolts to fit properly.
I bolted the hinges to the pad using 1⁄4-inch x 2-inch flat head bolts countersunk into the top of the pad so the pad would fit tightly to the original lid. The center of the lid is convex. More on that in a moment.
With all the hinges bolted securely to the pad, I put the pad in place once more, clamped to the lid as it would be when installed. I then carefully marked the holes where screws would fasten the hinges to the sides of the locker. At first, I had planned to fasten the hinges on the sides with 1⁄4-inch bolts but, absent a helper, that would have required cutting a large hole in each side (and later fitting deck plates to close them) so I could hold the nuts while tightening the bolts. Since there will be little upward force on the assembly and no force to pull the fasteners out of the wall, I mounted the hinges to the hull with #10 stainless-steel screws.
I used hex head screws as they are much easier to install and remove. All the stress when the anchor is pulling will be toward the bow. The smaller screws also provide more latitude in having the mounting holes in exactly the right place. I placed a 3⁄4-inch fender washer under the head of each screw to create more friction against the hinge and improve its holding power.
Coping with convexity
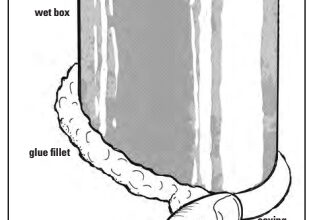
Next, I dealt with the space between the convex fiberglass lid and the flat reinforcement pad.
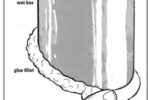
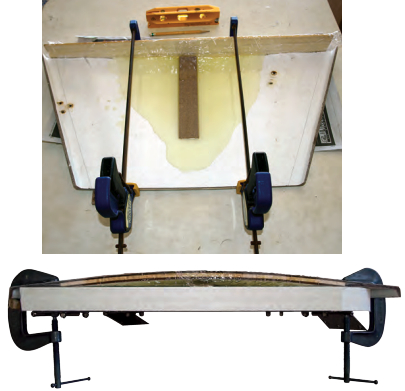
I placed the upside-down lid on a table and used wedges to carefully level it. I clamped a thin piece of wood against the wider side of the lid, where the concavity was most pronounced. I used very thin wood, thinking that if it got epoxied to the lid, it would be easy to sand it off.
I covered the wood strip in plastic wrap to prevent the epoxy from sticking to it. That worked wonderfully. I marked where the epoxy level should be at the center of the lid. When I poured the epoxy into the concave lid space, it leveled out to create a flat surface to bolt against the reinforcement pad. I did this in three pours, embedding a carpenter’s shim at the center to make the thickness more exact. It’s better to add epoxy a little at a time to prevent too much heat build-up from the curing process.
I used newspaper under the lid to catch any epoxy that dripped out. That was a mistake. The newspaper ended up epoxied to my anchor lid and removing it without leaving a scar took a lot of patient chipping. I should have positioned the lid so it hung over the end of the table, with newspaper on the floor to catch the drips.
Other than that, the epoxy solved my concern that bolting the windlass to the lid might flatten its convexity.
Fitting the windlass
I could now bolt the pad and center lid section into place in the anchor locker. I found the easiest sequence was to disconnect the hinges from the pad and mount the hinges to the locker walls first, leaving the screws loose. I then put the pad in place, pushing its mounting bolts through the holes in the hinges and putting a lock nut on them underneath. At this point, I left all the screws and nuts loosely fastened so I could move the pad slightly to fit everything in place. I put all three sections of the lid in place to make sure the forward and aft sections would properly swing up with the center lid section permanently bolted in place.
The V700 windlass has three mounting bolts and requires two overlapping circular cutouts — one for the motor to be mounted below and another where incoming rope and chain will be dropped into the anchor locker. I decided I could cut the circles and bore the mounting holes more accurately if I removed the center section and used the windlass-mounting template to mark the reinforcement pad, because the pad is flat. For the windlass mounting bolts and circles
I drilled pilot holes in the flat reinforcement pad from the top, using an accessory to make sure the drill was vertically plumb. (Note that the StarBoard pad is not yet attached to the locker lid — the windlass-mounting bolts will join the two together.)
With all the pilot holes drilled in the pad from the top, I clamped the lid back in place over the pad and, using the pilot holes in the pad as a jig, drilled from the bottom and up through the lid. This way, I could be sure the bolts would be vertical as they passed through both the lid and the pad. It took an extra-long 1⁄8-inch bit to drill through the pad and the lid section.
I then removed the assembly, unclamped the lid, and cut the two circles in the pad using a 2 1⁄2-inch hole saw and a circle-cutting adapter for my router. With the lid detached from the pad and clamped to two sawhorses, I was able to cut those circles the same way. I had expected the convex lid to be more difficult than it was. I then drilled the three windlass mounting-bolt holes in both the lid and pad, using the pilot holes made in the step above.
Both the large cutouts could be made with a jigsaw, but not nearly as neatly as with a hole saw and router. Because neither is visible once the windlass is installed, my fetish for neat circles may be unwarranted.
I put the lid and pad back in place on the boat and, after a little trueing work on the bolt holes, bolted the windlass on, making sure the assembly fit well. The windlass comes with a rubber gasket that eliminates any problem with the convex lid. A lid with greater convexity might require a shim under the windlass and sealant around the base instead of the gasket.
Electrical wiring
The installation manual says the power supply for the windlass should come straight from the boat’s starter battery, rather than going through the electrical panel. This is because the windlass might draw enough current to shut off the entire electrical system.
One of the most challenging tasks is hiding the wiring. I had to run the #8 AWG supply line forward from the battery to a dedicated circuit breaker, then to a contact module, and on to the windlass operating switch. If the windlass is more than 16 feet from the battery, larger wire is needed to carry the current without causing undue voltage drop.
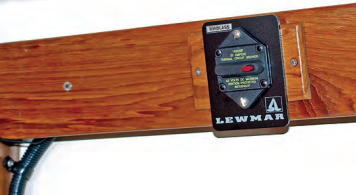
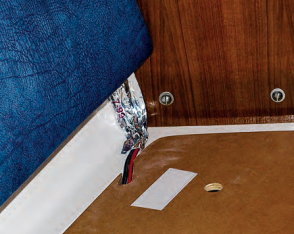
I installed the master switch for the windlass inside the anchor locker where it will be protected from weather. I wanted it close by when the windlass is operating so it can be shut down quickly if a problem develops.

Finishing up
The Lewmar V700 requires a G4 or BBB chain and 1⁄2-inch line. You’ll need to buy a new chain and line unless you have a 1⁄2-inch line you can splice onto the right-sized chain.
Normally, I would have installed a latch on the starboard side of the forward section of the lid to keep it closed. But that’s where the hidden steel is embedded in the fiberglass to strengthen the starboard bow cleat. Because the forward section only has one working hinge, the section is not very strong and can only be used as an inspection port. But how to keep it firmly closed?
I went to a marine store and found a stainless-steel latch that would mount on the sturdy center section with a lip that would swing over the forward section and keep it closed. One of these latches was priced at $23.
Instead, I bought two latches for a total of $3.40 at a hardware store. They’re rubber toilet-seat bumpers. They work great, but I’m not sure how long they’ll survive the sun. If they deteriorate quickly, I’ll look for another solution.
Fair winds and easy anchoring.
Clarence Jones is a former TV investigative reporter who published Winning with the News Media and left reporting to become an on-camera coach for government and corporate executives. He and his wife, Ellen, sail their Catalina 28, Prime Time, in Tampa Bay. Clarence’s latest book is Winning Webcam Interviews. A tinkerer and inventor, he has published about a dozen magazine articles on modifying a sailboat and making inexpensive sailboat gear with non-marine items.
Thank you to Sailrite Enterprises, Inc., for providing free access to back issues of Good Old Boat through intellectual property rights. Sailrite.com