A spiffy new look for regulation flotation
Issue 86: Sept/Oct 2012
They’re bright yellow, anonymous, and everywhere. New ones are expensive but they become faded eyesores after a few years in the sun. No one wants scruffy old horse-shoe buoys making their good old boats look shabby. But if the flotation core is sound and the cover’s not rotted, you can turn the old buoy into a real looker with leftover paint.
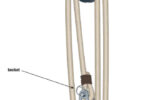
Sockdolager’s grotty old horseshoe was the perfect candidate for an extreme makeover. As it was covered in boatyard grime with its zipper corroded shut, there was little risk of ruining its looks. Stretching artistic muscles is easier when you can’t lose. What’s more, we think the results look great; our buoy became the envy of D dock.
After cleaning and drying the buoy, give it a couple of coats of semi-gloss white latex house paint. This alone will look good, but why not go further?
Put a name to it
The next step is to pencil the boat’s name on the buoy’s uneven surface. Measure and make sure the letters are somewhat evenly spaced, with the middle letter or space at the top. I gave the spacing my best effort and say that the letters were done freehand and “free-spiritedly.”
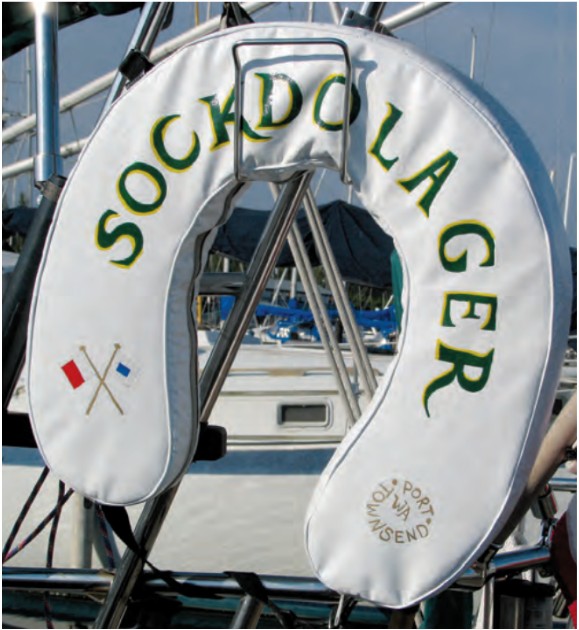
A stencil can help in the creation of the letters. You can make your own stencil by cutting out paper letters with a razor blade and placing them on the buoy to trace around. It’s fun to be creative with the typeface; I made up my own font. Once you’ve got the name penciled on the buoy, stand back to examine it, making sure there are no obvious gaps in the spacing. You can still erase and correct at this stage.
Now find three good-quality artist’s brushes, sized from small (about 1⁄8-inch) to extremely fine (about a millimeter). Although painting with small brushes may take longer, corners are easier and mistakes are simpler to correct. Get a small can of water-based paint in your favorite color from the hardware store and have a small rag handy for dabbing out paint blobs from the wrong places.
Winter therapy
It’s fiddly work, but you have nothing to lose. Besides, you have all winter. You can paint over mistakes. You’ll also learn how steady your hand is. I chose a paint color to match the boat, and later added a bit of outline in a contrasting color. Extra spiffiness came from painting two crossed signal flags (the first letters of our surnames) and a hailing port. When spring arrived, I carried our “new” buoy proudly down the dock and was promptly stopped by admirers. They asked, “Where’d you get that?” When they learned I’d done it, they asked to place an order. I said, “Thanks, but I need to go sailing now.”
Karen Sullivan and her partner, Jim Heumann, are sailing their Pacific Seacraft Dana 24, Sockdolager, across the Pacific. They maintain a spirited record of their travels on their blog, http://karenandjimsexcellentadventure.blogspot.com.
Thank you to Sailrite Enterprises, Inc., for providing free access to back issues of Good Old Boat through intellectual property rights. Sailrite.com