The answer is to baffle it
Issue 85 : Jul/Aug 2012
Everyone else on the shopping bus was bleary-eyed and commiserating about how many times during the night they had gotten up to close hatches. It had been yet another night when rain showers swept across the anchorage every hour or two — a recurring pattern here in the tropics — yet we had slept right through them all, the cooling breeze pouring down the hatch above our bunk uninterrupted.
Most cruisers give pre-cruise thought to shade, but few consider rain. Stewing in my own sweat while rain pounds the deck of my closed boat is not my idea of paradise. This is eventually a universal sentiment, and no canvas item on the Richard Cory has delivered as many “Aha!” moments for other cruisers as our forward-hatch rain hood. Our hood is tailored to our boat, so specific measurements have little value, but the current model (Mark IV, I think) does exhibit the essentials of a good rain hood.

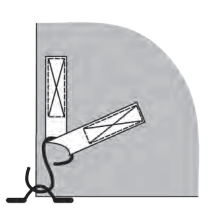
A flat awning rigged over the hatch, perhaps with a center lift to give it an umbrella shape, is a common effort to keep out rain. Rigged high enough to allow the covered hatch to open fully, this kind of awning offers scant protection from rain coming from the sides as the boat yaws. Rigged low enough to keep the hatch dry, the near-deck leading edge blocks wind from reaching the now-only-partially-open hatch. A good rain hood will keep out rain without restricting the flow of air coming in the hatch. Here are the design features of a hood that satisfies that objective.
Low sides
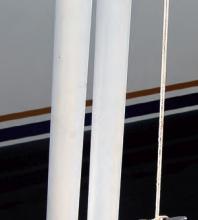
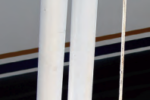
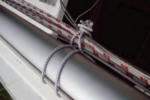
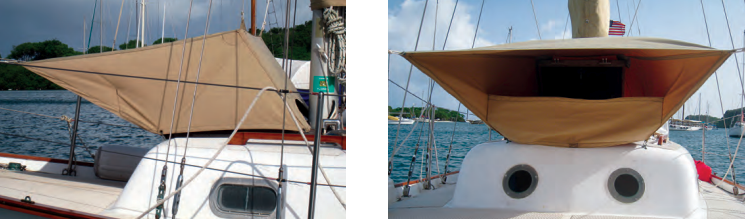
Take a look at the photos. To exclude rain that pounds the deck, the sides of the hood should lie against the deck and extend well forward of the hatch opening. My hood attaches quickly and simply with four captured S-hooks through strap-eyes screwed to the deck, but this positions the fabric an inch or two above the deck. My Mark V model will attach the hooks higher (with stitched webbing) so the fabric is right down on the deck.
Maximum top
Make the top of a hood as wide as possible and to extend forward as far as possible. Width is likely limited by lifeline location. I would have made mine a bit longer but at anchor we rig solar panels inboard above our foredeck, so their location was the design restriction. The shape and size of the top is also determined by the tie location that, in our case, was with half hitches over the lifelines where they pass through the forward stanchions.
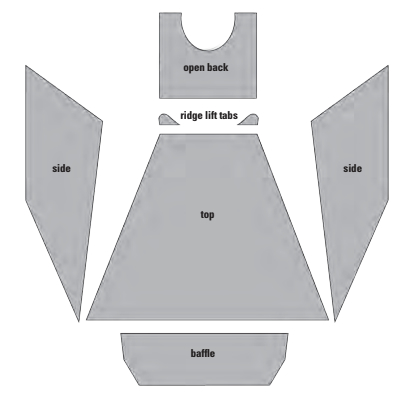
Ridge lift
Note in the photos that both top corners of the hood have lift tabs with grommets. Lines from these tabs lead more or less vertically to positions no higher than you can reach on the forward shrouds, where they are simply secured with rolling hitches. If the geometry of your boat does not allow shroud attachment, you will have to devise another configuration — perhaps teeing to lines stretched between shrouds and forestay. The ridge lift supports the hood, avoiding chafe with the hatch and allowing the hatch to be closed partially or completely without affecting the hood. I do have leather sewn into the corners (the circular stitching) to protect the abrasion-sensitive acrylic canvas from occasional chafing as the hood adjusts to the wind.
Inclined top
The hood can tilt either up or down, but it should not be rigged flat (horizontal). The top panel will be either hemmed or seamed along all its edges, making them more rigid than the center. As a result, the center will belly and hold water if the top is flat. A slant encourages the rain to spill off.
Foredeck baffle
The forward baffle is the money feature of this design, the detail that converts a hood that will protect from light showers into one that can keep out blowing rain. The baffle does two things: it deflects water splashing up from the deck and it increases the angle (from vertical) that driving rain must achieve to reach the hatch opening. As a splash guard, the baffle is most effective if it leans out over the deck, following the contour of the triangulating sides. However, to keep out driving rain, the baffle’s effectiveness increases with the height and aft location of its top edge. My compromise is to sew the baffle to the bottom edges of the sides for several inches, then turn it vertical. For Mark V, I might make the baffle even a bit taller, always keeping the area of the opening in the hood greater than the area of the hatch opening. You will need a means of keeping the center of the baffle down on the deck, which I accomplished with a snap.
Open back
If the leading edge of a squall comes with 40-knot winds, even the best hood will not prevent some rain from blowing in. In this case, you will want to close the hatch. Configuring your hood with a large open vent in the back (normally blocked by the open hatch) allows it to spill high winds, reducing the strain on the hood and the load on your ground tackle.
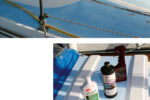
That’s it. Lay out the framework to fit your boat using tensioned string or line, work out design details with paper patterns, then build it with acrylic canvas. It may take more than one try, but once your boat is fitted with a rain hood that actually works, you will shake your head that you did not do it sooner. Just try not to act too smug around your bleary-eyed harbor mates.
Don Casey became the authority on boat fix-it projects with This Old Boat, which came out in its second edition in 2009. He and his wife, Olga, have been cruising aboard their 1969 Allied Seawind since 2002.
Thank you to Sailrite Enterprises, Inc., for providing free access to back issues of Good Old Boat through intellectual property rights. Sailrite.com