Conduct ocean passages from the Maestro seat
Issue 94 : Jan/Feb 2014
In the mid-1960s, Bernard Moitessier was in Tahiti preparing his 40-foot steel ketch, Joshua, for a “fast return to France” by way of Cape Horn. In a burst of inspiration, he bought a round steel washbasin, cut holes in the sides, covered the holes with acrylic “portlights,” then bolted the basin upside down on top of his main hatch, creating what amounted to a ball turret. This turret would give him a 360-degree view from inside the main cabin, keeping him dry and safe from the huge seas of the Southern Ocean. His voyage, which he described in his book Cape Horn, the Logical Route, made him an instant hero with ocean sailors the world over. Since then, the washbasin concept has evolved into a full acrylic bubble turret and, to this day, no self-respecting French cruising yacht puts to sea without one.
The first time we saw a boat so equipped, we laughed, saying it looked more like a spacecraft than a proper sailboat. But our first trans-Atlantic crossing (3,000 miles entirely to windward) caused us to reconsider the idea. We now understood the turret’s appeal. Devising a way to sit a watch high up where we could see everything, while staying warm and dry out of the wind and weather, became a quest.
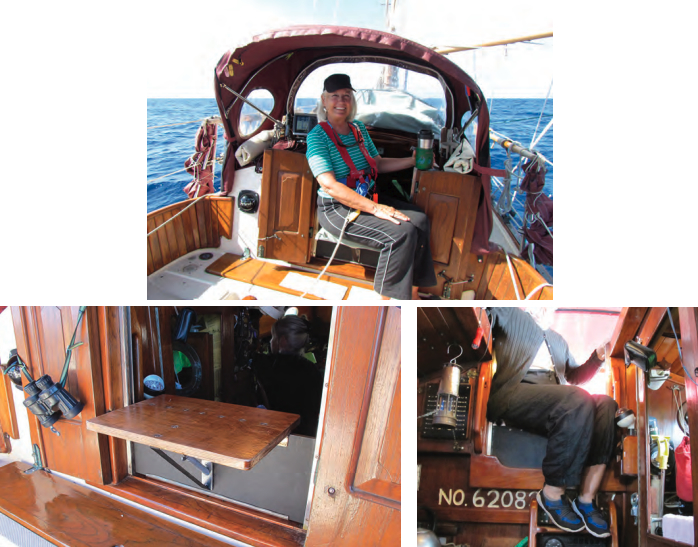
Unfortunately, there seemed no practical way to add a turret to Entr’acte, our Nor’Sea 27, without destroying her classic look and compromising our dinghy storage. The idea went to the back burner. During our 2003 winter in Seville, Spain, however, we met the French yacht Maestro, which was equipped with a full bubble turret. Her owner, Michele, suggested I “try it on for size.” His version employed a simple plywood seat hinged to the companionway sill and supported by two lengths of chain connected to eyebolts on either side of the hatchway — simple and effective. I sat on the seat, looked around, and knew we had to have this.
For days we brainstormed . . . until the light came on.
An extemporized solution
Because of our companionway configuration, Maestro’s simple seat would not work for us . . . but what if we made a seat that slid down into the hatchboard tracks and allowed us to sit upright under the dodger? The seat would have to be secure enough to support an adult body while withstanding the strains it would encounter on a passage. It would also need to be compact and easy to stow when not in use.
The next day, I threw one together with materials I had lying around. It was Jazz! I made it up as I went along. It was easy to construct and turned out far better than I dreamed. The Maestro seat was born! The original version — made from two pieces of plywood — served us for thousands of miles and we came to rely heavily upon it.
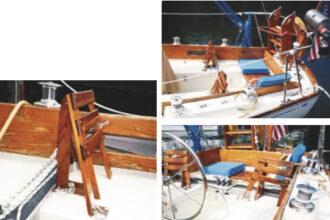
The seat is simply two pieces of plywood hinged together. The main support piece is cut to the width of the hatchboard tracks and slides inside the tracks to sit securely on top of the companionway sill. This piece will support Ellen’s or my entire body weight. The seat itself is mostly on the cockpit side of the support piece and hinged to it for easy stowage. The support slides easily down the hatch tracks and the seat is ready for use in seconds. The challenge was to make the seat solid and safe.
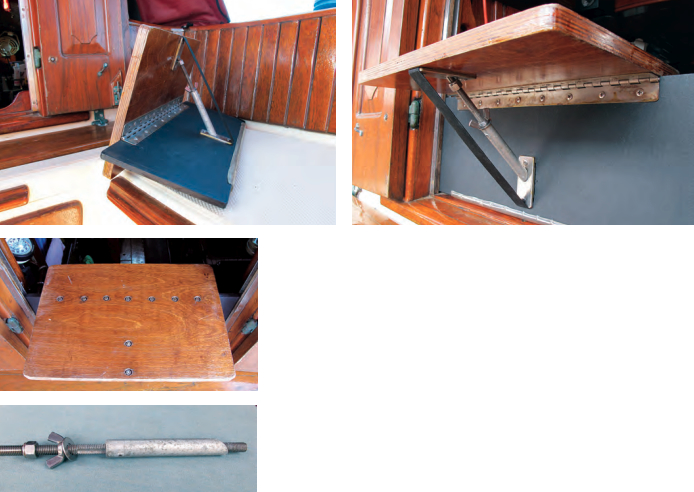
To make the seat one rigid, stable unit, I employed a “support rod” combined with a “limiter strap.” This is the heart of the system and its only complexity. It consists of a piece of 3⁄8-inch stainless-steel threaded rod with a Nylock nut screwed to one end to serve as a stopper, a short piece of aluminum tubing with one end cut at a 45-degree angle to serve as a “compression tube,” a washer, and a wingnut. The support rod slides through the compression tube and fits into two openings, one in the support piece and the other in the seat. The rod sets the seat into a comfortable position and prevents it from collapsing aft.
The limiter strap prevents the seat from folding forward and losing the support rod. This strap is a length of 3⁄4-inch nylon webbing. One end is attached to the seat and the other end to the support piece. Both ends are through-bolted. Once the rod is in place, screwing the wingnut against the compression tube pushes the seat into position and puts tension on the limiter strap, which is set to become taut just as the seat reaches the perpendicular. The strap has to be tight when the seat is in use, so I made it a little short to allow for stretch.
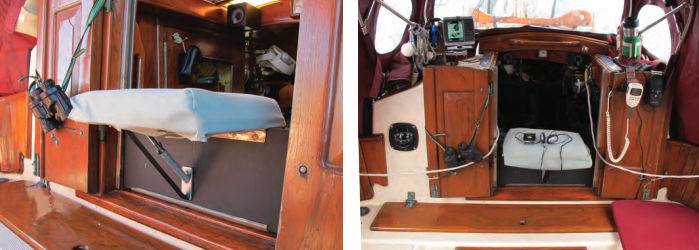
To use the seat, I install the rod and screw the wingnut against the compression tube until the strap is tight, making the seat one rigid unit. I then slide it into the hatch tracks.
To stow the seat, I simply unscrew the wingnut and remove the rod. The seat will fall flat and remain out of the way in the hatchboard tracks, or I can slide it out and stow it as a handy backrest in the cockpit.
I constructed the supporting hatchboard from 1⁄2-inch scrap plywood and the seat from 1-inch mahogany plywood and connected them with a stainless-steel piano hinge. The original plywood support eventually delaminated. We replaced it with 1⁄2-inch StarBoard, but retained the 1-inch plywood for the seat.
Design for comfort
Make the seat wide enough athwartships that you can sit on it comfortably for long periods of time. At the same time, you don’t want the finished seat to interfere with your use of the companionway ladder. You will also want to stand on the ladder periodically and stretch. If the seat extends too far over the ladder it will be in the way.
So the seat stows conveniently when not in use, you will want to assemble it so it folds flat. I accomplished that by joining the seat to the support with a piano hinge, and I found the right position for the hinge from trial and error with a mock-up by “sitting” on it, placing my feet on the top step of the ladder, and standing up or stepping down as if to go below. In my case, the best position for the seat was with one fourth of it extending forward of the supporting hatchboard.
For quick-release stowage, the fore-and-aft measurement of the seat and the height of the supporting hatchboard should be such that, when you remove the support rod, the seat folds down perfectly flat against the hatchboard.
Construction
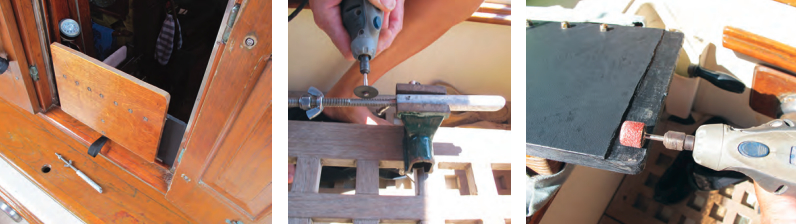
When determining the thickness of the supporting hatchboard, bear in mind that the seat will be subjected to a surprising amount of torque as your body moves around in a seaway, so your personal body weight and the width of the hatchboard are factors along with the size of your hatchboard track. At a minimum, the support board should be 1⁄2 inch thick, but thicker is better. A close fit in the hatchboard channel is desirable so the board will slip easily into it without binding but not be a sloppy fit — if the seat wobbles, you’ll become exhausted trying to sit still. If you use a board that’s thicker than the hatchboard channel, shave the edges to the proper thickness with a router or Dremel tool.
If you make the seat of 1-inch-thick material, that will allow you fasten the hinge with through-bolts, which I recommend, and to countersink and recess the nuts.
Make a cardboard mock-up of the seat and its supporting hatchboard. Check that it meets your requirements before you cut any wood.
Before attaching the seat to the supporting hatchboard, think about which side the hinge should be so your weight on the seat is in the direction of closing the hinge and not opening it more. Center the piano hinge on the hatchboard support and through-bolt it in place.
Attach the hinge to the seat with through-bolts and countersink the seat to recess the nuts. I cannot overstate the importance of through-bolting everything. This seat will endure a surprising amount of torque when under way. Screws will pull out in a very short time and that could lead to a nasty fall.
With the Dremel tool and a cutoff wheel, remove any bolt threads that extend from the nuts. You want the entire seat to be as smooth as possible with no protrusions to compromise your comfort or safety or to interfere with ease of stowage.
I was tempted to use acorn nuts because they would look nice and finished, but the Nylocks are more permanent.
Support system
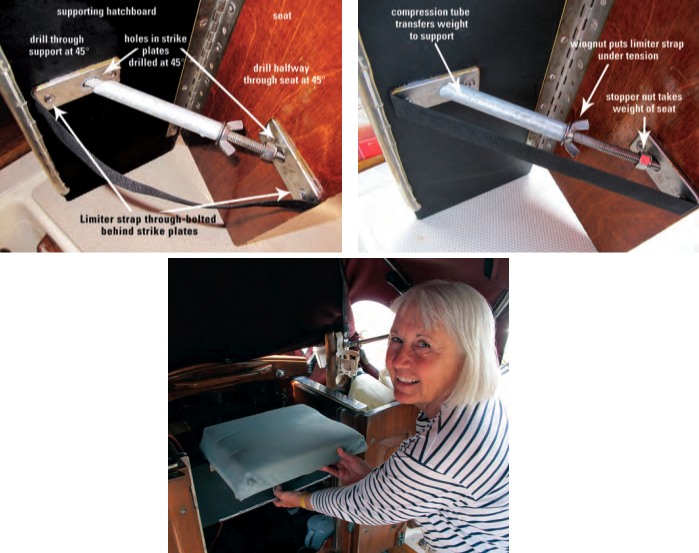
The support system consists of a support rod, compression tube, limiter strap, and two strike plates. They perform as a unit.
The support rod makes the seat rigid and supports your weight as the boat moves around in a seaway. The limiter strap prevents the rod from falling out as your weight shifts. A wingnut against the compression tube maintains tension on the limiter strap. The strike plates provide a solid metal-to-metal surface against the compression tube at one end and a stopper nut at the other. They also serve as chafe protection where the compression tube and support rod come in contact with the seat and hatchboard.
I made the compression tube “captive” so it would not fall off the rod and get lost every time it was stowed. I used a Dremel tool with cutoff wheels to grind a 2 1⁄2-inch-long channel into the rod. I then drilled and tapped a small hole in the compression tube and installed a 10 x 24 stainless-steel Allen setscrew with a dab of red Loctite for security. The Allen screw slides inside the channel and stops when it reaches either end of the channel, thus preventing the tube from falling off the rod. The rod, tube, wingnut, washer, and stopper nut become one permanent unit — I have only one piece to find when I want to use the seat.
For strength, I made the the support rod from 3⁄8 -inch stainless-steel threaded rod. Any metal tubing will do for the compression tube as long as it fits over the 3⁄8-inch rod, but a thicker-wall tube will better accept the setscrew that holds the tube captive.
The most difficult part of this entire project is machining the groove for the compression tube setscrew. With the aid of a small vice, a steady hand, and a little patience, I achieved an acceptable result with the Dremel tool. Safety glasses are a must for this operation.
Strike plates
My original strike plates were simply stainless-steel fender washers drilled out on an angle to accept each end of the rod and screwed permanently in place. I replaced them with 1 1⁄2-inch lengths of 1 x 1⁄8-inch stainless-steel bar stock. Mortising out the support and seat to receive the strike plates will prevent the plates from drifting under your weight. I also recommend through-bolting the strikeplates.
For maximum strength and efficiency, position the strike plates so the support rod meets both the seat and hatchboard at a 45-degree angle. Drill the holes in the strikeplates that receive the support rod at a 45-degree angle and a bit over-sized to allow for easy assembly. The hole in the seat should not go all the way through the seat. The hole in the support piece must be drilled all the way through to facilitate mounting the support rod.
Limiter strap
Without the limiter strap, the support rod will fall out every time you shift your weight. Worse, the seat will move beyond the limits of its attachments and something will break in short order. The limiter must always be under tension to perform properly, so set the strap to come up short just before the seat reaches 90 degrees. Allow for some stretch in the webbing as the wingnut pushes the compression tube along the rod. You might have to experiment a bit to get the length just right.
Secure the ends of the strap under the strike plates and through-bolt them into place along with the plates.
Final touches
Slice a length of soft clear-plastic water hose and mount it to the bottom of the supporting hatchboard to protect the wood and silence any squeaks. To secure the hose, drill a few small holes through the hose and the board and fasten the hose in place with a needle and waxed sail twine. Slide the seat into the channel and cut off any excess support rod that protrudes inside the cabin.
As a finishing touch, since you’ll spend a lot of time on this seat, make it more comfortable by adding a cushion made of closed-cell foam with a laced-on cover. A really cheap source of closed-cell foam is a garden kneeler you can find in almost any hardware store.
Once you have everything assembled, insert the rod, spin out the wingnut and slide the seat into the tracks. Grab some coffee and cookies and enjoy your watch. Don’t forget the MP3 player!
Ahead of the game
There is an old adage about hatchboards: when the first reef goes in, so does the first hatchboard. Most of us tend to neglect that until we take the first bucketful of water below. Normally, the hatchboard is in the way, but with this system we’re ahead of the game. The first hatchboard is always in the right place at the right time and in a much more useable way.
This has saved us on many occasions. We might not be able to fit an acrylic bubble, but we now have what amounts to the same thing, and perhaps better. It is a favorite piece of our offshore cruising equipment, second only to the windvane steering gear. Ellen recently remarked that of all my additions to Entr’acte over the years, the Maestro seat has been the most useful.
The watch enjoys a 360-degree view and remains warm and dry in any winds from a beat to a beam reach. Rain? Who cares?
What happens when the wind goes astern? That is the next step. We do have a solution for that eventuality that we call our Bubble of Comfort.
Ed Zacko the drummer met violinist Ellen while playing in the orchestra of a Broadway musical. They built their Nor’Sea 27, Entr’acte, from a bare hull and since 1980 have sailed thousands of miles on both sides of the Atlantic and in the Pacific. After shipping Entr’acte from Noumea to France, they are in Seville. Follow their voyage at www.enezacko.com.
Thank you to Sailrite Enterprises, Inc., for providing free access to back issues of Good Old Boat through intellectual property rights. Sailrite.com