Rail pads add a little plush to the catbird seats
Issue 89 : Mar/Apr 2013
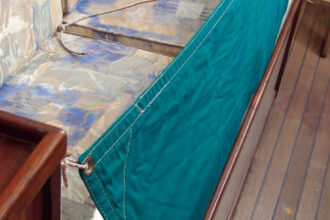
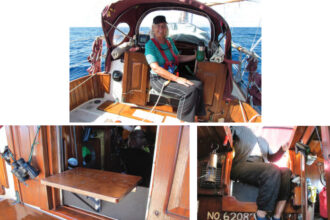
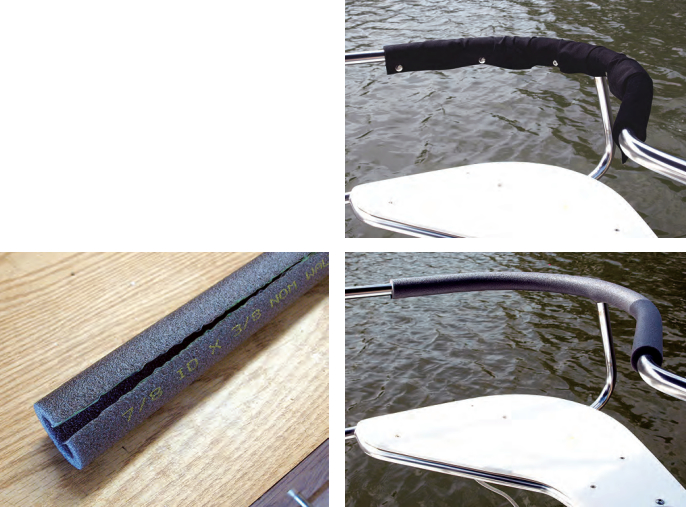
After I made an extension rod for my boat’s wheel so I could steer from the cockpit catbird seats (see “Steering Wheel Extension,” page 42), I found that the pulpit rail did not make a comfortable backrest for any length of time. That prompted me to put padding on the rails, a simple project that cost a total of $24.
I started by covering the rails with foam insulation made for water pipes. The insulation is split, with self-adhesive glue on both sides of the split. Once it’s in place and the tape covering the glue is removed, the insulation is seamless. I put the seam on the underside, just in case water gets in and needs to drain out.
The insulation comes in a variety of sizes. Six feet of insulation for 7⁄8-inch OD pipe ($1.50) fit my boat’s rails precisely. The insulation alone would work fine, but the sun would quickly destroy it. So I made canvas covers.
After I’d picked a dark blue canvas at a local marine surplus store, the clerk asked if the fabric would be exposed to the sun.
“Let me show you what the sun will do to it,” he said, bringing two samples from under the counter. One was a beautiful dark blue. The other was purple. “The purple one,” he said, “was this same blue material before it spent three months in the sun.” That demonstration convinced me and I selected another fabric made to withstand sun exposure. I bought two feet of 60-inch-wide canvas for $10.
To fasten the canvas over the foam insulation, I used six snaps on each cover ($12). The snaps are available at most hardware stores. They come in a kit that includes a flaring tool you hit with a hammer to fasten the snap and socket to the canvas.
Making the covers
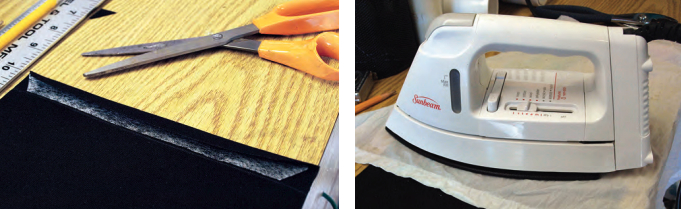
Start by draping a tape measure over the insulation to see what size fabric you need for each cover, allowing at least 1 1⁄2 inches on each side for a hem and the snaps. To make sure the pads will be completely covered, cut the fabric about 2 inches longer than the pads.
Cut your strip of fabric, then lay it on a workbench and fold in 3⁄4 inch on all four sides to make the hems. A hot iron will stabilize the fold. The hems will prevent fraying and give you a strong double layer of fabric to support the snaps. You don’t need to be handy with a sewing machine to do this project — I used iron-on fabric-mending tape to glue the hems.
Lay the fabric mending tape inside each edge and press it with a hot iron. The brand of tape I used requires a damp cloth to be placed over the hem while you heat it for 15 seconds. Read the instructions carefully. Some brands may not need the steam from the damp cloth to melt the mending tape.
Once the hems are done, mark where you want the snaps and hammer them in place. If they’re difficult to close at first, apply some petroleum jelly with a cotton swab to each socket and then force the snap closed with pliers or a light tap with a hammer. Once they’ve been snapped and unsnapped a couple of times, they’re easier to close with your fingers.
Clarence Jones is a writer, news media consultant, photographer, sailor, tinkerer, and inventor. He and his wife, Ellen, live, work on, and sail their Catalina 28 from Anna Maria Island in the mouth of Tampa Bay. Clarence recently published his ebook, Sailboat Projects, in which he describes inexpensive ways he has enhanced his boats and his sailing enjoyment.
Thank you to Sailrite Enterprises, Inc., for providing free access to back issues of Good Old Boat through intellectual property rights. Sailrite.com