Out with the old . . . er, not so fast!
Issue 104 : Sept/Oct 2015
Why was there water in my normally dry bilge? Rain, I suspected. I checked all the hose clamps on the deck drains and the portholes, the stanchions, and the chainplates. Nothing was awry. So where was this small amount of non-salty water coming from?
My clues were that it was wet just about all the time and no more than a very narrow band was wet at any time. It couln’t have been rain; even after several dry days and nights the wet trail remained. Was there a leak in the boat’s pressure water system? There are no plumbing fixtures forward of the beam, yet the stain ran aft from forward of the beam. Wait! That’s where the two freshwater tanks are!
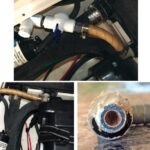
I pulled out drawers and lifted covers to inspect the tank. I saw no sign of leaks at fittings or the gauge and no punctures on the tank top. Peeking through the opening where I’d removed a drawer gave me a limited and inconclusive view of the tank front. But the tank was clearly the culprit, based on the slim silvery stream flowing through the weep hole in the bulkhead. I use the word “stream,” but it was not visibly flowing . . . more like a snail’s mucous trail marking the path from the tank to the bilge.
My boat is a 1997 Packet Cat 35 built by Island Packet. The tanks, 70 gallons each, are custom-fabricated aluminum with welded seams and holding brackets. The tanks lie beneath the forward berths, one in each of the Packet Cat’s hulls. A quick check of the port hull showed no “snail trail” in the bilge, so I confined the project to the starboard side.
Seeking a cause
Some likely causes for a leak in an aluminum tank are a stress failure in a weld, metal fatigue, or corrosion. Or, if the tank is loosely fitted, vibration could cause abrasion of the tank wall. The small amount of water I observed in my boat was not from a ruptured or punctured tank. It was more likely a result of abrasion or corrosion. But where and how did it happen?
Abrasion was unlikely, as when I unbolted the tank and attempted to remove it for inspection, it wouldn’t budge. It was held solidly in place with no evidence of looseness to allow chafing or wear.
That left corrosion or metal fatigue. Metal fatigue was not evident in the sides of the tank or top. Nothing looked like it had failed.
Chlorine attack on aluminum is well documented. A web search on the subject revealed that even the level of chlorine in city water can spell trouble for metal tanks. I’ve seen chlorine removal filters on dockside water supplies and have read cautions about using bleach to sanitize drinking water in tanks for fear that sodium chloride deposits will plug filters and screens in the boat’s water lines. Can chlorine truly etch its way through the wall thickness to cause a leak?
Digging deeper
Following this deductive path — fresh water in the bilge, no visible damage to the tank, and the unanswered questions associated with a leaking tank — I decided to remove the tank for a closer inspection.
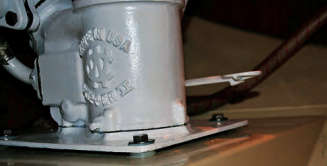
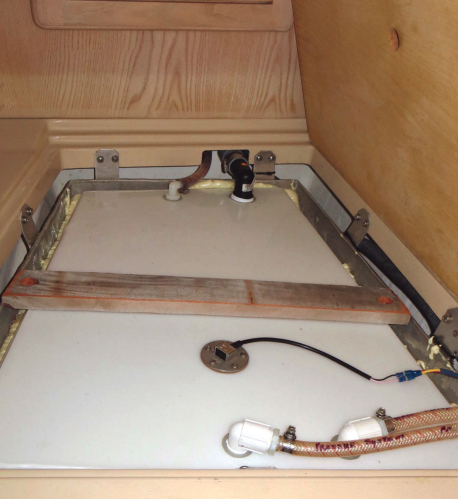
As mentioned earlier, the tank’s installation was first-rate. Nine 2-inch-wide tabs welded to the tank are fastened to the surrounding berth flat. Furthermore, the base of the tank is contoured to the hull shape and sits on solid fiberglass. After removing the screws, I expected to be able to lift the tank out of its hole. But it would not move. I later found out from the factory that the tanks are bedded in polyester-based putty that is strong and very adhesive. It was still holding very well.
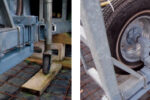
No amount of persuasion on my part would move the tank. I considered options like trying to get a lifting strap around the tank and using a come-along rigged to a beam laid across the deck above and through an overhead hatch. That should do it. However there was no way to get the strap around the bottom of the tank. Then I tried a variety of “persuaders” or pry bars to apply pressure from the side. Still no luck. It became evident that continuing along this path would only result in a damaged tank or hull. I wanted to salvage the tank and repair the leak, not destroy it during removal.
After some consideration, I devised an inspection plan. I would cut holes in the tank top and find the leak. Then after inspection and repair, I could close the access holes with deck plates like the Beckson BEC-DP40B4 that have a gasket-fitted base with a screw-in inspection cover. Or I could use aluminum plates cut larger than the hole and screwed to the tank with gaskets between them.
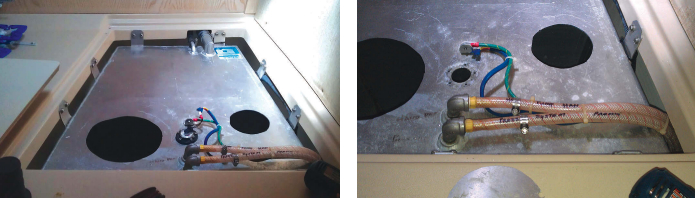
I marked out my spot, drilled a pilot hole for my saber saw blade, and cut into the tank. The first thing I noticed was the thickness of the tank material. It was fully 3⁄16 inch. The saw buzzed and the cutout dropped into the tank with a thunk.
Even with the inspection hole cut, I couldn’t see much due to the baffled chambers. Looking at the walls and corners that I could see, I noticed a collection of yellowish-brown sludge in a bottom corner and along the welds, but not much else. The welded seams on the tank’s outer skin and along the center baffle were smooth and solid. I saw no evidence of a leak site.
Because the baffles divided the tank into four sections, I could not see anything in the other three sections. I cut another access hole and, upon getting the same results, decided I needed another approach. I began to think of replacing the tank.

Replacement options
I contacted Island Packet and they provided drawings of the tank. The fabrication company, Ezell, replied to my call as well. It’s always good to receive support from the original equipment makers. Their suggested solution was to replace in kind. Other options were standardized prefabricated tanks made of plastic or polypropylene, a wood-framed fiberglass-lined tank, or a rubberized bladder. After sifting through these options while considering serviceability, installation issues, and price, I chose to use a custom-fabricated
polypropylene tank.
The concerns of service-ability are threefold. First, I didn’t want to replace this tank again, so it would not be made of aluminum. Second was the question of keeping weight in a catamaran balanced. Third was the goal of maintaining the cruising range. I needed a tank that would have a capacity close to that of the original and be secure in the same position in the vessel.
There was also the installation issue involving access in the starboard stateroom. Armed with the factory’s drawing, I could see that the tank would not fit through the stateroom doorway. I suspect the tanks were installed before the deck was joined to the hull. This meant the old tank would have to be cut up for removal and the new tank would have to be smaller than the original. An in-kind replacement was not going to work.
Another consideration was the cost of each option. Custom fabrications from either material would be about the same, around $900. While standard prefabricated plastic tanks or conformable bladders cost much less, they miss the mark in serviceability. They can be installed easily, but in my case would require re-plumbing and weight balancing, thus adding to the lower initial cost.
Weighing my options and requirements, I chose custom fabrication from the poly material. Using the Internet, I located Dura-Weld, a tank fabricator in Lake Worth, Florida, with an impressive résumé. It builds tanks for a local utility company, for use in architectural applications, and has an excellent reputation in the marine market for tank design and construction. The owner of the company took my call and we discussed my project. I provided a copy of the factory tank drawing for reference and we continued the conversation the following day.
The plan
My plan called for reducing the size of the original tank by 1⁄2 inch on all outside dimensions. This would allow me to get the tank into the stateroom and install it inside the existing tank. More on this later.
Dura-Weld recommended an internally baffled design fabricated from polypropylene with the best weldability and strength. The material is USDA-approved for water tanks. He also suggested a wall thickness of 3⁄8 inch for added durability.
The plan was to construct a tank with the new reduced dimensions, with fittings placed to match the original setup, and a new tank-level indicator from Wema USA (model #SSS flange-mount style with a 23-inch-long shaft). The completed tank would have the original capacity minus a small percentage due to the reduction in overall size. I placed the order.
I went aboard to prepare for the new tank. Unfortunately, the existing tank was still firmly in place — apparently the sea gremlins had not deigned to remove it while I had been working on the tank order. I started by removing the entire top of the tank. This was not a straightforward process of simply cutting the material. Some tight corners required hand sawing because electric tools would not fit into the cramped confines and because the baffles were welded to the tank top and the side walls. It took some fancy saw work, but finally the top and baffles were all removed. I could now see where the leaks were located.
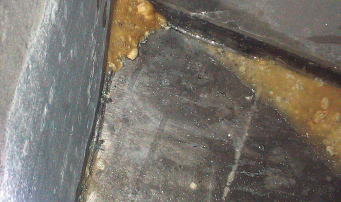
The sludge I had seen through my earlier inspection holes was drying out and turning into a white powder. It was noticeable along the welded seams of the tank and, when swept away, revealed where the leaks were. The welds had been attacked by chlorine, leaving them porous and weeping water.
My next step was to prepare the inside of the tank so I could insert the new tank. Using a cold chisel and hammer, I removed all the raised weld material from the internal baffle sites. I also drilled several drain holes in the tank so no water could accumulate in the liner.
The hitch
The new tank was ready for pickup. I got to see the shop, meet the owner, and collect a few pieces of tank material to use during the installation. When I got to our boat, I proudly carried the tank aboard and came to an abrupt halt. The new smaller tank would not fit through the companionway to the starboard stateroom. I rotated, angled, and swung it in every direction, but no-go. It didn’t miss by much but it would not pass through the opening. After contemplating my options, I removed a 3⁄4-inch piece of molding from one side of the companionway and, as I held my breath, the new tank slid through the opening and into the stateroom.
I lowered the new tank into the old tank which, with just five of the previous six sides, made the perfect perch for the replacement. All the hose fittings and the gauge wiring were correctly aligned, so I set out to complete the installation.
Using some lengths of the tank material, I placed four equally spaced strips on the bottom of the old tank. I then laid a heavy bead of expanding urea foam between each of the spacer strips, quickly lowered the new tank into the expanding foam, and held it down as the foam filled the voids under the tank. The next day, I injected the foam around the remaining sides of the tank, adding 3- to 4-inch-deep layers at a time and letting it expand before applying more foam. The cured and finished foam provides a rigid but conformable packing on five of the tank’s sides.
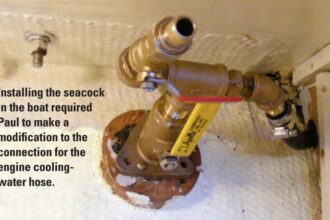
To hold the tank down, I devised a crossbar made from red cedar and attached it to the sides of the old tank with self-tapping screws. I then made up the hose connections, connected the new float gauge, and added water.
In summary, my old tank had exhibited a slow, weeping type of leak. Traditional repair methods were unlikely to solve the problem because the site or sites of the leak were hidden. Wanting to keep the capacity and functionality of the original Island Packet design, I had a new, slightly smaller tank made from a lifetime material that would not be subject to chlorine attack, and I used the old tank’s rigid attachments and well-bonded structure as a holding tank for my new tank.
Alan Wilson began boating in childhood in wooden-hulled skiffs and lobster boats on the New England Coast. He holds a U.S. Coast Guard Vessel Master’s Rating for Steam, Motor, and Auxiliary Sail. As a freelance writer, he has had several articles published on navigation and boat maintenance. He enjoys boating on Biscayne Bay, the Florida Keys, and the Bahamas.
Thank you to Sailrite Enterprises, Inc., for providing free access to back issues of Good Old Boat through intellectual property rights. Sailrite.com