Tame an unruly gennaker with a homemade snuffer
Issue 117: Nov/Dec 2017
Aboard Smooth Moves, our Hughes 26, we do most of our cruising up and down the Strait of Georgia during the warm summer months. Whenever we encountered a period of light wind, we would be torn between loafing along at one or two knots or getting ambitious and raising the gennaker. Too often, we settled on the former. Deploying and retrieving the colored sail required more effort than we were sometimes willing to commit to. We knew that the sail liked to twist and billow unexpectedly, and sometimes it would slip overboard.
One afternoon, the idea of using a snuffer sock wafted over us. Upon returning to port we investigated, and quickly discovered that a sock for our modest 26-foot vessel would cost more than a few hundred dollars.
At the same time, we set out to learn about snuffers: how they work and what it would take to make one. As it turns out, the principle of the system is quite simple, and so are the needed components. The part of making it that requires the most skill is sewing a long fabric tube. Arlie was up to that task; the rest we fumbled through together. It has changed our lives — on light-wind days at least.
Since making the snuffer, we don’t hesitate to bring out the gennaker — the sock has made storing it and using it that much easier and more enjoyable. We recommend this piece of equipment as an inexpensive addition to any good old boat with a similar sail. The most expensive items were the sock fabric ($50) and 65 feet of 3/8-inch line ($25). Most of the hardware items are probably in your spare-parts box. The plastic collar is made from a durable pail that can be purchased in many hardware stores; ours cost $3.
Snuffer in a nutshell
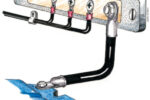
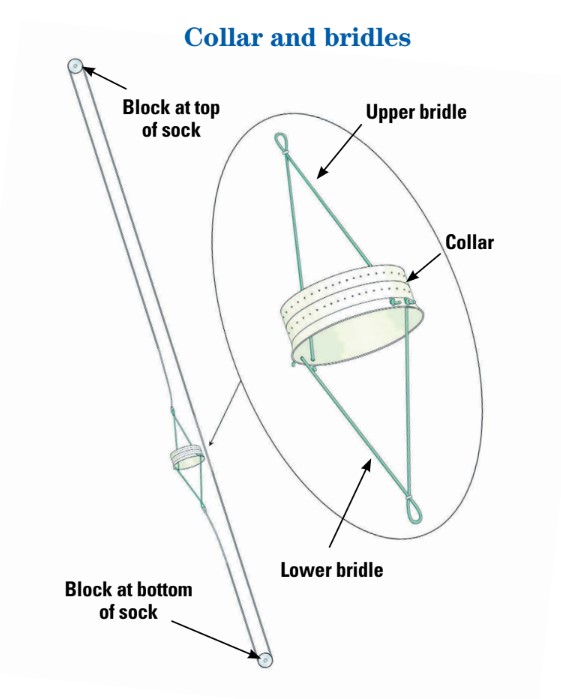
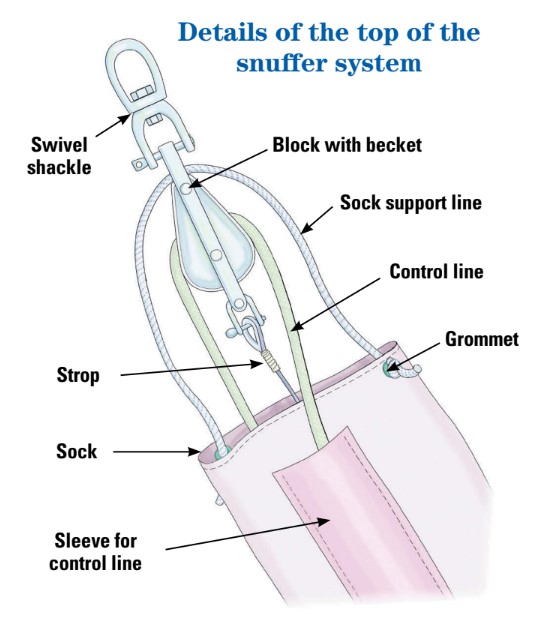
A key component of a snuffer is a plastic collar that’s connected to both ends of a long continuous line that passes through a block at the top of the mast and another at deck level . . . think of a vertically oriented clothesline. As you pull on one side of the line, the collar rises. Pull on the other side and the collar comes down, like a pair of pants moving back and forth on a clothesline. Now, connect a long cloth tube, or sock, to the top of the mast, let it hang down, and attach the collar to the bottom of the sock. As you pull the collar up, it pushes the sock up ahead of it. Pull the collar down, and the sock follows it down. Finally, hang a sail inside the sock. Raising the sock will expose the sail; lowering it will cover the sail, snuffing it in the process.
Making the collar
When making a snuffer, it’s best to make the collar first. You can then make the sock to fit snugly over it.
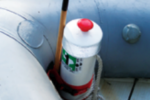
For the collar, look for a pail with reinforcing ridges near the top. First, though, you need to determine what size of pail to use. Lay out the gennaker on the floor, bunched together as it would be inside the sock. Using a piece of wire or something similar, make a hoop through which you can pull the sail easily. You want the sail to be as compact as possible, but it must not snag or bunch up in the hoop. A 10-inch diameter collar works well for our 32-foot-long gennaker that we use on our 26-foot boat. Pails are available in larger and smaller diameters.
Cut the top 5 inches from the pail and sand the edge smooth. Bore two 1/4-inch holes exactly opposite each other and 1/2 to 1 inch below the lip of the collar. To make a bridle, take a 3-foot length of 1/4-inch line, pass its ends through the holes, and tie knots to keep the line in place. The knots should be on the outside of the collar.
Shifting two inches sideways from these holes, drill two more holes opposite each other. Tie another bridle similar to the first. When the bridles are pulled in opposite directions, the collar should be suspended between them.
Later, the sock will be sewn onto the collar. To facilitate this, bore two rows, 1 to 2 inches apart, of 1/16-inch holes around the perimeter of the collar. Space the holes in the rows about 2 inches apart. Keep the top row away from the 1/4-inch bridle holes so the bridles won’t interfere with the snug fit of the sock.
Sizing up the sock
To determine the length of the snuffer, measure the length of the gennaker and then subtract 4 feet. This will leave the tack and clew exposed outside the sock collar so they can be attached to the boat before the sock is raised. We sewed a sleeve onto the outside of the sock to contain the control line and prevent tangles. We made the sleeve a different color from the sock so we are able to see if the sock is becoming twisted while it’s being hoisted. The finished circumference of our sock is about 28 inches. (See “Sewing the sock,” below, for instructions on how to make the sock.)
Joining the sock and collar
It helps to detach the bridle lines from the collar while attaching the sock so they won’t get in the way. Pull the stretchy transition strip over the collar until it covers the farthest row of holes and a bit more. It might be helpful to hold it in place with tape or an elastic band. I used a large needle and sail-repair thread to stitch the cloth to the collar, but any good thread will do. Use a simple in-and-out stitch all around the perimeter. I went around a second time on each row. When done, reinstall the bridle lines.
Assembling the snuffer
Lay out the completed sock, on a flat surface if possible. You will need a block with a becket and a swivel shackle for the halyard. Attach a short strop to the becket. I used a 10-inch length of 1/8-inch stainless-steel wire. Line will do, but it must be strong enough to support the sail when it’s set and drawing. The strop allows the stiff head of the sail to hang below the mechanism and not interfere with it.
Pass a 24-inch length of 1/4-inch line through the hole above the sheave and tie the ends into the grommets at the top of the sock. As you haul on the halyard, the lanyard pulls up the sail, and the short line pulls up the sock — everything goes up as a unit.
At the opposite end of the sock, you will need a single block with some type of shackle attached so that you can easily clip it to the toerail or some other attachment point.
Finally, you need a control line. It should be twice the length of the gennaker plus a few extra feet to ensure you don’t end up short. I used 3/8-inch line, not because it needs to be that strong, but anything lighter is not kind on the hands.
Tie one end of the control line to the center of the bridle that will pull the collar up. Pass this bridle through the collar and into the sock, taking the control line with it. Push the control line right through the sock to the top end. Pass the end of the control line through the block, and feed it through the sleeve on the outside of the sock and out the bottom end. Pass the end of the line through the bottom block and tie it off to the center of the other bridle. The bottom block should be as far from the collar as the clew and tack of the sail or it will not reach the deck when the sail is hoisted. Do not cut the control line to length at this point, because you won’t know exactly how long it needs to be until you’ve used the sail.
With the snuffer now complete, pass the top of the sail through the collar, pull it all the way through the sock, and attach it to the strop hanging from the top block.
Setting the sail
Attach the gennaker halyard to the swivel at the top of the sock. Hauling on the halyard will raise the block; the sail, which is attached to the lanyard; and the top of the sock, which is supported by the short line held by the two grommets. Haul the block to the top of the mast. Because you made the sock shorter than the sail, the plastic collar will be suspended above the deck with the tack and clew showing.
Attach the tack to the bow. The bottom block and control line should just reach the deck. Clip the block to the toerail or any other convenient attachment point. (The length of the control line might need adjusting, which is why it’s best to start with it a little longer than necessary.) Attach the sheets to the sail.
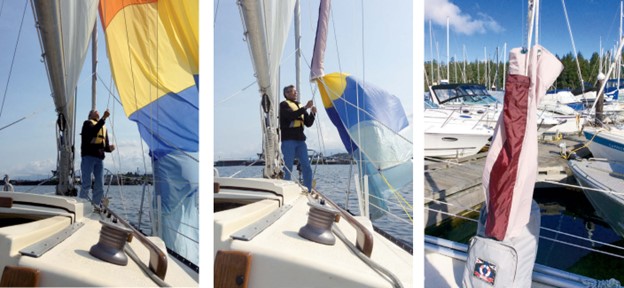
Pull on the control line where it exits the sleeve. The plastic collar will rise up the sail, pushing the sock ahead of it. As with any new equipment, minor adjustments may be required. If the sock does not rise smoothly, try to determine what the problem is rather than pulling too forcefully. If all goes well, the collar will clear the top of the sail, freeing your gennaker to the breeze. Trim the sheet and off you go.
Dousing the sail
Free the tack and slack the sheet. As you pull on the control line that’s attached to the bottom end of the collar, the collar and sock will come down, encapsulating the sail.
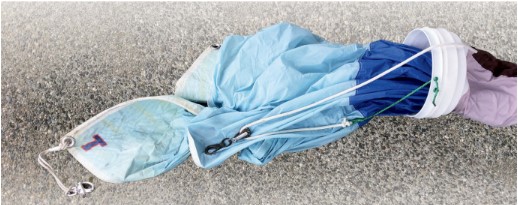
A good way to stow the sail is in a sturdy bag that stays open. Clip the bag to the lifeline or to an eye near the mast. Tuck the clew, tack, and collar into the bag and, as you ease the halyard, lower the sail and sock into the bag. Lay the hardware on top of the sail in the bag so it’s ready to go next time you want to sail your boat in a light wind.
Material and parts
For the sock
- 5 yards of 60-inch nylon fabric (or other light, strong fabric that dries easily)
- 3 1/2 yards of 60-inch nylon fabric of a second color
- 5 x 30-inch piece of stretch-knit fabric
- 4 x 30-inch piece of iron-on fabric stiffener
- 2 rust-proof grommets to receive 1⁄4-inch line
For everything else
- Pail for the collar
- 3/8-inch line, 2x length of sock plus several feet
- 1/4-inch line, about 10 feet
- Single block
- Snapshackle or similar
- Single block with becket
- Swivel shackle
- 1/8-inch stainless-steel wire cable (or line of similar srength), 10 inches
Sewing the sock — Arlie Clegg
For a 28-foot sock to cover our 32-foot gennaker, we used the materials listed under “Material and Parts” on the facing page. The dimensions for the fabric depend on the size of the sail and the diameter of the collar to which the sock will be attached.
Cut the 5-yard length of nylon in half lengthwise to make two lengths 30 inches wide.
Sew the two lengths together at the short ends.
Finish all the raw seam edges to prevent them from fraying. I used a modified flat fell seam, but a zigzag stitch, seam-binding tape, or a serged seam would serve the purpose.
Iron the 4-inch strip of fabric stiffener onto the top of the long strip. Fold over the stiffened fabric and hem the top edge.
Assemble the control-line sleeve by cutting the 3 1/2-yard piece of 60-inch-wide nylon (second color) into 7-inch-wide strips along the length of the fabric. Sew enough of these strips together end to end to make a long strip about 6 inches shorter than the main tube strip. Hem the top and bottom of this long sleeve strip.
With an iron, press under the long raw edges of the control-line sleeve.
Pin the sleeve onto the center of the main tube strip so it is 3 inches short of the top and bottom edges of the main tube strip.
Sew the sleeve in place.
Sew the two long edges of the main sock together. (I kept the control-line sleeve on the outside as I sewed so that the tidiest side of the seam was inside the tube.)
Finish the outside raw seam edge.
Attach the two grommets about 1 inch below the top edge of the tube and 180 degrees apart. The grommets will be used to hold a short line connecting the sock to the top pulley assembly.
Cut the 4 x 30-inch strip of stretch-knit fabric that will be used as a transition band between the sock tube and the collar.
Sew the two short ends of the fabric together to make a short tube.
Sew the short knit tube onto the bottom of the main sock tube and finish the raw edges. The stretchy knit allows for a little discrepancy between the circumferences of the sock and the collar — it can be difficult to manufacture a perfect match.
The sock is now ready to be attached to the collar.
Paul and Arlie Clegg sailed their Hughes 26 on Georgian Bay, Ontario, for several years. In 2003, they moved across the country to Vancouver Island, bringing Smooth Moves with them. They have since been sailing out of their home port of Nanaimo, British Columbia.
Thank you to Sailrite Enterprises, Inc., for providing free access to back issues of Good Old Boat through intellectual property rights. Sailrite.com