Keep those old primaries clicking nicely
Issue 59 : Mar/Apr 2008
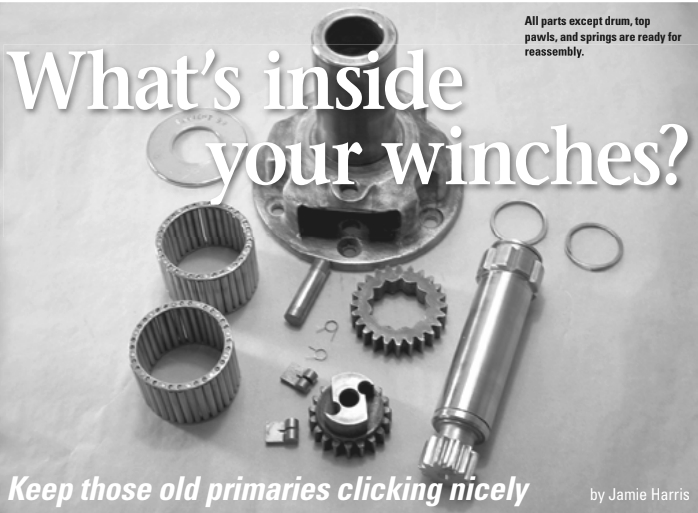
Back in the 1960s and ’70s when many of the good old boats we love were built, Barient winches were considered the gold standard for primary sheet winches. Bold chrome-plated bronze drums and heavy-duty top and bottom gears offered owners of Barient-equipped boats a sense of confidence in their sheet handling. The solid reputation of the Barient name was helped by its origins as well as the quality of the gear. Barient was a combination of the names of two of the most famous racing yawls of the 1950s, the beautiful Baruna and graceful Orient. I still remember seeing a stirring photo of these gallant beauties racing neck-and-neck out of the Golden Gate into the Pacific.
In 2006, before I left on a summer cruise to Hawaii in my 1968 Spencer 35, Onrust, I took the drums off my Barient 22 winches to clean and lubricate the top gears and pawls. I sprayed a goodly amount of WD-40 on the bottom gears and left them alone, since taking them out requires removing the winch base from the coaming. (Owners of Lewmar winches will note that Lewmar made a big improvement over Barient on this point — you don’t have to remove the base to clean and repack all the moving parts in the bottom gear set of Lewmar winches.)
I suspect my approach is what most people follow, but eventually the bottom gears need love and attention. In the fall, several months after Onrust was back in her home berth in California, I noticed that the winches were harder to turn. The accumulated salt and grime of two Pacific crossings had taken a toll. It was time to remove the winches and give them a complete servicing, top to bottom. But the Barient Company is no more and there are no parts lists, service instructions, or manuals.
Undaunted, I removed the drums, pulled both winches off the boat, and took them home to inspect and clean. Now restored to Onrust’s cockpit coaming, they turn smoothly as can be. Even though they are decades old, the drums gleam nicely.
What follows is a step-by-step guide. (For clarity, the photos were taken after the winches were cleaned.) The same approach applies to many winches of other manufacturers, even if the detail of the parts is different.
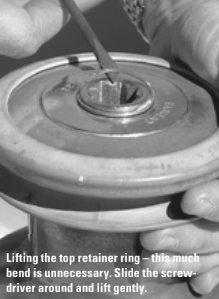
First, carefully remove the retainer ring that circles the top of the spindle and serves to hold the winch drum on the base. Use a small bladed screwdriver to gently pull the end of the retainer ring out of its groove and then push the screwdriver around the spindle between the ring and the spindle body, using a finger from your other hand to prevent the ring from sliding. Don’t pry so hard that you bend or crimp the ring; you’ll need to put it back later. (For clarity in the photo, the ring in the photo is being lifted up higher than necessary.)
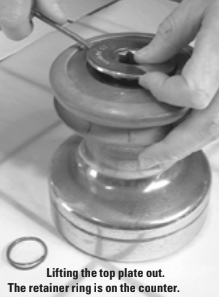
With the retainer ring removed, you can lift the top plate off. You may need to tap one side of it gently with a hammer to raise the opposite edge and then slip the end of a screwdriver under the edge.
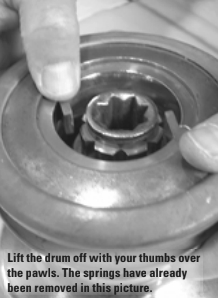
With the top plate removed, you can lift the drum off. There are two pawl-and-spring sets in the top of the drum under the top plate, but don’t worry. If you lift the drum carefully, nothing will spring out. The pawls are held in their traces by the spring pressure, but it is a good idea to hold your thumbs on top of the pawls as you lift the drum off, using both hands to pull straight up. These steps take place on your boat since the heads of the through-deck bolts are under the drum. Be careful to keep the parts together in a container. Avoid the dreaded “plink, plink, splash.”
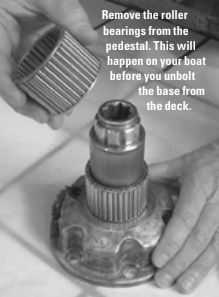
Next, slide the two stacked roller bearings up off the pedestal.
Put all these greasy parts in a box so you don’t lose anything. I’d also suggest taking the pawls and springs out and putting them, along with the retainer rings and top plates, into a small sealable container for small parts. Barient parts are like treasure: hard to find and costly. Now you have left — still bolted to your boat — the winch base containing the spindle and the bottom gears. The spindle is held in place by a second retainer ring at the bottom end, inside the winch base. Get underneath the deck and unbolt the whole thing. When you lift it off, don’t worry; nothing is going to fly out, but nonetheless keep a good grip. Carefully mark the exact alignment of the winch base relative to the bolt holes so you can replace it in exactly the same position; what may appear to be a symmetrical set of holes probably is not. For the same reason, mark individual winches as port and starboard as well.
Take the whole kit and caboodle to a place where you can work on a solid bench or table with good light and power tools and where your significant other will not complain too much about solvent smells.
Cleaning the top pawls and roller gear barrels is just a matter of soaking them in kerosene or other light solvent and giving them a good brushing with an old toothbrush. You can also rub the flat sides of the pawls with a very fine (I used 1,500-grit) emery paper to polish them up and remove the last remnants of baked-on grease. Examine the pawls and springs carefully. If the springs are rusty or if the pawls show chipping, rust pits, or excessive wear on the tooth ends, they should be replaced. Refer to the sidebar for a source. The roller gear barrels are good quality stainless steel and should be in pretty good condition. A good strong metal polish on the outer drums will make them look a lot better and make you feel as if you’ve made progress.
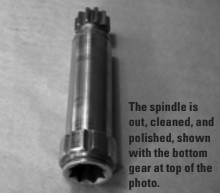
Now you’re ready to take the spindle and bottom gears out of the winch base. The bottom end of the spindle is held in place with a retainer ring just like the one on the top. Before you try to extract it, it’s best to remove the bottom gears. They’re held in place by a stainless-steel pin that is their axle. Drive it out from above. Don’t use a pointed punch tool or screwdriver for this task; you may damage the end of the pin. I used a 3-inch stainless-steel bolt as a driver with gentle taps from a mallet.
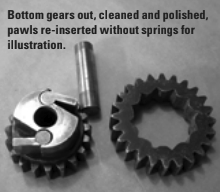
With the pin removed, the two nested bottom gears slide out easily. The smaller one on top has two more pawls in it that engage the inside of the larger gear ring. Remove and inspect. Clean and polish the pawls and springs just as you did the top ones and put them into your small-parts container.
The bottom gears will need buffing and cleaning. I used a stiff wire brush to clean between the teeth where hardened grease and salt had formed a solid cake that wouldn’t yield to the kerosene and toothbrush. (I did the same on the gear teeth at the bottom end of the spindle.) I polished the sides of the gears by rubbing them on the emery paper laid flat on a tabletop. If you do this, use minimal pressure and very fine emery paper so as not to remove any metal or make any change in the clearances; you are merely cleaning.
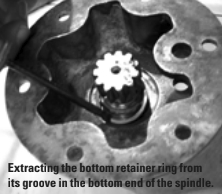
When you have the bottom gears out, you should be able to easily access the retainer ring on the bottom end of the spindle. Extract it as you did the one on top.
I know I’m the only one who will ever see the base, but I like to know that what’s underneath has been cleaned up anyway. I used a rotary wire brush on my power drill (a bench grinder with brass wire brush would have been better) to clean and polish the winch base. Be sure to wear eye protection when doing this work; little bits of the wire brush will fly off. I did this only on the raw metal, not on the machined shaft surface where the roller bearings ride; this surface must be kept free of scratches.
Before reassembling, wash down all parts with lots of hot fresh water and dry them thoroughly. This is to remove all remnants of kerosene and polish before applying new lubricating grease. Reassemble them in reverse order to the teardown, applying a very light coating of top-quality winch lubricant to all gears, the spindle, and inside the shaft. When you reinstall the bottom gears, turn the base over, grease the pin well and drive it up from the bottom. Since doing this job, I have learned that Barient’s literature recommends not lubricating the springs and pawls or the ratchet teeth. However, I believe that a little bit of marine equipment grease on the pawl and spring actually makes it easier to reinstall the pawls and doesn’t seem to interfere with performance. Don’t put a big gob of grease in the pawls, however; they need to flip back and forth across the gear teeth smoothly. A bunch of heavy fresh grease might just immobilize them.
There is a right way and a wrong way to install the pawl springs. One arm of the spring comes off the spring straight in a tangent from the circle, while one is bent pointing into the circle. The straight tangent side of the spring should rest against the inside of the pawl and the bent arm of the spring should rest against the gear body.
When you re-mount the base on your boat, be sure to use new silicon-bronze bolts and nuts; you do not want stainless-steel bolts tight against the bronze winch base. Apply a thin bead of quality bedding compound around each bolt hole, being careful not to let any get into the bottom gears. I also dabbed some caulk under the head of each bolt so the head would be sealed nicely in its hole in the base.
Voilà! Due to this full service, your Barients should provide several more years of smooth grinding.
An afterword on mounting winches: the older-style winches addressed in this article are meant to be installed on a flat surface. Mine are placed on a molded flat-topped winch pedestal built into the cockpit coaming. If your winches are not on a completely flat surface, think about adding a proper winch pad to level it. Also pay attention to drainage from the base when mounting the winch. Water can enter the spindle from above and, unless there is a way for it to get out, it can puddle in the base of the winch. Good quality washers under the base at each mounting bolt will allow the base to drain.
Jamie Harris , a recovering lawyer who is now an organizational consultant, began sailing in high school with an old wooden Snipe on a Michigan pond. In the 1970s he crewed on a Lapworth 36, racing on San Francisco Bay before purchasing a Gary Mull-designed Ranger 26. Next he sailed a Sparkman & Stephens Yankee 30. After being boatless while raising a family, Jamie and his wife, Martha, purchased the 1968 Spencer 35, Onrust, (Dutch for “unrest”) in 2003.
Thank you to Sailrite Enterprises, Inc., for providing free access to back issues of Good Old Boat through intellectual property rights. Sailrite.com