Follow this comprehensive checklist
Issue 59 : Mar/Apr 2008
Do you find yourself adding coolant to your engine more often than the engine manufacturer suggests? Are you having difficulty figuring out where the coolant is going? Often, the reason for a loss of coolant is obvious. You notice a big puddle of fluid in the drip pan and quickly locate a loose hose connection. Other times, identifying the cause for the ongoing loss of coolant is a time-consuming, frustrating, and unsuccessful event.
Losing coolant may just be an inconvenience, but it might be leading to an engine-destroying sequence of events. Until you know what is causing the loss of fluid, you cannot know which scenario you are facing, so it’s important to keep looking for the cause until it is found.
Once the cause of the leak is located, it is usually easily repaired . . granted, not always cheaply, but no matter what the cost, a repair is seldom as costly as replacing the engine.
A word of caution: do not remove a pressure cap from a hot, pressurized engine cooling system. The coolant will spray, often resulting in burns or other injuries.
If the loss of coolant occurs following the draining of the cooling system and subsequent replacement of the coolant, the cause may be nothing more than that the system is accepting more coolant as the air is purged from it. Once you are sure that all air has been removed from the system, that’s the time to investigate any further loss of coolant.
The first thing to do when losing coolant is to look the engine over while it is not running. If the coolant is leaking externally, it is likely to have left a trail that can be followed back to its source.
Water intrusion
Since water in the oil can destroy an engine, the second check to make — even if an external leak is found — is to examine the oil for water intrusion. Water in the oil is never to be ignored and usually indicates a blown head gasket, a cracked head, or both.
There are two places to check for water in the oil. First, pull the oil dipstick and look for a milky substance on the stick. Oil is light brown in color or (with use in a diesel engine) black. When water enters the engine’s oil system, it will turn milky-looking, a color change that will be easy to recognize.
The second place to check for water in the oil is inside the valve cover. This is an area that often shows the first evidence of water in the oil, even before it shows on the dipstick. If there is an oil fill cap on top of the valve cover, remove it and check underneath for that milky-looking substance. If this visual inspection is inconclusive or if a cap is not present on your engine, remove the valve cover and inspect the inside of the valve cover and the mechanisms under it for the telltale milky mixture.
Once you have determined that there is no water in the oil, the third check is to start the engine and look for leaks, continuing to search until the engine is fully warmed up and the cooling system has fully pressurized. If there are any external leaks, they may become evident with the system under pressure. If you can’t find any leaks in this way, shut the engine down and look once more after it has cooled.
Be careful when searching for a leak around an engine that is running. In your zeal to find a leak, it is very easy to forget about the parts that are moving. Take my word for it, it is easier to locate a leak when your fingers, hair, or clothing are not being wrapped around rapidly moving parts.
More devious
These are the obvious and easy initial checks to make. These first steps will often locate the source of a leak, but sometimes a leak can be more devious. Even though a cooling system is fairly simple, it does have a few places where a leak can hide.
Check the transmission fluid both for evidence of water and to determine its level. If the fluid level has gone up without the addition of more transmission fluid, suspect water intrusion into the transmission. This can occur when the transmission has a heat exchanger that cools using the engine’s coolant. A leak in the heat exchanger will allow coolant to drain into the transmission, raising the fluid level, and leading, eventually, to its failure.
Another overlooked cause for coolant loss is an improper antifreeze-to-water ratio. If there is not enough antifreeze in the mixture, the engine’s temperature may be high enough to allow the coolant to boil off, which then escapes from around the pressure cap.
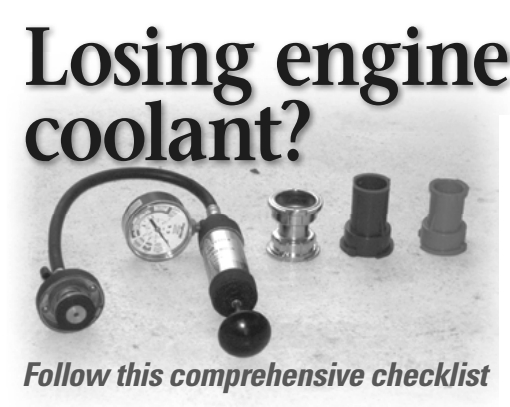
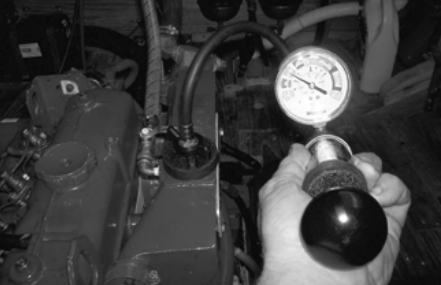
Have you done these checks? If the leak persists, now’s the time to run down to the auto parts store and buy a cooling-system pressure-test kit. These kits vary in price from $50 to $150. A kit contains an air pump with an integral pressure gauge attached to the coolant fill opening. It will also have, available as additional purchases if not in the kit, several adapters to fit various-sized pressure caps. This kit allows you to pressurize your cooling system without running the engine.
Once you have your pressure-test kit, attach the pump to the coolant fill and pressurize the system to the engine manufacturer’s specifications and look for leaks. If no leaks are apparent, leave the system pressurized for several hours, even overnight, and look again both for a drop in pressure and for evidence of leaking coolant. Many times, a small leak will ooze coolant while the engine is running, but the hot engine will evaporate the coolant before it can leave any evidence of a leak. With the engine cold and the cooling system pressurized, a leak can usually be spotted even though you may have to look closely at every little connection and part in the cooling system.
Remove glow plugs
Still no leak evident? Pull the glow plugs and see if any coolant leaked into any of the cylinders. If coolant is present, do not start the engine with this incompressible substance in the cylinder. Any coolant in a cylinder indicates that a blown head gasket or a cracked head allowed the coolant to get sucked into the cylinder and then blown out with the exhaust gases. This is often accompanied with white smoke in the exhaust. The water, over time, will eventually wash off enough oil from the cylinder walls to create major damage to the cylinder wall, rings, and piston . . . resulting in a most expensive repair.
No water in the cylinders? Replace the glow plugs, reattach the pressure pump — but do not pressurize the system — and start the engine. If the pressure starts to increase (watch the gauge), shut down the engine. This increasing pressure indicates a blown head gasket or cracked head and, if it rises too much, can damage your pump. There should be no transferring of pressure from the pumping pistons to the coolant system.
Still have not found the problem? There are still a few more places to look.
Shut off the raw-water seacock, drain the raw water from the engine and transmission’s heat exchangers, if
present, and disconnect the raw-water hoses from the heat exchanger’s ports. Pressurize the engine’s freshwater cooling system with the pump and look for coolant leaking from the heat exchanger’s raw-water ports. As with the other tests, you may need to leave the system pressurized for several hours in order to find the leak. If the coolant is leaking, there is a hole in the freshwater cooling tubes inside the heat exchanger. This will need to be repaired (at a radiator repair shop) or the heat exchanger will need to be replaced.
Heat exchanger removal
If the raw-water ports are located so as to prevent drainage of any leaking coolant, the heat exchangers will have to be removed, after enough time has elapsed for the coolant to leak into them. Rotate them to see if any coolant drains from the raw-water side. If this test is inconclusive or not possible, the heat exchangers can be taken to a radiator repair shop for pressure testing. While the heat exchanger is removed and at the radiator shop, you might as well have them clean it out before reinstalling it.
Keep in mind that after a leak is found, you should run the engine to see if the coolant levels are now back within specifications. It is possible that other leaks are present and also need to be located.
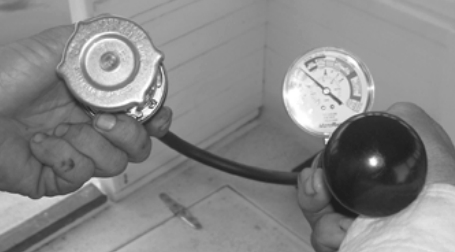
With the pressure-test kit, the cooling system’s pressure cap should also be tested for the correct pressure. The pressure cap will have its pressure rating marked on its top. This pressure rating needs to match the engine manufacturer’s specifications and the cap tested to make sure that it’s holding the correct pressure. Too little pressure, and the cap can allow the coolant to boil off, escaping from around the pressure cap. Too much pressure can allow damage to parts of the cooling system not designed for this higher pressure.
Any new pressure cap should be tested before you install it, as they can be bad right out of the package. If the cap does not measure up, return it to the store for an exchange, but do not forget to pressure test the replacement cap.
If you have chosen not to buy a test kit for this, take the cap to a radiator repair shop and have them test it for you. This is such a simple thing to do that they may not even charge you for this service.
Other leak sources
These are the areas that can cause leaking in the typical diesel engine’s freshwater cooling system, but some engines are also connected to other — out of sight, out of mind — appliances. Any item, such as a water heater or cabin heater, that uses the engine’s coolant can also be a source of leaks.
To test for leaks, without removing the appliance, remove the coolant supply hoses and cap them off or connect them together. Then run the engine to pressurize the coolant system or use your pressure pump. If the leak stops, the appliance or its connection is the problem. Another option is to remove the appliance and have it pressure tested. Obviously, if the appliance is leaking it will have to be removed, repaired, or replaced.
It is often difficult to determine if a slight drop in pressure is from a leak in the coolant system or because of a poor seal around the coolant fill opening. You can reconnect the pump — after wetting the pump’s rubber seal with water-based lubricant, such as spit, water, soap, or K-Y Jelly — to see if the seal can be better established. A soapy solution may also help to determine if this seal is leaking (bubbles will be evident if a leak is present).
A slight reduction in pump pressure, combined with the results of the above tests and tempered with common sense, can lead you to a reasonable conclusion.
If there is no water in the oil or transmission and no transfer of pressure to the cooling system from the pumping pistons, then — even though a leak should not be ignored — the engine can probably be run safely, as long as the coolant level is adequately maintained.
Having a cooling-system pressure-test kit is extremely helpful for finding leaks and making a leaky cooling system easier to diagnose. It also is important to periodically test the pressure cap and to allow for its replacement before its failure causes other problems. A leaky cooling system does not have to be a source of frustration. It can be a source of several satisfying hours spent working with your engine, the result of which will be the resolution of those niggling concerns about your cooling system.
Rudy and Jill Sechez have lived aboard and cruised for 10 years, beginning with a 36-foot wooden cutter they built, and currently with a 34-foot sail-assist troller yacht they designed and built. They finance their cruising by working when funds run low . . . mostly on boat-repair projects. They write for pleasure.
Thank you to Sailrite Enterprises, Inc., for providing free access to back issues of Good Old Boat through intellectual property rights. Sailrite.com