A flopper stopper makes untenable anchorages amenable
Issue 109 : Jul/Aug 2016
We were anchored in Resolution Bay on the island of Tanna, Republic of Vanuatu. Although we had arrived only that morning and had just had lunch, our friends were busily preparing to leave.
“This anchorage is awful! We’re rolling so much we can’t sleep or eat,” John said, “We have to try someplace else.” “John, there is no place else,” I told him. “If we want to climb the volcano, this is where we have to be.”
On a chart, Resolution Bay appears to be completely protected from ocean swells, but if the wind has the slightest northerly component, as it did that day, a very slight swell finds its way around the point and ricochets into the harbor. There was another unsheltered anchorage 6 miles away. If this one was bad, that one would be impossible. Besides, the walk from there to the volcano would be far too long.
In fact, we had not encountered five surge-free harbors throughout our entire Pacific voyage, or so it seemed. On this day the swell, while almost imperceptible to the eye, was causing every boat in the anchorage to roll severely. Every boat but Entr’acte, our Nor’Sea 27.
Entr’acte rose gently as each swell passed beneath her almost unnoticed. Thanks to our flopper stopper, Ellen and I were quite comfortable. It had taken us a long time to develop and refine this indispensable piece of gear, and it was certainly earning its keep that day.
Roll-damping devices have been around for centuries. They are simple baffles that, when hung from the boat, resist being lifted through the water and thus dampen the roll. We could have purchased a flopper stopper, but we could not bring a commercially made one on board. The deterrent was not cost but, rather, size and weight. The lightest damper we could buy was made of aluminum and weighed 15 pounds. It made all sorts of noise as the baffles opened and closed and it was too large to stow on our little plastic boat. Even the milk-crate design Lin and Larry Pardey described in The Self-Sufficient Sailor was difficult to stow.
The trigger
The day comes to all sailors when, for any number of reasons, their idyllic anchorage or mooring is no longer tranquil and their good old boat’s roll throws them out of their comfort zone. Things came to a head for us in Black Point, Bahamas, when we rolled for three nauseatingly vile days waiting for the Police Force Band to perform. Every boat in that otherwise wonderful anchorage rolled horribly as, for no apparent reason, a surge had found its way around to the back side of the cay and into what appeared to be a secure all-weather anchorage. Half an hour after the band completed its performance, we were gone. We were far more comfortable at sea than we had been in that harbor.
When we departed, we left with a plan. We would develop our own flopper stopper.
Cost was not a factor. Our requirements for our flopper stopper were in this order:
- It had to work.
- It had to be light, compact, and stowable in a minimum of
space. - It had to be fast and easy to deploy.
- We had to have it immediately.
We set to work. The entire project took less than 3 hours to complete. When not in use, our flopper stopper takes less than 1 inch of vertical space and can be stowed invisibly on top of the coachroof under the dinghy.
Construction materials
We didn’t have to look far for materials. With the exception of the PVC sheet that we added later, we assembled our flopper stopper from bits and pieces we found on board.
One plastic milk box or bottle crate – Milk boxes come in various sizes, the most common being 13 x 13 inches. Bottle crates measure 13 x 19 inches. Our measurements reflect the use of the 13-inch-square box, which proved quite adequate for 27-foot Entr’acte. A larger boat might need the larger crate. Adjust your measurements and the number of fasteners to suit your box.
The condition of the sides is unimportant; you’ll use only the bottom, which must be sound and without cracks.
Robust fabric – A sufficient amount of fabric for four 13- x 9-inch panels for the sides and two 11- x 9-inch panels for the flaps. We used scraps of Top Gun fabric left over from the dodger we’d constructed. Dacron sailcloth is also a good choice. Allow for a hem around the perimeter. If you don’t have access to a sewing machine, you can seal the edges of sailcloth with a hot knife. It might not be elegant but it will work.
PVC sheet – Two 101⁄2- x 8-inch pieces of 1⁄8-inch-thick PVC for use as flap stiffeners. We did not use PVC sheet in our original version because we did not have it on board at the time. Cloth flaps worked well enough, but we could see that stiffening the flaps would be a definite improvement.
Fasteners – You need 16 10 x 24 stainless-steel machine screws with washers and Nyloc (nylon-insert) nuts and four 1-inch-diameter stainless-steel fender washers with 5⁄16-inch holes.
Spur grommets and cutter and die – Eight #2 spur grommets and 16 #0 spur grommets. You can build and use a flopper stopper without the grommets if you are truly desperate but the sides will last much longer with grommets.
Nylon line – You need approximately 12 feet of 5⁄16-inch nylon line. Nylon acts as a shock absorber and is preferable to Dacron or polypropylene as it holds knots better and can be more easily stowed.
Weight – A dinghy anchor or 6 pounds of divers’ weights.
Sewing kit – Sail twine, needle, and palm.
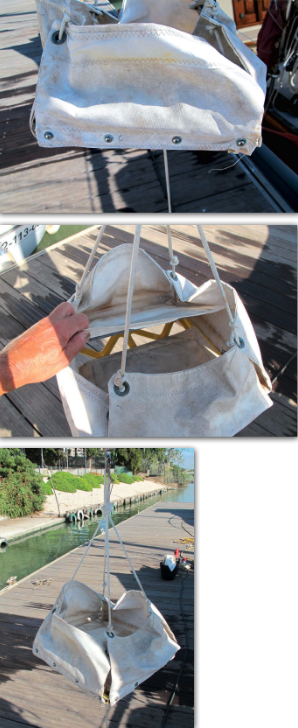
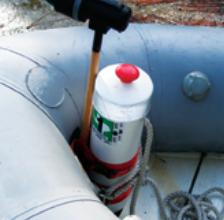
Two canvas flaps on opposite sides control the outflow of water as the flopper stopper rises, middle.
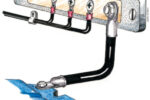
The flopper stopper is suspended from two equal lengths of line doubled, then tied to form a loop and four ends, at left.
Construction
Cut the bottom off the box and discard the sides. Sew four simple 13- x 9-inch rectangles for the collapsible sides and two 11- x 9-inch rectangles to serve as internal flaps. Set a row of brass #0 spur grommets along the bottom of each of the sides (for attaching the sides to the milk crate bottom) and a #2 spur grommet into the upper corner of each side.
Attach the sides – Do not sew the sides together to make a watertight bucket. You want the water to flow out freely through the corners, dampening your roll.
Using the grommets as reinforcement for the canvas, attach two opposite sides to the bottom with the machine screws, washers, and nylon-insert nuts.
Attach the flaps – Sandwich the flaps between the other two sides and the base of the box. Grommets are not necessary on the flaps as they are not used for lifting.
Suspension loop – Begin with two equal lengths of 5⁄16-inch line and double them. Tie the doubled ends together to form a loop and tie a figure-eight knot in each of the four resulting lines about 12 inches from the end (you will adjust these later). Pass a line through both grommets at each adjoining corner and tie a second figure-eight knot just under the “lower” grommet on each corner. If placed properly, the knots will fully extend the sides to open the “bucket” while allowing water to flow out freely through the corners.
Bottom – Pass the ends of the lines through the corners of the milk crate bottom. Slip a stainless-steel fender washer over the end of each line and tie a final figure-eight knot under the bottom at each corner. The washers take the load.
Adjust – Suspend your flopper stopper and adjust all the knots so it hangs level and the sides are completely extended. It needs ballast. Two 3-pound divers’ weights or a small dinghy anchor suspended from the bottom should be adequate.
Improved flap – Originally, our flaps were just fabric. This worked reasonably well but they tended to collapse when in use. A rectangle of 1⁄8-inch PVC sheet hand-sewn to each flap provides more rigidity.
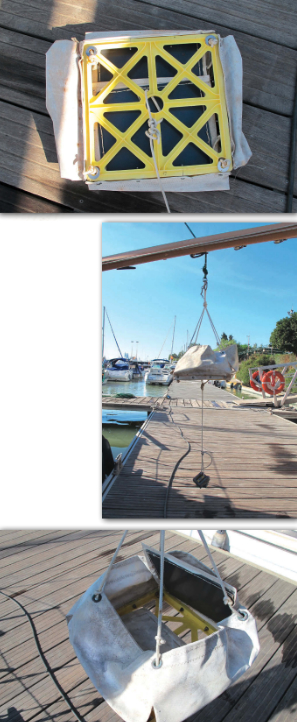
To first set up the flopper stopper, the knots on the four support lines must be adjusted so it hangs level and the sides are able to open fully, at right.
Stiffening the flaps with PVC sheet improves the way the flopper stopper functions, below.
Theory of operation
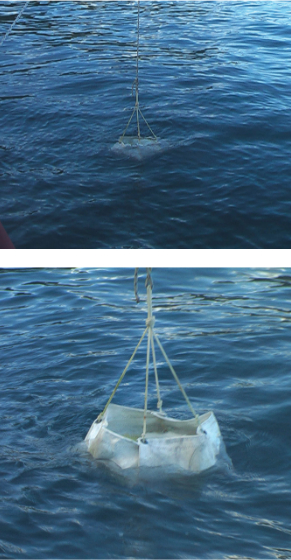
The flopper stopper is not a watertight bucket. The idea is not to lift the water, but rather to use a controlled flow to slow the boat’s motion. Trying to lift any volume of water will induce needless stress on the lifting rig and actually increase your roll.
As the boat rolls, the device rises and the flaps close to restrict, but not trap, the flow of water that flows freely through the four corners where the sides would normally meet. The horrible gunwale-to-gunwale roll is damped and converted to a more gentle, predictable, and tolerable up-and-down motion which will be restricted to the actual height of the swell or wave.
Deploying the flopper stopper
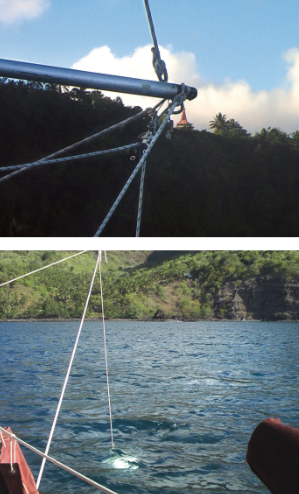
The first time you use the flopper stopper you will have to make a few adjustments to get it working just right. It needs a few pieces of rigging:
- Trim line with snap shackle attached
- Foreguy
- After guy
- Snatch block or single block with a snap shackle
- Boom, or a spinnaker or whisker pole with a topping lift
Attach the trim line to the eye of your flopper stopper. Lead this line through the snatch block. Attach the snatch block to the end of your pole or boom. Adjust the topping lift to set the pole parallel to the water and swing the pole abeam until it is perpendicular to your hull. Cleat the foreguy and after guy to maintain that position. If you run the after guy through a genoa lead block and position the car just right, this line will also act as a vang.
Launch your flopper stopper and adjust the trim line for the device to cycle from just below the water at rest to just above the surface at maximum rise. You do not want the device to lift completely out of the water and splash around; it only needs to break the surface and drain.
Life aboard will be a little quieter if you tie the lines to the pole with bowlines instead of using shackles. Once you have the flopper stopper properly adjusted, mark the lines to speed up deployment on future occasions.
Prudence dictates attaching a light to the end of the boom for overnight use.
Suddenly steady
The first time we deployed our flopper stopper the effect was instant. Even before we had trimmed it properly, it had calmed the wild roll into a gentle up and down motion with a reduced and dampened sway that our bodies could adjust to.
We have found no evidence whatever of stress on the mast, rig, or boat while using our “comfort machine.” After 15 years of duty, our good old box is beginning to show signs of stress cracking. The time for replacement is near.
Flopper stoppers are not just for those who cruise to far-off Pacific Islands. We have used ours in Chesapeake Bay creeks, Long Island Sound, the Intracoastal Waterway, the Bahamas, and the Hudson River. There is no reason to be chased out of a beautiful anchorage by an unruly swell. When we start rockin’ and rollin’ we know relief is only minutes away. Black Point, here we come!
Ed Zacko is a Good Old Boat contributing editor. He and Ellen met while playing in the orchestra of a Broadway musical. They built their Nor’Sea 27, Entr’acte, from a bare hull and since 1980 have made four transatlantic and one transpacific crossing. Entr’acte is now based in Seville, Spain, where Ellen and Ed are happily sailing in and around the Mediterranean and playing in the jazz clubs of Spain, France, and Morocco. When not on board Entr’acte, they heave-to in Phoenix, Arizona, where they maintain a busy concert schedule throughout the Southwest U.S. Follow them on www.enezacko.com.
Thank you to Sailrite Enterprises, Inc., for providing free access to back issues of Good Old Boat through intellectual property rights. Sailrite.com