Letting in new light on an old problem
Issue 31 : Jul/Aug 2003
After 20 years, the flush windows in our C&C Landfall 35 had been ravaged by exposure. They were suffering from age. One window had a minor leak that I had been battling for years. Two others had developed transverse cracks. All were deteriorating optically from UV exposure and a patina of scratches.
I consulted several sources and received many differing opinions on materials and methods for installing replacement windows. After sorting through the opinions, all it needed was a few hours in the shop and a weather-friendly day in the marina. I now have clear new windows and some new skills I hope not to use again for a long while. Anyone with modest woodworking tools, some energy, and an assistant can accomplish the same.
The original factory installation fixed the acrylic panels to a rabbeted recess around the window opening with a methacrylate structural adhesive. This is a bonding medium only; the windows were sealed with a silicone caulk. The methacrylate resin is applied to the opening flange and an accelerant applied to the acrylic panel. The panel is held in place manually for the few seconds the adhesive needs to activate. Think Superglue in paste form.
The methacrylate structural adhesive used in the original window installation, while extremely aggressive in bonding acrylic to gelcoat, was very rigid. The difference in thermal coefficient of expansion between acrylic (large) and cored fiberglass (small) created a lot of stress on the bond. The minimal compliance or flexibility of the adhesive may have contributed to the failures.
Maintenance problem
The silicone caulking used in the original factory installation created a maintenance problem as well. It was difficult to reach the surfaces between the acrylic panel and recessed flange. Thus, after removal of the old caulk, cleaning was nearly impossible. Sometimes we would get lucky and succeed in removing a long strand of silicone caulk. This was a mixed blessing because it meant the silicone had not bonded the first time. Most often we could only scrape out small pieces at a time. As you would expect, mold and slime tended to grow in the damp places. It was not possible to adequately clean the surfaces in the gap to assure good adhesion for the caulking. I tried using other materials, but the leaks inevitably returned.
I always washed the windows with clear soapy water and polished them with Meguiar’s Mirror Glaze No. 17 plastic cleaner followed by Mirror Glaze No. 10 polish. The elements, helpful guests, and other hazards took a toll on the surface finish of the windows that Mirror Glaze was unable to combat. Our outlook from belowdecks took on a permanent haze. The cracking may also have been a sign of age embrittlement. Since losing a window completely would endanger the vessel and her crew, it was time to tackle window replacement.
I spoke with several boatyards, dealers, and technicians on methods and materials for replacing the acrylic glazing. One suggested polyurethane, such as 3M 5200. The technical data sheet on any of the 3M polyurethane products specifically recommends against using these products for glazing without mechanical fasteners. An inquiry to 3M’s technical support for an alternative product recommendation was unsuccessful.
Large holes
One dealer uses Dow Corning 795 silicone with fasteners every 8 to 12 inches around the periphery. He cautioned that large clearance holes need to be drilled in the acrylic to avoid cracking from the thermal expansion stresses. I was reluctant to deviate far from the builder’s original intentions. Perforating the cabin trunk with holes for fasteners seemed like an invitation for leaks and long-term maintenance requirements. Moreover, we did not think the “industrial” look of closely spaced fasteners would enhance the lines of our boat.
South Shore Yachts offers a large selection of replacement parts, including windows, for old C&Cs. They recommend a methacrylate structural adhesive manufactured by ITW Plexus. Plexus MA320 is a two-part adhesive with a modest open time and relatively short cure time. More importantly, the cured resin will stretch 100- to 140-percent before it breaks. And it has exceptional adhesion to acrylic, fiberglass-reinforced polyester, epoxy, and gelcoat. It serves as both a structural adhesive and a sealant. I discussed the application with the regional manager for ITW Plexus, and he agreed this was the proper choice.
The final decision was choosing glazing material. The original windows were tinted 3⁄8-inch thick acrylic, commonly called by its trade name, Plexiglas. I considered using polycarbonate, trade name Lexan, which has superior strength. If the windows were large, I might have felt more comfortable with polycarbonate, but the Landfall 35 windows have less than 10 inches of unsupported span. Acrylic is much more scratch-resistant and somewhat easier to fabricate. I requested quotes from plastics distributors and South Shore Yachts on cut-to-pattern, cut pieces, and full sheets. I decided to purchase a full sheet from a local distributor and fabricate the panels myself.
Made a tracing
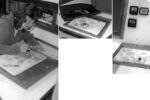
South Shore Yachts will fabricate finished replacement windows from patterns. For a while I was contemplating this alternative and made a tracing of the window on drafting vellum. I used this pattern to fabricate one panel in my shop by carefully following the outline with a band saw and finishing with a horizontal belt sander. It did not fit exactly; I had to sand and trim the panel before it would fit the opening. I recommend using the original windows as templates.
I rough-cut four pieces from the 4 x 8 sheet using a 4 1⁄2-inch Porter-Cable trim saw. A saber saw could also be used, but it would be slow and tedious work. I purchased a special acrylic plastic blade for the trim saw which, according to the marking on the blade, is supposed to run with the teeth backward. I challenged the factory on this and was assured this is the correct rotation. The blade performed equally poorly running in either direction. The teeth appear to have insufficient set, thus the kerf is too narrow and the blade overheats. I switched to a fine-tooth carbide wood blade and cut the remainder easily. One caution: narrow strips tend to chip and shatter. Try to leave at least 1⁄4 inch for trimmings; it will have less tendency to shatter.
Two router bits
I also purchased two carbide router bits with ball-bearing followers on the end. One is a straight bit, sometimes called a laminate trimmer, and the other a 45-degree chamfer bit. You might save a few dollars using high-speed steel router bits, but even a slightly dull cutting edge tends to perform poorly when machining acrylic plastic.
With a prayer for continued good weather, I struck the fatal blow. Actually, I selected one of the smallest of the four windows and rapped it from the inside with a dead-blow hammer. I started from the center near the edge where it had cracked. As the bond fractured, I could feel and see the acrylic flex. I continued around the periphery, rapping firmly with the hammer until the window was free. Out of four windows, one was removed intact; the others were already cracked.
(It may be very difficult to remove the new windows installed with Plexus MA320. We have heard unconfirmed stories of laminate failing before the bond breaks. It may be necessary to grind through the acrylic and adhesive to remove windows installed by this method. –Ed.)
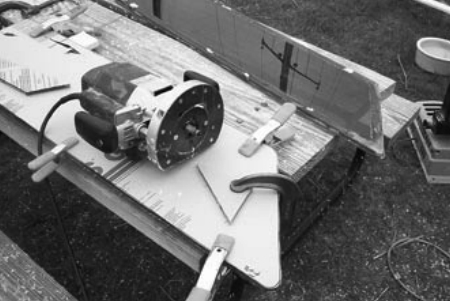
We traced the outline of the original window onto the rough-cut blanks with a fine-point permanent marker. Using the trim saw, we cut outside the line, leaving 1⁄8- to 3⁄16 -inch of material all around. I used the original window as a router guide by clamping it to the blank and following it with the bearing-guided router bit. To assure the pattern would not slip from the blank, I placed double-sided pressure-sensitive tape between them. The original windows have a healthy 45-degree chamfer on the side against the cabin trunk. I had the major edge against the blank for the first window I patterned. There is a gap between the end of the cutting edge of the router bit and the bearing, and it is difficult to cut the full 3⁄8-inch thickness and keep sufficient engagement with the edge of the pattern. On subsequent pieces I reversed the pattern, which was much easier to follow. After the edge was trimmed, I switched router bits and cut the 45-degree chamfer.
Large chamfer
The profile of the openings in the cabin trunk did not seem to require such a large chamfer, but I was uncertain of the requirement for this feature. In retrospect it may be a cavity to accept excess structural adhesive in the original installation. Some relief may be required, but I probably used more adhesive than was necessary to fill the space. I broke the outside edge by hand using a flat file, which trimmed away any of the paper swarf left as the router cut the protective paper. Fabricating the windows was relatively easy, yet exacting, work.
I masked the inside of the window opening with 10-mil polyethylene to keep dust and chips out of the cabin. I used a 4 1⁄2-inch grinder with 50-grit sanding disks to clean off the original adhesive and caulking. We vacuumed all the surfaces, then wiped the window flange with alcohol and inspected it carefully to make sure all the caulking was removed and the surface was sound. Next we removed the dust barrier and masked around the inside and outside of the window opening.
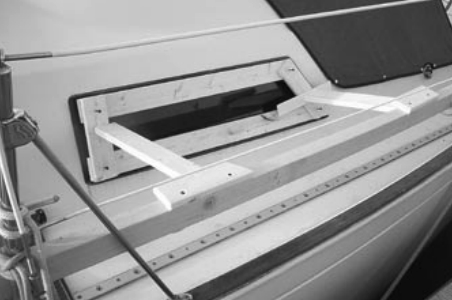
Building the fixturing was the most time-consuming part of the project. I lashed a 2 x 3 thin stud between the lifeline stanchions to provide a structure to brace against. Then I fashioned a frame using 1 x 3 shop-grade pine and screws. The frame is dimensioned somewhat smaller than the window and shaped to spread the compression forces evenly. With window and frame in place, I cut struts to fit between the frame and lifeline brace. The struts are cut 1⁄4- to 1⁄2-inch longer than the distance between the frame and bent brace. I also had a pocketful of wood shims to fine-tune the pressure on the frame and window. The brace flexes as pressure is applied and the struts interact. With the window in the opening and fixtured from the outside, I carefully cut the protective paper with a razor knife, following the inside opening. It is impossible to cut the paper without scribing the acrylic as well. Do not worry: the scratch does not show after the installation is complete.
Certain urgency
We double-checked the fit and confirmed that all the tools, braces, shims, and rags were ready. The process took on a certain urgency once the adhesive started to flow down the mixing tube. It was time to commit.
Plexus MA320 is a two-part methacrylate adhesive mixed 10 to 1 by volume. This ratio is metered in a special dispensing tube with a caulking-gunlike dispenser. The components are combined in a static mixer attached to the end of the dispenser. The working open time is 8 to 12 minutes depending upon the temperature. I set a timer, and my wife, Sandy, monitored the countdown as I started applying the adhesive to the window flange.
It was difficult to squeeze the dispenser gun while tracking an even bead, so I made sure I had a goodly amount applied to the flange and tooled the adhesive smooth with my finger before inserting the window. (Wear gloves, don’t get this stuff on your skin. –Ed.) A putty knife might work as well. To assure a minimal adhesive thickness, we scattered 0.030-inch glass beads on the wet adhesive. Sandy and I placed the window in the opening and erected the fixture. We inspected the gap between the acrylic and cabin trunk and added more adhesive if it was not filled. Then we tooled the joint off with a finger and removed any excess globs with a scraper. Fixture time is 30 minutes. A cautionary note: mask the area around the window opening well; once the MA320 cures, it owns whatever it touches.
Forms a bead
Some adhesive extrudes to the inside of the window and forms a bead. It is easier and much cleaner to deal with the excess after the MA320 has cured. I scored the bead by tracing the inside of the opening again with a razor knife. The protective paper acts as a release layer and carries the excess adhesive when peeled away.
I was dissatisfied with the distribution of adhesive on part of one flange; I either had insufficient clamping or too little adhesive. Structurally it was sound, but an irregular line was visible from the outside. It was clear that the flange was not completely wetted. I masked the inside of the window and window frame with low-adhesion masking tape and forced more adhesive into the joint with a 2-inch putty knife. The gap filled smoothly.
With that long day of work completed, Sandy and I can now enjoy a fresh, clear view out the cabin windows. Sandy meticulously waxes, polishes, and varnishes, but replacing the windows added a sparkle we had not seen in years. Twenty years from now we will be ready to do it again.
Thank you to Sailrite Enterprises, Inc., for providing free access to back issues of Good Old Boat through intellectual property rights. Sailrite.com