Start by sewing a pair of custom-fitted handrail covers
Issue 31 : Jul/Aug 2003
I recently installed a pair of brand new teak handrails on my old MacGregor Venture 222. With about four coats of varnish, they looked fairly spiffy, but I knew from experience that after a season or two in the sun, they wouldn’t look nearly so nice. A pair of canvas covers would help preserve the varnish job by keeping the sun off the teak and would look nice as well.
Looking through catalogs, I was able to find only an ugly, wrinkly cover that was the wrong color for my boat, as well as a lousy “universal fit.” Add the cost of the rails to the cover, and you’ve nearly got the book value of my boat. I decided to make my own and discovered a great way to learn the basic principles of marine canvaswork.
Once you’ve got the principles, there is almost no limit to the number of useful things you can make for your boat. They can be simple and inexpensive, like handrail covers, or they can be difficult and expensive, like a dodger. Most projects will fall on the easy/inexpensive side of the scale, once you’ve mastered a few techniques.
I’m not an expert with canvas. My skill level registers somewhere between Cro-Magnon and average, but I got some pretty good results. My covers are better than I could get from a catalog and at a fraction of the cost.
Tools
There are a few tools you’ll need. Most are basic, like needles and thread, some good scissors, and so on, but the most important tool is a sewing machine. Don’t panic. You don’t need a special sail-making machine to do canvaswork. In fact, you don’t need a machine at all to do small projects. But it does make quick work of sewing long seams.
I use an old straight-stitch machine from the 1940s. A friend bought it in a garage sale for $10. It weighs a ton. It’s pretty rugged and — with a special needle installed — it can sew through four layers of canvas (though I wouldn’t try to do this all day long). I had to replace the rubber belts and some of the wiring; that took an afternoon. (For more on making an old home-style machine do the job for heavy canvas work, see Good Old Boat, January 2003).
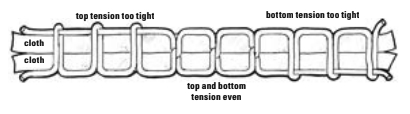
Nearly all older machines use the same basic design, and they’re threaded and adjusted the same way. My machine didn’t come with a manual, but I was able to figure out how to thread, adjust, and oil the machine with the help of a basic sewing book from the library. The trickiest part is getting the top and bottom thread tension adjusted properly. The top tension is usually adjusted with a knob, but the bottom thread is adjusted by a screw on the bobbin case. It’s done by trial and error. I adjust the bobbin first and then balance the tension on the top thread. Sew small scraps of cloth together until the stitches look similar from both sides of the cloth (see illustration at left).
There are a few other tools you should gather together before you start. A seam ripper is really handy if (or should I say when) you need to remove a seam that was incorrectly stitched. To mark up the cloth, I used colored pencils. These leave faint, fine lines so you can sew neat, straight seams. An old bar of soap, worn down to a thin sliver, also makes a great marker for sewing. Chalk and grease pencils work, but they leave a thick line that’s harder to follow accurately.
Materials
You have a couple of choices when it comes to material. The industry standard is Sunbrella acrylic canvas. It holds up really well in the sun and is easier to sew than natural canvas. The downside is the cost, usually more than double the price of canvas. It’s also slightly less resistant to abrasion.
An alternative is treated natural canvas. Brand names are Vivatex, Graniteville, and Terrasol. In my part of the country, though, marine supplies are difficult to find. I found some canvas at a domestic sewing store at about $7 a yard. The sales people had no idea what brand it was or if it was treated or not, ergo “mystery canvas.” But it was the right weight. I bought two yards and have plenty left over for other projects. Depending on the length of your handrails, you might be able to get by with one yard.
A regular cotton-covered polyester thread works well with most machines. I used a heavy button and craft thread. (For outdoor applications, Sailrite sells a UV-resistant polyester sailmaker’s thread. It helps preserve your efforts. –Ed.) A contrasting white thread on a dark canvas looks nice but shows off mistakes. If you’re not too confident of your sewing skills, choose thread that matches your canvas.
While you’re at the fabric store, pick up some snaps and a snap-setting tool. The large ones I bought are made of chrome-plated brass and are basically tubular rivets set with a hammer and block of wood. The special tools needed to set the snaps came in the package. The directions are easy to follow, and setting the snaps is straightforward. Marine snaps are very heavy-duty, high-quality snaps, but they’re pricey. The fabric store variety snaps have worked well for me and haven’t corroded yet.
Lay out a pattern
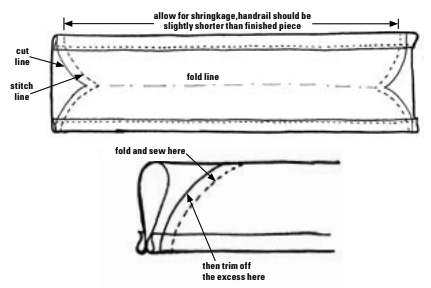
I made a pattern out of newspaper by wrapping the handrail and marking where it contacted the deck. If you use natural canvas like I did, don’t wrap the handrail too tightly. Natural canvas will shrink a little; allow for this in your pattern. I also marked the length of the rail, leaving extra material for shrinkage.
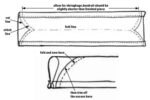
Armed with my newspaper pattern, I transferred the dimensions to the canvas. Remember that the pattern gives the approximate size of the finished handrail covers, not the size of the cloth needed to make them. I added 3⁄4 inch to the top and bottom edge to make a hem. When I laid out the cloth, I marked both the “fold” line, and the bigger “cut” line. The fold line represents the finished edge of the cover . . . don’t get the two mixed up (see illustration above).
Cut and sew
Next, I cut out the cloth. The long edges are sewn first. As I prepared to sew the edges, I discovered an advantage to using natural canvas. The material had a slightly waxy coating.
The coating stiffened the cloth . . . so stiff that I could fold the seam with my fingers, and the fold stayed in place like a piece of paper. Normally you will need to pin the hems. Some people have had good results using staples or double-sided tape for this step. I like plain old pins, though I was able to avoid fastenings altogether and sew the hems simply by folding them in place.
Before you sew the hems, make sure the machine is adjusted correctly by sewing some scraps. Keep your stitches as straight as possible, especially if you use a contrasting thread color.
It’s usually a good idea to “lock” your stitching so that it doesn’t unravel. By this I mean at the beginning and end of each row of stitches, lift the presser foot, and go back and stitch over the threads you just laid down. If your machine is reversible, all you need to do is stitch backward for a few stitches, then continue as normal. Once you’ve hemmed the top and bottom edges of the cloth, you’re nearly finished with the covers.
At this point you sew the ends. There’s a trick to this. In most canvas projects, you sew the inside surfaces, then turn the piece “inside out” to finish. Here’s how this works with the rail covers: fold the cloth in half lengthwise, with the cut edges to the outside. Using the pattern, mark the curved ends of the covers and sew along this line. Trim off the excess cloth from the ends about half an inch from the stitching.
Reverse it
Now you can turn the piece right-side out. Check the fit of the covers on your boat, just to be sure your measurements were correct. If everything looks OK, mark the locations of the snaps. Optionally, you could use Velcro to secure the covers to the rails.
When I made my covers, I did a little hand stitching at the corners. I nearly always do some hand stitching on canvas projects. That’s one step that most professional lofts can’t afford to do. I can easily afford a few extra minutes to make things stronger.
The only detail remaining is to set the snaps. This involves cutting a small hole, inserting the snap and its back, and hammering the two together. There’s a nifty Vise-Grip pliers-type tool, but it doesn’t do the job any better, only faster.
Other than fastening your new canvas covers to your boat and basking in compliments, that’s all there is to it. It takes less time to make handrail covers than it does to sand and varnish them and will open the door to dozens of other projects that will improve the looks of any boat.
Thank you to Sailrite Enterprises, Inc., for providing free access to back issues of Good Old Boat through intellectual property rights. Sailrite.com