Getting comfy starts with hard work
Issue 57 : Nov/Dec 2007
It was a cold march day on the Chesapeake when my wife, Marty, and I found the boat that was exactly right for us. We enjoyed sailing Take Five, our new-to-us 1982 Allmand 31, all spring. However, as we got to know her, something was not quite right. The settees were uncomfortable and the varnished table, while attractive, simply did not work. It was a drop-leaf design that lined up with the port and starboard settees with a fore-and-aft axis. Its center box and lid provided a perfect space for keeping navigation tools and keys. However, when the port side leaf was raised (because the table was located next to the port settee), it extended far enough to push into our middles. The starboard side leaf, on the other hand (because of the passageway between the table and the starboard settee), left about a 10-inch reach for anyone seated on that side. Something had to be done.
The great thing about a boat that is more than 20 years old is the realization that it’s OK to modify it. If you make a change, you have not necessarily ruined your investment. You might just enhance its value at the same time that you increase functionality. The question was where to start.
We wanted our boat to be a comfortable place in which to relax. I started by collecting data. Why was our couch at home so inviting? I tried to measure the angle of the seatback-to-bottom cushion with a plastic semicircular protractor left over from my son’s elementary school days. It wasn’t easy to obtain an accurate measurement with such a small device. Using a cardboard box, I created a reasonable imitation of a couch-sized, two-armed protractor. Now I could use the plastic protractor, together with the cardboard pieces, to measure accurately. Our couch’s seat-to-back cushion angle was 115 degrees. The Allmand’s settee seatback angle was only 10 degrees past vertical at 100 degrees. On the boat, we had been sitting nearly bolt upright. That’s no way to relax. If we were going to get comfy, I would have to do some work.
First the port settee
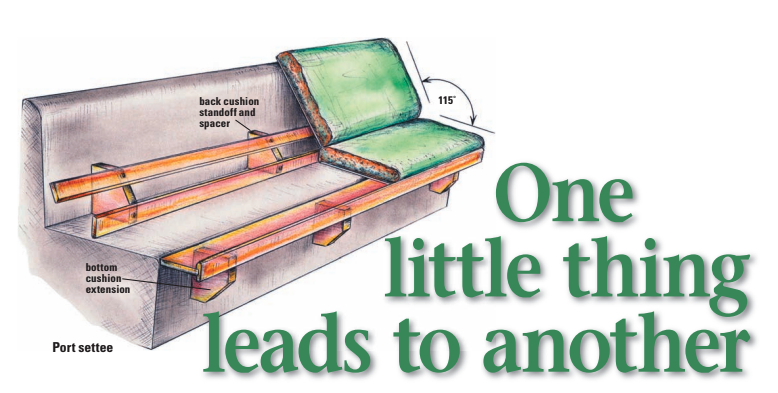
A plan emerged. I began with the port settee. All I had to do was increase the seatback angle a few degrees to match the couch’s angle. One way to achieve the desired rake of the back cushion would be by moving its bottom toward the center by placing a length of wood, such as a 2 x 4, on the bottom cushion to achieve the intended seatback angle. Discarding the idea of having an unsecured 2 x 4, I visited my local lumberyard and then crafted a combination cushion standoff and spacer.
Then came the unintended consequences of a theoretically simple design modification. To feel just right, the base of the back cushion needed to be 6 inches away from its original position. That adjustment made the bottom cushion too narrow. Our thighs were now unsupported. In order to address this new development, the bottom cushion would have to be repositioned 6 inches farther toward the center. This meant making a long settee extension so the bottom cushion could provide the necessary support. A suitable length of mahogany attached perpendicular to the plywood settee extension would look great and keep the cushions off the cabin sole. After consulting the folks at our local lumberyard once more, I fashioned and installed the port side extension and standoff. A retired sailing buddy has a drill press with a bit that makes a tapered bung. We made enough bungs to fill the screw holes in the mahogany boards. I was ready for some serious sitting trials. The port settee turned out to be just right for relaxing . . . as long as you didn’t need the table.
Next the starboard settee
While the drop-leaf table barely worked before the cushion modification, now it was useless. It had to go. It became clear that more work would be necessary before serious relaxing could begin.
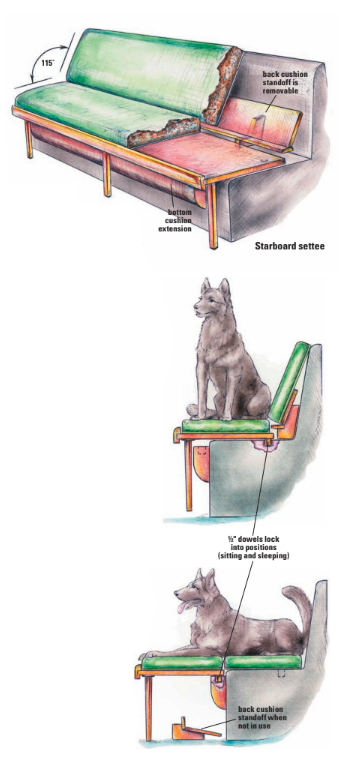
First, I would have to work on the starboard settee. Until it was finished, I would not know the critical dimensions for the replacement table. While I was at it, a slide-out extension for the starboard settee would be a welcome addition to our accommodation plan. This would create a wide sleeping space in the main cabin for use on humid nights. I made another visit to our new friends at the lumberyard.
The width of the slide-out extension was determined by measuring the width of the bottom and back cushions side by side. Subtract the width of the fiberglass base, and you have the width needed for the plywood extension. Check to make sure you account for cushions that are not true rectangles. To keep the extension in place, I glued a pair of 1⁄2-inch dowels in the outboard corners of the plywood. Then I drilled corresponding holes into the fiberglass settee (seating position) and support board (sleeping position). I had already purchased the mahogany face board to keep the bottom cushion in place. I used a router to cut a 3⁄4-inch slot the length of the board to fit the edge of the plywood extension.
I purchased three table legs at Home Depot to support the extension when pulled out to the sleeping position. These have a metal base with a large wood screw and a suitably long table leg. Each leg was then cut to ensure a horizontal sleeping surface. I cut the middle leg first, then the corner legs. (The sole is not as flat as one would think.) As I did for the port settee, I measured a back cushion rake angle and cut and assembled the standoff pieces. The starboard settee design was more complicated, due to the extension being farther out from the original position of the back of the settee. However, at this point both settees were comfortable.
Now the table
The great table design-elimination process began. Marty and I pored over old sailing magazines. We paid particular attention to various setups at the boat show. Our choices narrowed to a bulkhead-mounted table or a pedestal-base table. Intense discussions followed relating to how the table should open: hinge down and pull up or fold over. A friend argued for the fold-over design, pointing out the need to keep the passageway clear and the benefit of being able to open the table without moving guests who were already on the settee.
Our decision was also influenced by the fact that the prior table had a robust aluminum pedestal and there were bolt holes in the bulkhead and screw holes in the sole. Another consideration was that our 31 is rather beamy and a rigid pedestal table offers support and an additional handhold while underway. The final concept utilized a fold-over system mounted on a permanent pedestal and bolted to the bulkhead for additional strength. The new table would double the dining surface area.
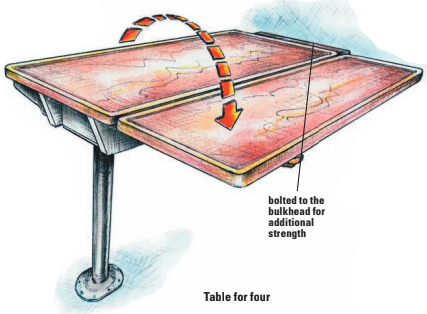
Marty and I went to the boat with a discarded cardboard box about the size of a table. With tape, a straightedge, and a box-cutter knife, we created a mockup of a table for two with just the right amount of room at a comfortable height. We determined the length of our table by sitting side by side and pretending to eat. We discovered that it’s important to leave room for elbows. Our table ended up being 48 inches long. The distance from our stomachs to the table edge was identified by sitting in our eating spaces and holding our fists at table height against our torsos at several points along the settee. We could then make a mark on the cardboard template equal to that distance. After several marks, we were able to use the straightedge to define the table shape. Since the Allmand’s cabin space is tapered, the after end of the table is 6 inches wider than where it is bolted to the bulkhead. The outboard edge follows the growing beam.
Doubled the space
Using the seam of the box as a centerline, we opened the cardboard to double the dining space. This design permitted a standard table for two with an unrestricted passageway forward. We again visited our good friends at the lumberyard for a sheet of furniture-quality ash plywood. The base of the table is built of the same plywood as the tabletop sections. The width of the box was based on the top platform of the aluminum pedestal. We screwed and glued the box frame together using urethane glue, reputed to be exceptionally strong. Because it froths and expands out from the glued joint, extra sanding is required. Based on my experience with it, I would not use urethane glue for a visible surface joint. The tabletop was glued to the frame and angle-screwed from underneath.
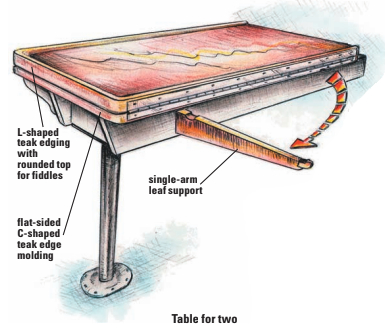
Teak edging would give the table a finished look. Fawcett’s catalog had exactly what we were looking for. We chose a flat-sided C-shaped edge molding for the permanent non-folding table section. This allows the folded-over leaf to rest securely on the flat edging. We used teak edging with a rounded top surface on the leaf. The folded position is our usual table for two. The leaf was sawn to be exactly the same shape as the base tabletop. However, the two edge moldings have a slightly different profile. The C-shaped molding is thinner than the rounded L-shaped teak. I had to take 1⁄8 inch off the width of the table leaf to enable the table and leaf to nest evenly when folded. It’s nice to have access to a table saw.
While the table and leaf nest evenly, they are not identical. The leaf was designed to be 7 inches away from the bulkhead to allow clearance for the mast compression post (not depicted in illustrations). We use this space between the mast support and the bulkhead for a 2-gallon container of spring water. The container is secured to the table and bulkhead. The rounded molding creates a lip of 1⁄2 inch for the leaf in its folded position. When the table is opened it has fiddles that are only 1⁄4-inch proud of the table surface. Marty and I figured that most dining for four would be at anchor and we would, therefore, not need high fiddles.
It’s important to know the distance from the midpoint of each table edge surface in the folded position if you want the hinge to function properly. That distance will determine the width of the piano hinge. West Marine had a selection of stainless hinges in 6-foot lengths, including one with screw holes 1 1⁄8 inches apart. That was exactly the distance needed for our table. I used a metal cutting blade inserted in the saber saw to cut the hinge to a length of 34 inches. Judicious use of a grinding wheel rounded the sharp corners.
One more thing
Another issue was the leaf support. I chose a single arm for this. I glued together two thicknesses of ash plywood with urethane glue. My friend with the drill press also has a band saw that allowed me to easily shape the arm so it rests under the table overhang when not being used but when extended still allows clearance for a diner’s knees. This is just another example of how boating supports adult friendships.
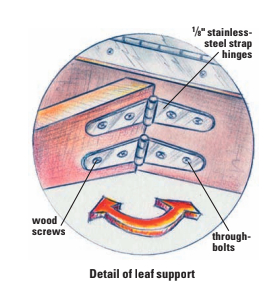
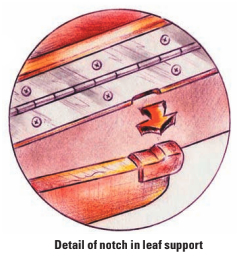
West Marine has a pair of stainless-steel strap hinges that are 1⁄8-inch thick. They provide excellent support even when elbows are on the table. The hinges are through-bolted to the table frame. I used wood screws in the arm. I added a bit of leftover edge molding at the end of the arm to mate with the radius of the edge molding from the fold-over leaf. This extra piece allows the leaf to lie flat when open. However, this meant that I had to grind the bottom of the edge molding on the base table to accept the raised piece at the end of the arm when folded in against the box frame (see detail illustration on facing page).
All the components were dry-fitted and screwed together. When everything fit, the wooden pieces were glued and screwed. There were 38 teak bungs to set and sand flush. We finished the table with five coats of clear polyurethane varnish. When the varnishing was completed, we drove down to the boat and attached the base table to the bulkhead and pedestal. Then I attached the piano hinge and leaf. The arm’s strap hinges were screwed tight after varnishing. I bolted the arm to the table through the pre-drilled holes.
Wouldn’t clear
When I opened the leaf, it was a mild surprise to discover that the leaf’s edge facing the bulkhead would not clear the mast compression post at the top of the arc by just 1⁄16 inch. It appears that the post is not quite vertical. The table leaf would require one more trip back home for a quick touch with the saw and re-varnishing. The following weekend, however, a slightly modified table leaf was screwed to the piano hinge and tested. Not only did it clear all obstacles, but it also looked great. Finally, it was time to sit back and put that refreshing drink on a coaster.
We now have a comfortable cabin where my wife and I can linger over a cup of coffee, plan a voyage, or seat four adults for dinner. We can sit back and relax with our weekend reading or even discuss a possible project discovered in magazines catering to boats of a certain age. All in all, not a bad outcome for a good old boat.
Bill and Marty Hudson have been sailing for more than 30 years on a variety of boats, starting with an old Moth that needed attention in order to float. Others included an 11-foot Robin, a Seafarer 26, a Columbia 29 in need of rehabilitation, and another Robin in need of a complete rebuild. Take Five, a 1982 Allmand 31, is now going through the renovation process.
Thank you to Sailrite Enterprises, Inc., for providing free access to back issues of Good Old Boat through intellectual property rights. Sailrite.com