Carving a stern nameboard is easier than you think
Issue 56 : Sept/Oct 2007
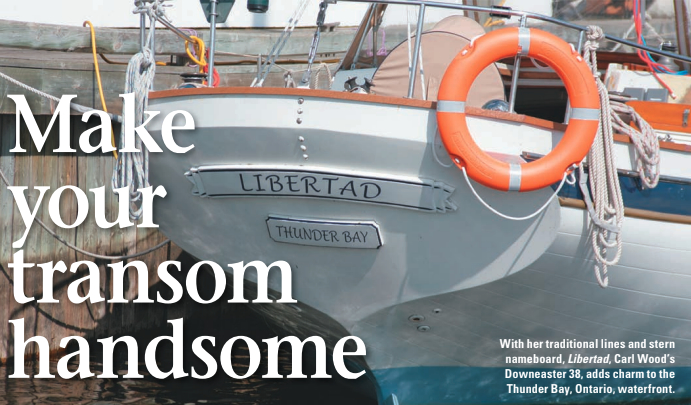
For saltiness and elegance, few things beat a hand-carved nameboard gracing the stern of a proper yacht. Having one made is expensive, however. The artist must earn a fair wage and much time is involved. The alternative is to carve your own. It’s not nearly as difficult as you might imagine and the results can be very satisfying. But patience and care are required. Here’s how to do it step-by-step.
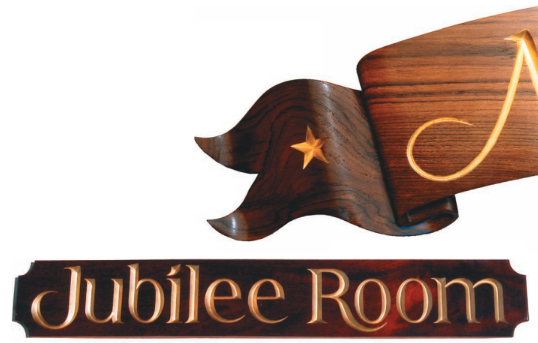
First, plan and design the board. The size and shape should be determined by the size and shape of your boat’s transom. About 75 to 80 percent of the transom width is a good rule of thumb for overall length, with the width in proportion to the length. The top and bottom edges of the board should follow the sheerline of the transom. The ribbon style is traditional for a stern nameboard, although other nautical themes, such as a shell design, can be attractive.
Develop the overall design by drawing it out full-sized on poster board or cardboard. Cut it out and tape it to your transom, then step back and take a critical look. This will allow you to get an “artist’s feel” for the overall design while changes can be made with an eraser. Some boats use a carved nameboard and a separate, smaller board carved with the name of the hailing port.
Teak is preferred for all exterior wood on boats. It is a heavy, dense wood with uniform grain. It resists splintering well and, for a hardwood, can be cut rather easily. However, it is abrasive and therefore dulls tools fairly quickly. Regular resharpening will ease the carving process. Teak’s expensive, but well worth it for this project, where the investment in time greatly outweighs the cost of materials.
Where to get teak
Few lumberyards carry teak, but coastal cities usually have at least one lumber company that carries boat lumber. As an alternative, I’ve obtained good quality teak by ordering it from M. L. Condon Company, Inc., 260 Ferris Ave., White Plains, NY 10603; 914-946-4111. Other companies can be located on the Internet. You might want to buy a little extra teak to practice carving a couple of letters.
The next step is to shape your nameboard. If you have chosen the ribbon style, you can achieve more realism and a three-dimensional look by cutting out the “wings” separately and gluing them to the back of the board with epoxy. After the glue has set, carve the “wings” to get that “blowing in the wind” look. This is reasonably easy to do, but use extra thought and care when carving the detail that shows the ribbon curling back behind the main board.
If your transom is fairly flat the “wings” will raise the nameboard off the transom and make it unnecessary to bend the board. However, if you must bend the board to fit, the best way to do it is by lamination.
Bend by laminating
Begin by measuring the curve of your transom. Ask a friend to hold the edge of a piece of stiff cardboard against your transom so the cardboard is horizontal and perpendicular to the transom, as if he were holding a tray. Then hold a compass in a vertical position and move it along, so the point leg rides against the transom and the pencil leg scribes the curve of the transom on the cardboard. Of course, the compass must be opened sufficiently to span the greatest distance between the transom and the edge of the cardboard. Now cut the cardboard on the line scribed and you have your pattern for laminating the nameboard.
From 1⁄4-inch teak stock (you might get your teak supplier to mill this for you), cut three identical boards, each a little longer and wider than the main part of the nameboard. From scrap, cut three blocks of wood, each as long as the boards are wide. One should be as thick as the bent board will be high at the center. The other two should be as thick as the bent board will be high at the midpoints between the center and end of the board. Use shims as necessary. Space the blocks so that when the boards are forced down over them, the boards will form a curve identical to your cardboard template.
Try a dry run. Two large C-clamps should be sufficient to bend the laminations. Pad the clamps with short 1 x 2s to keep the laminations from cupping or possibly cracking. If everything has gone well, you are ready to glue.
Use epoxy glue for its waterproof qualities and strength. After mixing, apply a coat of unthickened epoxy to all surfaces to be glued. Now add a thickener (colloidal silica) to your remaining epoxy — just enough to keep it from running. Spread a liberal amount of the thickened epoxy to the glue side of the two outside laminations. Then stack the laminations on the bending blocks and, using your C-clamps, bend them to shape. It helps to have an assistant to hold things in place because the boards will tend to slip and slide when you tighten the clamps. After the laminations are clamped in place, look for gaps in the glue lines. If there are any, use additional C-clamps to squeeze the boards together. Do not use excessive pressure or you will starve the joints of glue. Use waxed paper between the clamp pads and the board, as necessary, to avoid gluing them to the nameboard.
Cut to shape
Let the epoxy cure overnight before taking the clamps off. Then cut the board to shape and attach and carve the “wings” to shape. Sand the board with 80-grit paper until it is free of tool marks. Finish up with 120-grit.
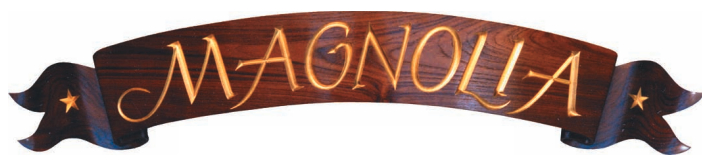
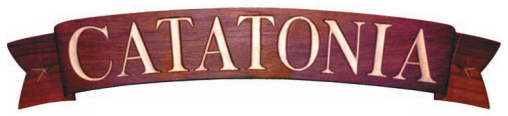
Letter style is a matter of personal taste. Plain block letters are the easiest to draw and carve and look good on a hailing-port board, but you’ll probably want something more stylish for your yacht’s name. Most libraries have books containing alphabets of various letter styles and the Internet is a great resource as well. There are also many other sources to select from. I found the letter style for Catatonia on the cover of a magazine.
After choosing your letter style, carefully draw each letter of your boat’s name full-sized on index cards. A draftsman’s dividers will help keep the letters to scale. For example, if the letters are to be five times the height of the sample, then every dimension of the sample can be projected full size by “walking” the dividers five steps. Draw each letter with thin, crisp lines and make sure you’re fully satisfied with its shape and proportions, right down to the finest detail.
Cut out the letters with a small sharp pair of scissors exactly on the drawn lines. Make any duplicates by tracing the cut-out letters on another index card. Use a sharp pencil to guard against making the duplicates larger than the originals.
When all the letters are cut out, draw a guideline on your nameboard where the bottom of the letters will rest. Place the letters on the board, beginning with the center one and working out in both directions. The spaces between letters should not be a set measurement; rather, the shape of adjacent letters determines the amount of space left in between. Again, use your “artist’s eye.” View the board from various distances and angles. When fully satisfied, carefully trace the outline of each letter on the board. An accountant’s fine-tip, black-ink ballpoint pen works well and, unlike pencil lines, these marks are easier to see and will not rub off as you work.
Skill and care
So far, everything you’ve done can be easily corrected, even the ballpoint pen lines can be erased with sandpaper. Carving, however, takes some skill and considerable care. Serious mistakes might require starting over again with a new board. But a word of encouragement: Catatonia was my first experience carving letters, apart from initials carved on a tree with a pocketknife when love was young. Using carving tools (gouges and skews) was new to me. A few words about these tools:
- High-quality tools are worth the money. A complete set is unnecessary; buy only what you will need for this project. Tool requirements will depend upon the letter style and whether the letters have rounded or V-shaped bottoms. In any case, you will need two or three gouges of different sizes and a small-to-medium-sized skew. For V-cuts, you will want a V-shaped gouge. Also get a wood-carver’s mallet; a hammer simply will not do.
- Inspect your new tools. They probably require sharpening. They must be razor-sharp and be kept that way in order to do good work and avoid slips which can damage wood and fingers. When sharpening, be careful to maintain the original shapes and angles of your tools.
In describing carving techniques, I will deal first with the round-bottomed letter, such as I used for Catatonia, and then with the V-bottom or “incised” letter, as used for Magnolia. There are other styles, such as “intaglio,” in which the edges of the letters are cut squarely into the wood and the bottom is kept flat. Just the opposite is the relief style, where the surrounding wood is cut away, leaving the letters behind. But the basic carving techniques for the round-bottomed and incised letters can be applied to all other variations.
Rounded letters
For the rounded letters, I began with a 3⁄16-inch gouge. This was equal in width to the width I had chosen for the narrowest portion of all the letters. First I cut the entire outline of a letter, including the wide parts, using this narrow gouge. The material in the center of the wider parts was removed with a wider gouge, after the outline had been cut. The size of gouge used will depend on the size of the letters. Give thought to this when purchasing tools.
The direction of cut is parallel to the outline of the letter. Place the gouge on the wood so that, when you reach the desired depth, the cutting edge of the gouge will be just reaching the outline of the letter or be just slightly inside. Fine trimming exactly to the line can be done after the letter has been basically carved. Use the mallet on the gouge with a light tap, tap, tap. If you are patient, use the mallet with a little finesse, and watch the grain direction, there is little chance of making slips that will ruin your work.
In some situations it will be more convenient to push the gouge by hand. Avoid potentially dangerous slipping by always using both hands, one guiding the gouge, and the other pushing. And be sure the gouge is very sharp, to avoid unnecessary and hard-to-control pressure.
Incised letters
A different technique is used for V-shaped or incised letters. Either a skew or a shallow gouge can be used, depending upon which you find most comfortable. Both have disadvantages. With the skew, some precision of placement is required to have adjacent cuts appear seamless, while the gouge will leave a slightly scalloped surface, which must later be sanded flat. Practice with each and then choose what works best for you.
The direction of cut is perpendicular to the outline of the letter and the skew or gouge is held at an angle of approximately 45 degrees to the surface of the board. Make the first cuts just slightly to either side of an imaginary line that would be the bottom of the groove when it is completed. Gradually work out until reaching the edge of the letter’s outline. It is important to cut at the same angle from both sides to ensure that the line formed by the bottom of the V is exactly in the center and straight.
When cutting curved and pointed portions of letters, the V-gouge can be useful. Place the tip of the gouge just inside the starting point. Begin the cut by holding the gouge at less of an angle than you will on the final cut. Take out a little material at a time and gradually increase the angle of the gouge until you have removed just the amount necessary.
In wider, curved portions of letters, such as in an old English T, the V-gouge may not cut to full width, but you might want to begin with it. When you have cut as deep as possible with the V-gouge, finish up with a rounded gouge and skew. Use the gouge on the outside edge of the curve and cut perpendicular to the outline, letting the curved cut- ting edge of the gouge follow the curvature of the letter. On the inside edge of the curve, use the skew in a similar fashion. Cut a little at a time to avoid splitting the wood. Alternate cutting with the gouge and skew until reaching the outline. Remember to maintain a constant angle of cut from both sides to ensure the V-bottom forms a smooth curve exactly between the outlines.
No set rules
It is impossible to detail every carving technique. There are no set rules with regard to tools and techniques for achieving a certain cut. As you work, you will discover the methods that work best for you. Keep making practice letters until you’re successful. There is no point in moving to the actual nameboard until you have mastered the required techniques.
I hope, at this point, you won’t decide to rename your boat something with only three or four letters. Each letter well done takes considerable time. But after each is successfully carved, you will feel more and more pride in the project.
Finish each letter as carefully as possible with carving tools, so very little sanding will be required. When sanding, avoid rounding edges that are supposed to remain sharp. To do so would destroy the precise, crisp outline of the letters.
After the letters are carefully sanded, they should be colored. Gold is traditional. I’ve used gold enamel, which looks pretty good at first but tarnishes in time. Gold leaf is the best, but it is expensive. If you are inclined to do it yourself, larger libraries have books describing gilding techniques.
If you are going to paint your letters, rather than using gold leaf, don’t worry about painting exactly within the borders of the letters. After the paint dries, sand the face of the board with sandpaper wrapped tightly around a wooden sanding block. This will sand away any paint that has strayed outside the letters.
Use the same finish
The finish you apply to your board will depend on what you do to the other wooden trim on your boat. If you use oil on your other teak, oil the board; if you use varnish, varnish the board.
If you are going to apply gold leaf, apply three coats of varnish before leafing. First scrub the board thoroughly with acetone to remove surface oils. Thin the first varnish coat by approximately 20 percent, so it can penetrate the pores of the wood. The remaining coats can be put on unthinned. Sand lightly between coats and sand the last coat, over which the sizing, which glues the gold leaf, will be applied. After gold-leafing, apply three more coats of varnish.
The final step is to mount your new nameboard on the stern of your yacht. I used two 1⁄4-inch stainless-steel machine screws from which I cut the heads. Then I drilled two blind holes in the back of the board in the thicker part where the wings were attached. The holes were slightly smaller in diameter than the bolts, so the bolts formed a thread in the wood as they were turned in. Then I removed the bolts and coated the inside of the holes and the bolt threads with epoxy and reinserted the bolts. After carefully drilling matching holes in the transom, I had a friend hold the board in place while I installed washers and nuts from the inside.
When the fellow in the neighboring slip admiringly asks where you got your new nameboard, you can tell him, with richly deserved pride, that you carved it yourself.
Paul Ring is a contributing editor with Good Old Boat. He has sailed, repaired, modified, restored, and built boats for the past 42 years. Magnolia, his restored Cheoy Lee Offshore 27, graced the cover of Don Casey’s book, This Old Boat. Paul currently sails his Nonsuch 260 with first mate, Barbara Brown, on Mobile Bay. He has written many how-to articles for sailing publications.
Thank you to Sailrite Enterprises, Inc., for providing free access to back issues of Good Old Boat through intellectual property rights. Sailrite.com