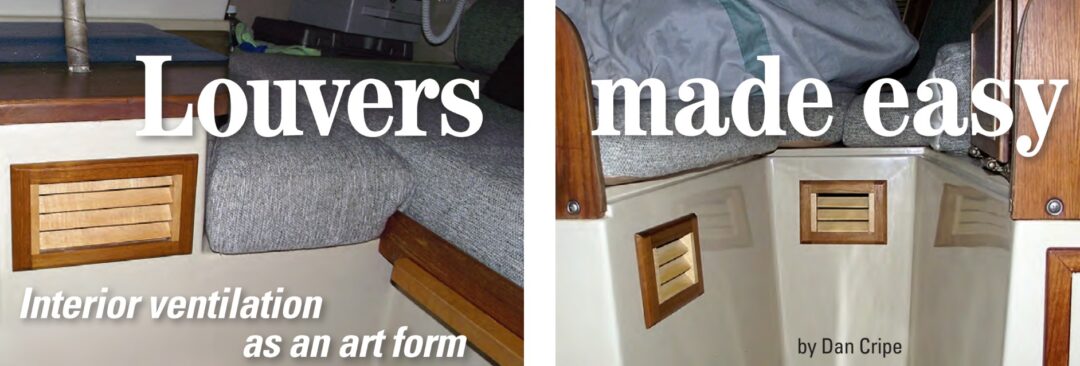

Interior ventilation as an art form
Issue 90: May/June 2013
Among the rituals we held during our many family sailing adventures, one was airing out the boat. For a family of six crowded in a small sailboat cruising the waters of the Pacific Northwest, this was a necessity. On bright sunny warm days we carefully arranged all the cushions topside and hung the sleeping bags side by side over the boom. In the cabin below, we opened all the hatches while we cleaned the interior.
I knew, too, that at the end of the cruise in four to six weeks, we’d be heading home to the deserts of southern Idaho and any remaining moisture would be baked away. I did wonder, however, what we would do if the cruise were to last an entire summer. How would we keep the boat ventilated?
The easiest way to deal with damp conditions is to create good air circulation. To do this you need vents: vents on the cabinet doors, vents on the lockers, and vents in the storage bins. Rather than buy cheap-looking plastic ones or expensive wooden ones, I decided to make my own. I’ve watched videos showing someone constructing louvered doors for homes. This project seems to require routers and special jigs and a lot of time. What’s more, this complicated technique won’t work on the small vents we needed for our bins and lockers. Out to the woodshop I went to find a quick and easy way to make louvered vents.
A decorative addition
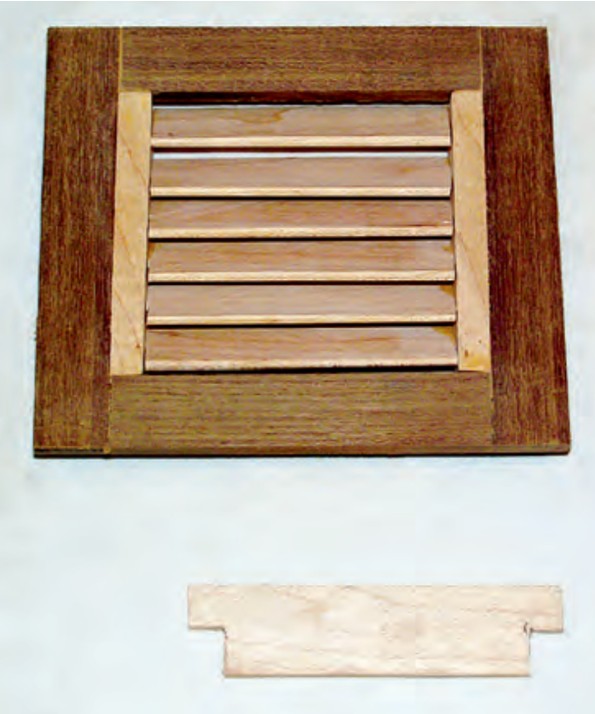
First comes the wood. Teak is fine, but I like to use a combination of woods. I chose teak for the outside frame and hard maple for the louvers. The contrast is stunning, like a teak-and-holly sole. I went a step further on our beloved 26-foot Kent Ranger. Before we sold it, I had redone all the interior cabinet doors and added several vents. I used teak for the outer frame, a narrow piece of maple to separate the frame from a panel of black walnut, and maple for the louvers. When we visited our old boat many years later, the doors and vents looked as good as when I first made them.
On our new good old boat, a 1982 O’Day 23, I wanted to add louvers on the storage area under the V-berth and for the bins around the ice box. As this little boat is really a weekender, I wouldn’t normally bother with louvers, but we were in the middle of a refit prior to cruising for the entire summer.
The next step was to figure out how big to make the louvered vents. After that, it was time to start cutting wood.
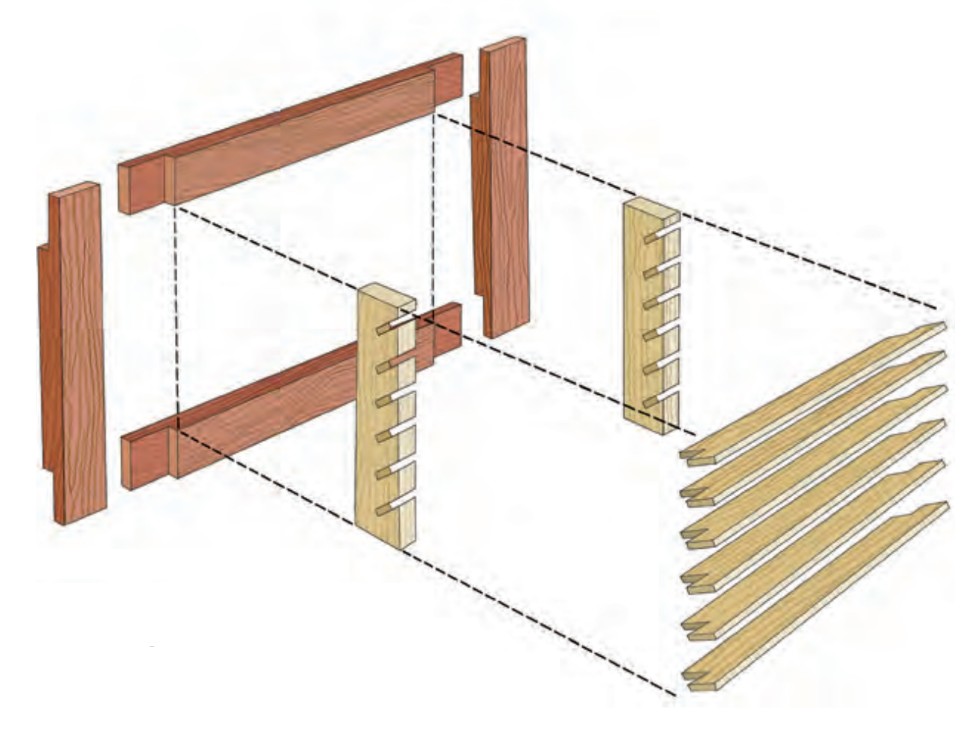
Simple components
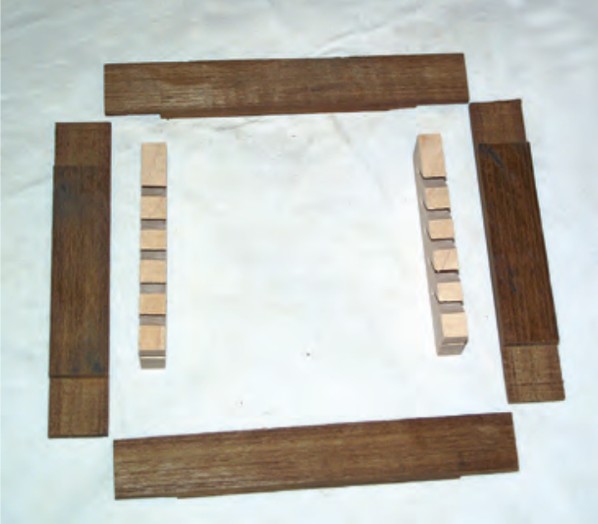
To look at the completed vent you might think this is a complex project, but it’s made of just three different pieces: the perimeter frame, the louver slats, and the strips of wood with 45-degree slots cut into them into which the slats are fitted.
Using the table saw, I ripped a piece of teak to size for the perimeter frame, 3/4 x 5⁄16 inch. For one of my louvers, I cut two 5½-inch lengths and two 5-inch lengths, then cut half-lap joints in the ends of each of them to form the corners. I glued the corners with epoxy. This completed the perimeter frame.
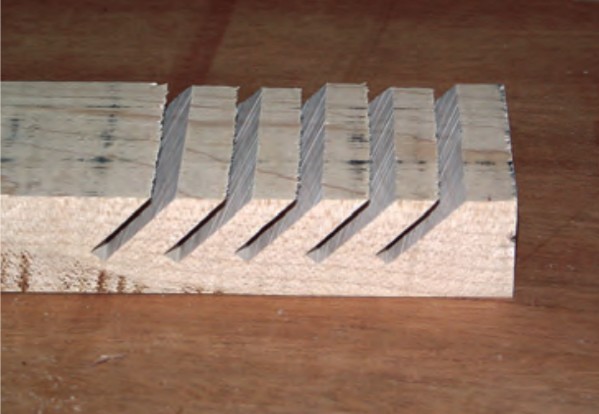
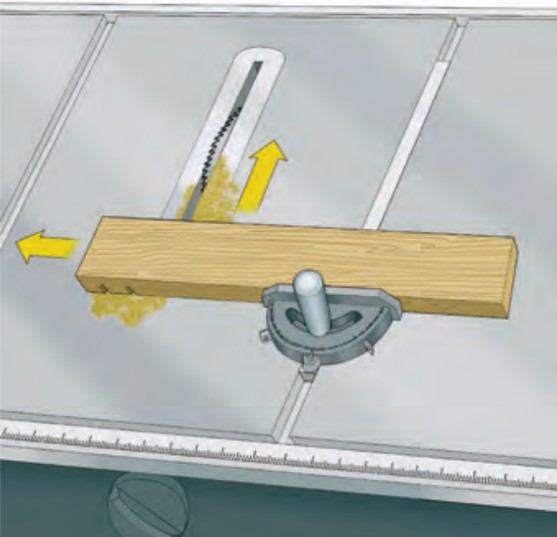
The fun part is making the strips to hold the louvers at the proper angle. In my case, that angle was 45 degrees. The most important part of this step is to use a piece of wood that’s longer and wider than needed (you can cut it to size later). My board was 4 x 8 x 3/4 inch. By using a larger board, you keep your fingers far, far away from the carbide saw blade. You do want to keep them far, far away. How I know this is material for another article.
I tipped the saw blade to 45 degrees and set the cut depth so the blade would cut through about two thirds of the board, making the slots about 5⁄8-inch deep. Holding the board against the miter fence, I made a series of cuts across the full 4-inch width of the board. I started the first cut well in from the end, knowing I would trim it later to the correct length.
It’s best to keep the cuts no more than 5⁄8 inch apart; 1/2 inch is better yet. By using an extra-long 4-inch-wide board, I could make pieces for several louvers.
Next, I set up the rip fence on the saw, reset the blade to 90 degrees, and cut my slotted board into 3⁄8-inch-wide strips. I now had several pieces of wood 3⁄8 x 3/4 x 8 inches with a lot of 45-degree cuts in them. I cut two of them to the appropriate length and glued them into the inside of the louver frame.
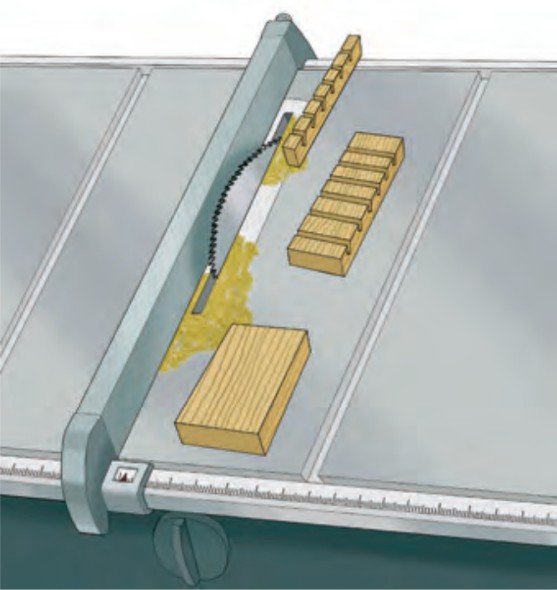
I then cut the louver slats. For this louver there were only six. Taking another oversized board, I ripped strips 3/4 x 1⁄8 x 4 inches. The 1⁄8-inch thickness was for a snug fit in the slots cut with the table-saw blade. (A thicker blade would require thicker slats and a finer blade thinner slats.) For this louver, I cut 4-inch-long slats.
Final assembly
It was now time to insert the louver strips into the slots. Note that they fit from the back of the frame, so they needed a little trimming to bring them flush with the face of the frame. Using a knife, I marked the front edge of the louver strip next to the slot at each end. I then cut away just enough of the louver strip for it to fit flush with the face of the frame. The cut strip looks like a flattened T.
Once all the strips were trimmed to fit and glued in place, I was almost done. All that remained was to sand the whole assembly smooth and, using either a round-over or a router with a round-over bit, ease the outside edge of the frame.
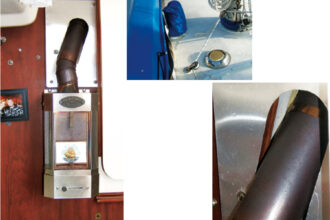
I made this particular louver to fit on a fiberglass interior panel and glued it in place with a little bead of silicone. If fitting a louver in a locker door, you might want to make a frame for the inside.
Even though that summer’s cruise was less than summerlike — it was more cool and damp than warm and dry — our boat remained dry inside and we had no dampness at all in the vented lockers.
I used scrap pieces of wood that were lying about the workshop, so the cost was near zero. Even if I had purchased the wood, the outlay would have been minimal since little material is needed. All it takes is a little time and — as this is boat work — it’s more pleasure than work.
Dan Cripe took “early retirement” from the building industry in 2010 and has lots of time to devote to sailing and writing. He and his wife, Teresa, have owned a series of boats, all named Fantasy, which they have sailed with their four children at home in Idaho and also on the “big waters” of the Salish Sea. Their current Fantasy is an O’Day 23.
Thank you to Sailrite Enterprises, Inc., for providing free access to back issues of Good Old Boat through intellectual property rights. Sailrite.com