Renovating a tender tests a range of skills

Issue 68 : Sept/Oct 2009
Picture a boat with cracked and crazed gelcoat, delamination, blisters, composite failures, peeling paint, and holes. If you had no experience with boat repairs, any one of these would be enough to keep you lying awake in bed at night. And although most books on maintenance and repair assure us that fixing such problems is not rocket science, it requires a certain boldness to take a grinder to your boat and hope it will all turn out in the end. Reviving an old dinghy is a less intimidating way to get your feet wet, and it can present the full range of problems you’re likely to find on the mother ship but on a more approachable scale.
Like so many others, this story starts on a dark and rainy night. Carrying my 6-month-old son tucked in his Snugli, I investigated a used 7-foot dinghy at a modest price.
It was dark out and the flashlight was rather dim. It was only in the light of the next morning that I realized my new acquisition might require slightly more attention than I had originally anticipated. Most notable was the considerable heft it took to remove it from the roof rack (the seller had helped me load it up the night before). I briefly propped up my spirits with the hope that some of that 82-pound load was just water in the buoyancy compartments, but the lack of sloshing as I moved the dinghy around did not bode well.
Assessing the damage
The dinghy had sat unused outdoors for a long time. Power washing removed years of grime and gave me the first chance to thoroughly survey what I was up against: chips in the gelcoat, cracks in the gelcoat, separation of the fiberglass shell and subsequent exposure of underlying plywood in the bow and stern, heavy wear and deep chips along the keel/skeg, lots of peeling paint, rusty fasteners and cracked holes where oarlocks had once been, and missing outboard mounting plates. It was not a trivial list, but it was manageable. However, two questions warranted further investigation: the condition of the plywood formers for the bow and stern and the still puzzling extra weight. The answers to both were disappointing.
The amount of damage that had resulted from the separated fiberglass seams on the bow and stern gave me pause. Poking a screwdriver into the gap revealed that the wood near the fracture was not solid. This was not a good sign.
Further exploration was going to require some pretty significant destruction, so I decided to table that problem and investigate my theory of water in the buoyancy compartments under the seats. This also was going to require some destruction (the seats were completely sealed). However, I figured adding an inspection port to each of the seats would create some handy watertight storage under the seat and provide a hole big enough to see how much water was in the seat.
Saturation and delamination
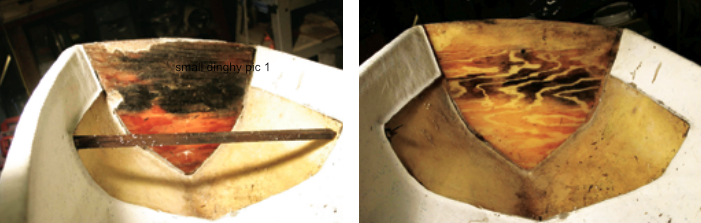
Cutting the holes revealed that the seats were definitely not watertight. The failure of the fiberglass joints and other cracks had allowed water to enter the buoyancy compartments in the bow and stern seats, completely delaminating the plywood inside and saturating the loose foam. At this point, I was certain I wanted a better look at the bow and stern plywood formers.
I removed the seats with a thin cut-off wheel in a grinder. Both pieces of plywood were completely saturated and significant portions of each had turned to mush. Water had gained access through multiple failure points.
The worst breach was where the seams at the top of the formers had separated, but the towing eye in the bow had not been sealed and water ingress had made the plywood into which it was fastened soft and spongy. In the stern, lifting handles and a wooden outboard mounting plate had been added. The screw holes had let water in and a hard pull on the handles would have separated them from the mushy wood that surrounded each screw. Replacing the plywood formers seemed like the only option. For such a tiny boat, the list of repair projects had grown quite long.
Fortunately, that was the end of the upwind leg of the project. From that point on, I could take on the far more rewarding jobs of repairing and improving.
Restoration commences
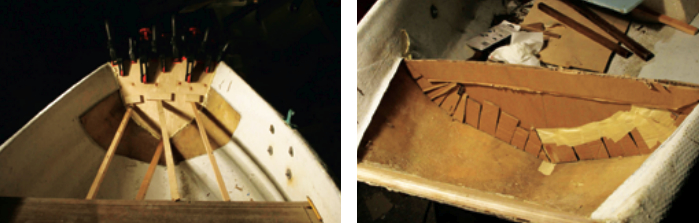
After removing the old plywood formers from the bow and stern with a putty knife, I used them as templates and fitted new ones. I cut the shapes out of outdoor-grade plywood with a sabre saw with the blade set at an angle to match the sides of the dinghy. I glued the formers into place with Elmer’s Probond polyurethane glue.
An interesting property of this one-part waterproof glue is that it foams while curing, with the degree of foaming dependent on the amount of moisture present. For the face of the board, where I wanted very little foaming, I wiped the plywood with a barely damp cloth. However, the original plywood formers (and thus the corresponding fiberglass shell) were cut rough and left many irregular voids around their edges. Wiping the edge of the new plywood and the corresponding fiberglass with a dripping wet cloth was sufficient to cause more aggressive foaming that filled the gaps nicely. It was easy to trim the foam back after it had cured.
To seal the plywood formers, I epoxied a layer of 6-ounce fiberglass cloth onto them with generous tabs to attach them to the hull. When working with epoxy resin, I like to use the slow hardener, as it reduces the stress of rushing to get everything in place before it sets. On the rare occasion when I want epoxy to set faster than over night, I use an electric heater to speed the curing.
Foam foundations
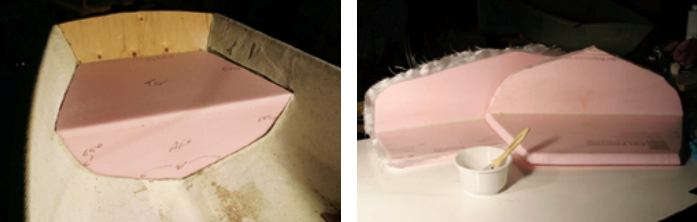
Replacing the seats was next on the list. The original seats were relatively undamaged and I could have fit them back into place with a bit of fiberglass patching and filler. However, the entire supporting wood framework had rotted away and fitting new wood inside the seat to match the seat and the hull of the boat would not have been an easy task. Instead, I decided to make new seats out of foam laminated with fiberglass. These seats would not suffer from rot as the originals had and they would provide permanent flotation as well.
I made cardboard templates for the seat parts. For an irregular shape like the hull, it’s easiest to cut the template small and, using a hot-glue gun or tape, fasten to it little pieces of cardboard arranged to follow the profile of the hull.
I transferred the templates to extruded polystyrene foam and cut around them. I glued the two pieces of foam for each seat with polyurethane glue. After the glue had cured, I checked the fit of the seats in the boat. Finally, before the undersides of the seats became inaccessible, I applied a fillet of epoxy thickened with colloidal silica to the joint and a single layer of fiberglass cloth to the surface.
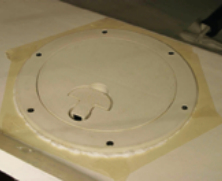
Before gluing the seats in place, I added a few details. I wanted inspection ports, so I cut backing rings out of scrap waterproof shower board and drilled holes in them to match the inspection port bolt pattern. These rings could have been cut in half and fed through the holes in the seats, but it was easy to put them in place before glassing in the seats.
A wheel in the skeg
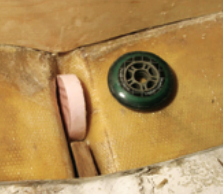
I also liked the idea of having a small wheel built into the skeg of the boat. Our sailboat spends the summer on a mooring, and the walk from the car to the launch site when carrying gear is a lot more pleasant if you don’t also have to carry the dinghy.
To make a well for the wheel, I cut a foam disk slightly larger than the wheel I intended to use. I then cut an opening in the bottom of the skeg, using a thin cut-off disk in a grinder and a rotary tool. I covered the foam wheel blank with a layer of packing tape and slipped it tightly into the opening in the bottom of the skeg. Inside the boat, I faired the sides of the skeg into the foam wheel blank with thickened epoxy, then added three layers of fiberglass cloth atop the wheel blank to make a watertight enclosure. After the epoxy had cured, I plucked the foam wheel out of the opening on the outside of the boat and drilled a hole for the bolt that would be the wheel’s axle.
At this point, I realized the stern seat wasn’t going to give me enough legroom to row from the center seat. Fortunately, it was still possible to cut back the face of the seat. I added two more pieces of foam to the stern seat so it would still have a small storage space/buoyancy compartment. I attached the seats to the hull with polyurethane glue.
Once again, the foaming glue helped bridge small voids where the fit of the parts wasn’t perfect. After I’d glued the seats in place, I applied a thickened-epoxy fillet to all the joints where the seats met the hull and tabbed the seats into the hull with fiberglass tape. Finally, I covered the seats themselves with fiberglass. The outer corners of the seats received three layers of cloth for additional impact resistance, while I covered the flat surfaces with two layers of cloth.
Patching perforations
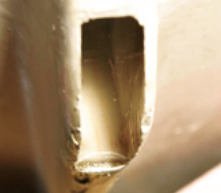
I repaired various holes in the boat, including those where the hardware had been mounted, by grinding the
surrounding surface back to solid glass. All the openings were small, so I applied packing tape behind them and laid in pieces of glass and thickened epoxy to fill the holes and build them up to the profile of the surrounding hull.
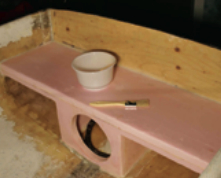
While repairing the damage from the oarlocks, I noticed a few areas where the gunwales were cracked. To reinforce this area, I brushed thin epoxy into the cracks then ran a fillet of thickened epoxy along the inner edge of the gunwale. To finish off, I covered the entire underside of the gunwale with an additional layer of fiberglass cloth.
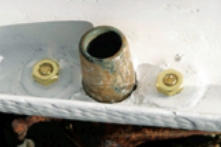
My next task was to prepare the dinghy for the hardware. The original installation of the towing eye, handles, and the motor’s mounting plate had all created spots for water to enter the plywood formers. To correct this, I drilled oversized holes for each piece of hardware, filled the holes with epoxy, then re-drilled them to the smaller size required by bolt-through fasteners. The original mounting of the oarlock sockets was also problematic in that wooden blocks under the gunwales had failed and the sockets had torn loose from the fiberglass. To correct this, I bedded the new cast-bronze oarlock sockets in thickened epoxy. Below the gunwale, I bedded oversized washers in thickened epoxy to provide a bearing surface so I could use through-bolts rather than screws.
A little brightwork
The woodwork for the boat was very straightforward. The wooden rowing seat received a heavy sanding and several coats of Daly’s SeaFin Teak Oil. I learned about Daly’s from Rebecca Wittman’s excellent book, Brightwork: The Art of Finishing Wood. Both the book and the oil are now at the top of my wood-finishing arsenal. I made the disposable outboard-motor mounts out of some scrap fir cut to trapezoids that looked about the right shape. They also received a coat of oil.
With the structural issues resolved, it was time to move on to the cosmetic problems. I opened the cracks and chips in the hull using a rotary tool with a small round cutting head. Next, I wiped down all the openings with acetone and a rag to provide a clean bonding surface, using lots of rags to avoid contamination. Finally, I filled all the holes and troughs with epoxy thickened half-and-half with fumed silica and microballoons. The only justification I have for this mixture is that I find fumed silica by itself a pain to sand and microballoons by themselves less impact-resistant. This compromise makes sanding and fairing less painful (at least I tell myself it does, which is all it takes to keep me sanding).
Ready for painting
After I’d sanded the entire hull with 280-grit sandpaper, using a semi-rigid rubber backing block, I was finally ready for painting. I could have continued to sand with finer grits, but that would have made the first landing on a barnacle-laden beach too painful. I vacuumed the boat and the area around it and then left things alone in the garage for 24 hours to let the dust settle. Before painting, I wiped down the boat with a rag wetted with solvent (use whatever solvent is recommended to thin your paint).
The paint I chose had been recommended by several plywood boatbuilders who’d had favorable results from urethane-fortified alkyd paint. Several manufacturers sell these under the label of deck and porch paint; the one I used was made by CIL. At about $30 a gallon, I figured it was worth a try and, if it worked on the dinghy, I’d also use it on the dry bilges of the mother ship. An added benefit was that I could thin the paint and clean it up with regular mineral spirits rather than a proprietary solvent.
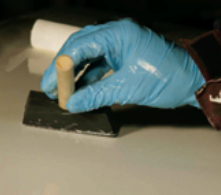
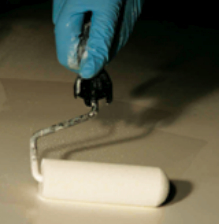
I applied the paint using the roll-and-tip method. I rolled the paint on with a foam roller and followed by drawing a foam brush very lightly over the area to break air bubbles and remove the orange-peel effect the roller can leave behind. Overall, I was pleased with the ease of this painting method and the good results I obtained. The only hiccup was that the first coat of paint revealed that I hadn’t thinned the paint enough and had left brushstrokes behind.
Subsequently, I used a piece of glass to test how the paint was flowing. This made it much easier to judge how the paint was going to act and saved me from sanding out brush marks. I gave the outside of the hull three coats of paint. I also gave the interior of the boat three coats. However, since it had a textured surface, I rolled the paint on and didn’t brush it out. For the final touch, I bedded Bomar inspection ports in silicone in the fore and aft seats to complete the watertight storage compartments.
A positive outcome
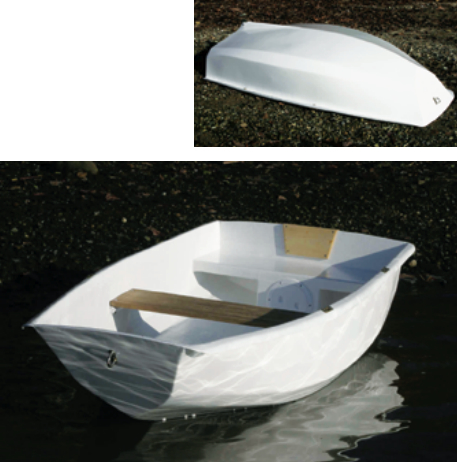
So was it worth it? Well, I suppose that’s a matter of perspective. Without question, refitting new formers and seats made up the lion’s share of work on the project. I could have saved myself a great deal of work if I’d carefully examined the fiberglass that encases the plywood bow and stern formers before buying a long project list along with the boat. A quick examination of the dinghy rack at the local marina revealed that many dinghies are built this way and this sort of damage is very common.
The total cost, including the purchase of the dinghy and materials I had to buy (I already had epoxy and fiberglass cloth left over from another project) was under a third of what even the least expensive plastic dinghy would cost new. I’ve ended up with a really nice dinghy that’s well-suited to my needs. I also have a boat with a sturdier towing eye, a skeg wheel, a second set of oarlock sockets to provide multiple rowing positions, 32 pounds of foam flotation built into the seats, storage areas in the seats with sealed air compartments for extra flotation, and sufficient legroom in a 7-foot dinghy for my 6-foot 3-inch frame.
In fact, I recommend a project like this. For a very modest investment, I think a dinghy restoration presents a great opportunity to brush up your skills and express a little design creativity.
Darren Bos, an aquatic ecologist, lives on the west coast of Canada and explores the Strait of Georgia with his two sons, wife, and dog aboard their Hurley 20, Second Wind. With two young boys in the mix, Darren can manage just one major refit project a year on Second Wind.
Thank you to Sailrite Enterprises, Inc., for providing free access to back issues of Good Old Boat through intellectual property rights. Sailrite.com