Making good old hardware gleam like new
Issue 68 : Sept/Oct 2009
Bringing the luster back to old metal boat parts is a lot like doing brightwork. It can be very tedious and time-consuming. The end result, though, can be very satisfying.
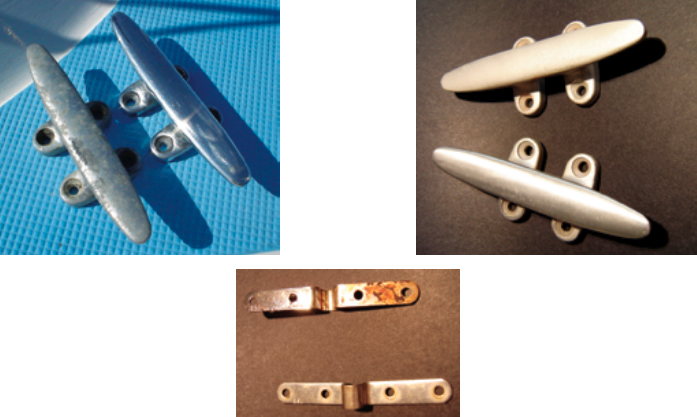
Many older styles of boat hardware are no longer available, which leaves you with a choice: buy all new hardware or recondition the old. As long as the old hardware is serviceable, you can make your boat look as good as or better than new (and original). It’s all in the details, and nothing looks better than polished metal fittings.
To start, you’ll have to remove the hardware, at which time I think you’ll learn a lot about its true condition and that of the fasteners. If the piece was not attached or bedded properly, you may have some additional work to do to the structure it was attached to.
If you’re dealing with aluminum fittings, they were likely attached with stainless-steel bolts or screws. Stainless steel and aluminum do not like each other. This will become evident as you remove the fittings. In the case of cleats, which should be through-bolted, you may not even require help on one side or the other. On most boats of any age, the stainless-steel bolts are probably held tight in the fittings by corrosion. Removing the fittings can then be a one-person job.
Separate with heat
Once you have removed the piece and it’s at the workbench, you can take out the bolts. The easiest way to do this is with heat. I use a propane torch with a trigger switch and attach it to one of the fat bottles normally used for stoves and barbecues, which makes it stable enough to stand upright when not in use.
Aluminum and stainless steel, being very different materials, conduct heat at different rates. Aluminum will heat up much faster than the stainless steel. While you do not want to apply any more heat than necessary, the piece will be way too hot to touch with your bare hands and, to handle it safely, you’ll need some heavy-duty gloves.
Apply heat slowly to the area where the bolt passes through. As it heats up, the aluminum will expand, freeing the bolt. You will have to work up to the proper amount of heat gradually. Take your time, and be careful. When you are done, set the piece aside and let it cool down slowly. Do not quench it or cool it rapidly.
You can also use heat to free up frozen turnbuckles, but you must always be very aware of the direction of your flame. Even when the materials are the same, heat applied to the outer part will expand it faster than the piece inside.
Clean before polishing
Now it’s time to clean your piece. The initial cleaning can be done different ways depending on the amount of corrosion present. This also is the time to remove any paint or bedding compound. If you have access to a bead-blasting cabinet, that is the easiest way to start. If not, take care in the process. Patience will pay off here!
Before cleaning aluminum, read the back of your sandpaper, wet-or-dry paper, or emery cloth or rolls, to make
sure you use only aluminum-oxide abrasives. Anything else will introduce contamination, which will cause corrosion. Any wire brushes you use should be stainless steel. That may sound contradictory to previous information, but stainless steel will not introduce contamination in the way a steel brush would. Do not use a brush that has had any chemicals on it.
I have small-diameter brushes of different sizes for cleaning the holes in the hardware and I also find abrasive rolls handy for this part. A small die-grinder, such as a Dremel tool, is useful here and also when polishing the piece. Many useful attachments are available to fit these tools. These will be helpful in various stages in the process.
Smooth and polish
Once the part is cleaned, it’s time to smooth it and polish it. Eastwood Supply makes very good videos on the subject available online, in both VHS and DVD format. While they are directed at the automotive enthusiast, the information and techniques they provide apply to any metal. You can also request a printed catalog.
The one exception I take to the methods shown is the use of gloves. In my mind, gloves and rotating machinery do not go together. I have been a sheet-metal worker for many years and have seen a fair number of accidents involving gloves. At this time, I still have a full set of fingers. If the piece gets hot, you are probably working it too hard. Either way, you can cool it with patience or a cooling bucket. Buffing doesn’t produce anything like the heat generated by the torch, and removing it by quenching will not alter the molecular structure of the metal. If you are doing multiple pieces or parts, you can set the warm one down and work another piece for awhile. If you do quench a piece, dry it off thoroughly before applying it to the wheel again.
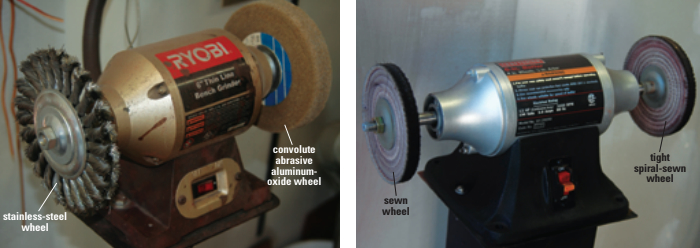
You can do your buffing and polishing with a minimum of equipment. Ideally, the more you invest, the easier the job will be. However, I am going to assume you do not want to spend a lot. If you have a 6-inch bench grinder, you are already started. You’ll just need to get wheels and buffing compound.
The best setup is a buffing motor. The only real difference between that and a standard bench grinder is that the shafts are longer on the buffing motor, allowing better access and more room for your piece. Both machines and the wheels and compounds can be found at any number of hardware and tool stores, even the big chain stores.
Safety around buffers
Buffing wheels are not guarded because guards on these wheels would create their own hazards and restrictions. With this in mind, you must be careful when working with them. Sometimes the wheel will grab the piece right out of your hand and throw it. Make sure you know what’s behind the wheels. While more powerful buffing motors are available, I recommend a 6-inch motor. It’s not too powerful to handle and the smaller motor and wheels will still do the job.
Buffing compounds are available for different metals and purposes. In fact, they are also available for plastics. In any case, the label will usually tell you what to use for a specific project. I keep several different compounds on hand as I am likely to be working on different metals at any given time. I also have different wheels for each type of metal, which is the best way to avoid cross-contamination.
Prior to beginning the actual buffing and polishing, remove any rough spots or scratches and gouges. Working the piece smoother and smoother with successively finer grades of sandpaper will save time in the polishing process. If you need to use a file on your piece, be sure it’s clean before using it. A file can drive contamination deeper into the part, which will make it harder to remove. Always have a file card handy.
Final polish
Once you have done the handwork, it’s time to start the actual buffing and polishing. Depending on your piece, you may be able to do all the work on the wheels, or you may have to use a small die-grinder for the smaller areas.
This part of the process is somewhat dirty. You will inevitably get a certain amount of the compound on your hands and clothes. Wear a clear face shield to protect your eyes. It will keep your face cleaner at the same time.
You’ll need at least two different buffing wheels, a spiral-sewn wheel and a loose-sewn cotton wheel. The spiral-sewn wheel will do most of the initial work, and the loose-sewn wheel will do the finishing of the piece. In addition to these two wheels, you might want a sisal wheel. It’s more aggressive, has a better cutting action, and can be used before polishing to remove quite severe marks and gouges from a piece that has excessive damage.
Re-installing the parts
When fitting the hardware back on your boat, take precautions. First, you should provide new backing plates if there were none before. A simple bolt, washer, and nut will not suffice. At the very least, use fender washers to help spread the load and provide a more secure fitting. Backing plates will provide even more security. They are not all that hard to fabricate and certainly look better than a mess of washers on the overhead.
Another thing to consider is corrosion, especially if you have aluminum hardware that will be attached with stainless-steel fasteners. You need to keep the stainless steel and aluminum from causing each other problems. Tef-Gel is a superior product that, when applied to the fasteners, prevents corrosion, galling, and seizing. Using it will also make it a lot easier to disassemble the parts in the future. Stainless-steel threads tend to gall, and preventing that in itself is worth the cost of the Tef-Gel. Even if you have bronze or other fittings, applying this product to your fasteners is a wise precaution.
While I likened bringing the shine back to hardware to doing brightwork, it’s not as daunting as it may seem at first. At least fittings can be restored individually. By reconditioning your deck hardware, you can keep your good old boat original and rest with the peace of mind brought by knowing a job’s well done.
Derk Akerson was raised on and about boats. He and his wife, Terri, sail a Coronado 23 off the coast of California, but they’re on the lookout for something bigger for retirement voyages.
Thank you to Sailrite Enterprises, Inc., for providing free access to back issues of Good Old Boat through intellectual property rights. Sailrite.com