A new cockpit locker provides stowage galore
Issue 59 : Mar/Apr 2008
Have you ever seen a sailboat with too much cockpit locker stowage space? Neither have I. Unfortunately, the reverse is more typical. A deep cockpit locker handy for stowing everything including spare sails, fenders, water cans, and even the dinghy’s outboard motor, is often sacrificed for a spare bunk in the form of the quarter berth.
On a small sailboat in the summer a cramped quarter berth lacking cross ventilation is virtually uninhabitable. In foul weather, the unfortunate inhabitant of this bunk has his face exposed to any sea spray coming through the companionway. Most quarter berths cannot be slept in anyway because they are used as a stowage area for items better stowed elsewhere.
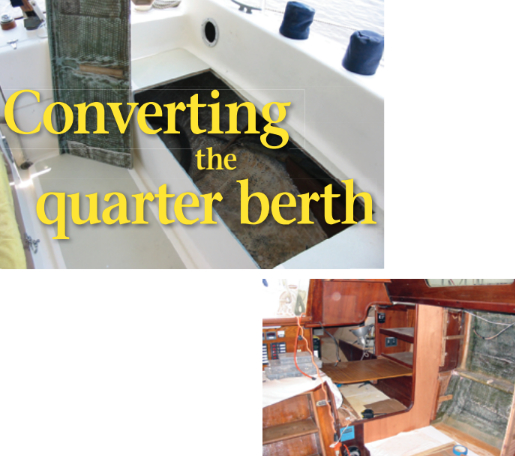
When our friend, Dan Grant, asked us to refurbish Psyche, his 1976 Columbia 8.7, one of the improvements was to convert the port quarter berth to a large cockpit locker similar in size to the existing starboard locker. A new hull-to-deck bulkhead, to be located 2 feet aft of the head of the berth, would separate the locker from a new navigation counter with stowage underneath and a radio locker to the side.
First, we removed and discarded an air conditioner and its ducting from the foot of the berth and a refrigeration compressor to the side of it. We also removed a sagging vinyl headliner, along with its disintegrating foam backing. Then we cut away the plywood bunk bottom and side, and peeled moldy carpeting off the hull. With a tape measure, we laid out marks for the position of the forward bulkhead and the top locker lid.
Better access
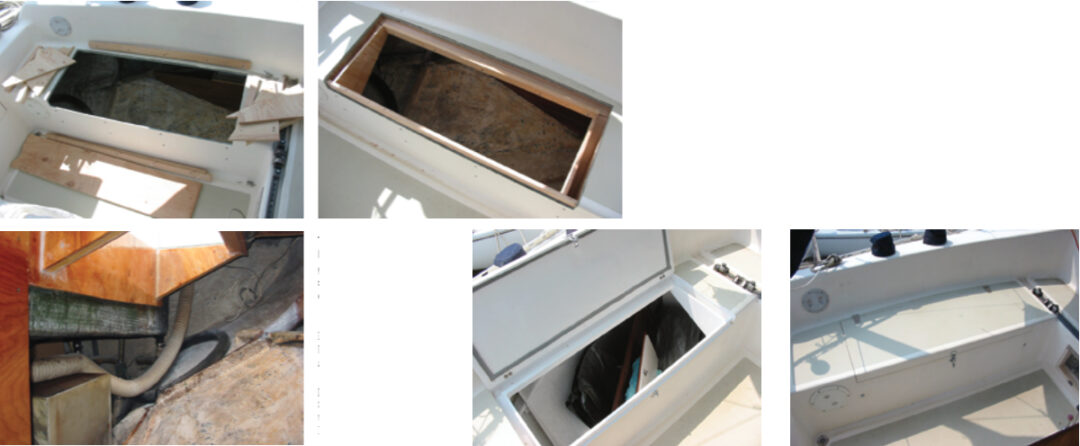
In order to get maximum access to locker contents, I marked out a locker lid that would be cut out of a seat only slightly longer than the 38-inch-long starboard locker door and full seat width, minus an inch for the hinges.
We used holes from an 1⁄8-inch drill bit to mark the corners of the lid, which was then cut out from above with a fine-toothed jigsaw. We took care to make the cut as straight as possible because the cut-out section would become the new lid. The cockpit seat I cut through was cored with 1⁄2-inch balsa. To seal the cut seat and lid, I used a chisel to remove balsa to a depth of 1⁄2 inch along all edges of the cut and fi lled this void with thickened epoxy.
Now I could work with more elbow room and better ventilation. My wife, who assisted me on this project, made sure the interior of the boat was protected from fiberglass dust by sealing it off with a plastic shower curtain. Next, we cleaned all fiberglass surfaces and thoroughly abraded them with a 36-grit disc on a 7-inch variable-speed sander/polisher. For corners, I used a similar disc on a 4 1⁄2-inch angle grinder. In really tight spots I used a #60 flap disc on a drill motor to quickly cut through the old paint.
Although we removed the bunk, hull stiffness was maintained by not disturbing the longitudinal hull stringers. I cut away the aft bulkhead of the original quarter berth, except for the area where the bulkhead was bonded to the hull with fiberglass tabbing. The integrity was maintained by a 3-inch margin which was left undisturbed. Because of the new forward bulkhead, the hull in this area was actually strengthened overall.
Replaced panel
Originally, there had been an engine access panel between the top of the quarter berth and the engine compartment. We replaced this panel with a larger one to provide better access to the engine and to the diesel tank fittings under the cockpit footwell. As an added bonus there was room to install a second 20-gallon water tank under the footwell behind the fuel tank.
At the aft end of the old bookshelf was a partial bulkhead. I cut the teak trim off this bulkhead and, using a cardboard template, cut a new full bulkhead of 1⁄2-inch plywood and sistered it onto the partial old one.
Some lightly built boats may require fitting a wedge-shaped piece of closed-cell foam between the hull and the edge of new bulkheads to spread the load and prevent a hard spot on the hull. The process is described well in the “Scratch and Itch” chapter of Don Casey’s book, This Old Boat.
However, this Columbia, with its thick hull layup and generous hull stiffeners, required nothing more than roughly fitting the bulkhead to the hull and filling any small gaps with epoxy thickened to a peanut-butter consistency. I applied a fillet on both sides of the joint by squeezing more thickened epoxy from the corner of a plastic sandwich bag and rounded the fillet off with a wooden tongue depressor. Before the epoxy hardened, I laid four layers of progressively wider 4-, 6-, 8-, and 10-inch-wide medium-weight fiberglass cloth saturated with epoxy resin over the joint and brushed out more resin on all exposed bare wood. Marine plywood is generally recommended for this, but because we sealed all sides and edges of the wood in epoxy and because the strength of the materials used was more than enough, we saved some money by using an A/B grade of exterior plywood.
Drainage channels
With the bulkhead in place, I moved on to complete the drainage channels and supports for the locker lid. These channels can be built in several ways. You might imitate the factory method by making a mold, laying up the pieces with fiberglass and glassing them in place. This makes sense when building hundreds of boats. For this job, however, I found it easiest to construct the channels from 1⁄2-inch plywood and 1-inch by 2-inch (actually 3⁄4- by 1 1⁄2-inch) white oak. The channels tapered from 1-inch deep near the cockpit coaming to 8 inches deep where they drained through two holes drilled into the side of the footwell. The lower the drainage holes, the better the channels drain when the boat is heeled. Eight inches was a compromise between good drainage and overly obstructing locker access with channels that are too deep.
The oak and plywood pieces were screwed and glued to the surrounding fiberglass, then strengthened and water-proofed with epoxy fillets, fiberglass cloth, and resin. Using wood that was screwed and glassed in place made the structure immensely strong. It could have been built lighter, but at some point the ultimate strength of the construction would be in question. We don’t have to guess if it’s strong enough — after giving it the backyard-engineering test of jumping on it, we know it is strong.
The tops of the wood channels were carefully lined up to fit evenly to the bottom of the locker lid, minus 1⁄8 inch in height. This was later made up by the addition of a rubber gasket to keep water out. The bottom of the locker lid was not perfectly level. I corrected that before the gasket was applied by squeezing out a line of epoxy under the lid where it met the wood channel tops and setting it in place with a thin piece of plastic sheet between the epoxy and wood. After it set up, I lifted the lid off and ground away the hardened epoxy that squeezed out from the high spots, and we had a perfect fit. The lid is attached with two stainless flat hinges and a lockable latch.
The two engine-access panels, notched at the top to accommodate the engine’s exhaust-outlet hose, fit in place with barrel bolts for easy removal. Another removable panel made a level bottom to the deepest corner of the locker and protected the wiring and plumbing running through there. We painted the locker with Interlux Pre-Kote primer and Brightside one-part polyurethane.
Navigation station
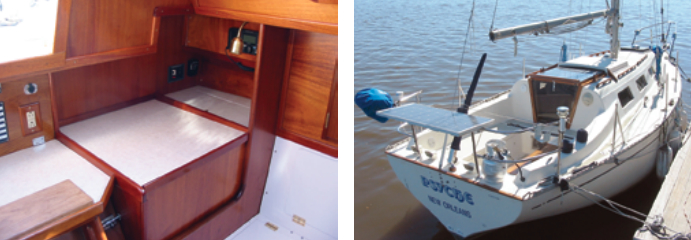
Back in the saloon, we tackled the new navigation station. In this conversion, merging the old cabinetry to the new navigation station was made easier by using some of the existing shelves and bulkheads and keeping to a similar layout. Outboard from the forward end of the quarter berth and below two shelves was a sliding hide-away panel that was used as a makeshift navigation table. Besides offending the senses, that wood-grained Formica sliding table had to go because it blocked locker space. We replaced it with a mahogany-trimmed, canvas-patterned laminate countertop that can be partly lifted or taken off to reach items in the locker below.
After ripping off more moldy foam-backed vinyl from the hull next to the old bookshelf, I converted this area to a radio locker at the top with counter space below and a locker beneath. We mounted the VHF here and left space for a future SSB installation. There is adequate space on the aft bulkhead to mount a new GPS or possibly a multi-function radar chartplotter. Since we were in the process of refinishing the entire boat with Honduran mahogany trim and veneer, we used these woods for the navigation station. This included applying veneer to the main bulkhead and other vertical panels with contact cement.
The nav table lifts up to access a huge locker underneath. Below that is the battery locker. The forward vertical panel under the nav table slides up and out of its tracks for easier access when it’s necessary to change batteries.
The entire conversion took roughly $390 in materials and 60 hours’ labor, not including the varnishing, which took place later as part of an entire interior refinishing. Besides the usefulness of a deep cockpit locker to swallow gear, Psyche now has a useable permanent navigation station and extra counter space that extends right through to the galley.
James Baldwin and his wife, Huang Huo-Mei, are currently between voyages, refitting large and small cruising sailboats near their home in Brunswick, Georgia. Their voyages and other boat-project articles are available on their website: http://www.atomvoyages.com.
Thank you to Sailrite Enterprises, Inc., for providing free access to back issues of Good Old Boat through intellectual property rights. Sailrite.com