Here’s how to find time both to varnish and to sail

Issue 42 : May/Jun 2005
Sometime long ago, with a pale newly sanded board scrap of some nice shape — maybe a toy sword — I took a small brush, dripping with varnish, and slowly dragged it across the wooden surface. I watched as it soaked deeply into the wood grain. As if a light had been turned on below the surface, the amber finish unlocked and illuminated the depth in the patterns of the beautiful wood grain. There was magic in the wake of that brush for me then. That magic remains with me years later.
About the same time in my life I also felt the wind fill a small sail. Sail, keel, and rudder working in unison, and a small boy in a small boat came to life. What a feeling! In the hissing sound of the tiny wake, I heard a whisper of adventure I still hear today. Few things are as magical. Another sailor was hooked for life.
These days, my deep appreciation of an older, nicely designed and crafted boat with a lot of brightwork blocked up on the edge of a beckoning blue sea presents a dilemma. Spring brings a new season and the crunch of projects to do on the boat. For a do-it-yourself sailor there never seems to be enough time. Therefore, my limited work time and conflicting desire to sail have evolved an efficient system for bright- work: a sailor’s system.
The lifecycle of varnish as an exterior coating is a dynamic process of renewal and aging. A combination of proper preparation, proper application, adequate maintenance, and amount of exposure to the elements will determine its lifespan.
Most of the brightwork on my boat is in the maintenance stage. Some of these areas are freshly renewed, some are in need of stripping but will be maintained for another year with the protection of a coat or two of finish as they await their turn on my schedule.
Your brightwork
Take a look at your own brightwork. Has it been aggressively refinished before? Severe sander cupping? Scraper gouges? It’s difficult to correct this damage, but it can be improved. If the wood has just been neglected and not aggressively attacked with scrapers and dished with sanders, it may be easier to renew even if it’s very discolored.
Step One for me is dividing the brightwork job into parts. This year I will renew the cockpit coamings and the aft end of the deckhouse. To illustrate my process, I’ll focus on one coaming board. This coaming was shaped from African mahogany and installed more than 40 years ago.
It’s been 10 years since it was correctly stripped and coated. Despite a yearly maintenance coat or two, the varnish has turned a cloudy yellow. Even with the UV protection a good varnish affords, the powerful sun still raises havoc. It is lifting off in many areas, especially the edges where it meets the deck and cockpit. Chips have exposed the wood underneath, now a little gray from sun and water exposure. Its life as a protective coating is over. The mahogany coaming has a straw-yellow shade that contrasts with areas that have been renewed in the last few years and show a deep rich reddish mahogany. They look like different species of wood, even though the pieces may have been milled from the same log.
I will leave the coaming in place, but I will remove the winch stands and cleats. The extra time spent removing most or all of the hardware will cut down equally on the renewal process. There are real benefits to removing and rebedding these pieces as well. Old brittle fasteners and aging bedding compounds will be replaced, surfaces under the parts will be sealed, eliminating varnish edges and making stripping and coating much easier on an unbroken surface. Except for the coating, this work will be performed during the off-season as time allows.
Think creatively about the work platform. The little time it takes to set up a simple, safe staging will be more than offset in time saved as you strip the outside of the coaming from a comfortable standing position. For low staging I like to use two step ladders and a plank. The steps make for easy adjustment of plank height. I use just the lower few steps. Anything higher requires a more substantial and safer platform.
Varnish removal
The important tools are stiff-bladed scrapers with a sharpened edge, not soft putty knives. In time, the edges may require filing to the original angle. Experiment with this. I like to file the edge to the original angle and then blunt the sharp edge with a stroke or two. Too sharp an edge is prone to gouging; too dull leaves too much finish. You also need small pull-type scrapers for tight spots and rounds and extra blades for the pull scrapers. A heat gun is important too. Any will work, the hotter the better as you get more skilled.
My sailor’s system uses the heat gun for finish removal. It’s fast and clean. Depending on the gun’s heat output and the finish age and thickness, the time to heat until the coating lifts will vary. This is an easy skill to learn. Use the medium 3-inch scraper. Moving the gun back and forth, gently heat the finish on the flat area of the coaming. Watch it closely; the old finish will begin to soften. Just as it starts to bubble, push your scraper (held at a sharp angle) into the melting varnish. It will begin to move with a gentle pressure as the coating softens. Your heat gun and scraper should move together now as wide ribbons of finish peel away. That’s it. It’s all feel and timing; little effort is needed or even wanted. The skill becomes second nature in no time. After a little practice, you should be able to strip the coaming board in little more than an hour. If the coaming has a lot of equipment still installed, it will take longer of course.
There are three things to watch out for. First, don’t overheat and scorch the wood; a burn will result from too much heat aimed too long in one area. Second, don’t force the scraper; you may gouge the wood. Third, don’t burn yourself. Direct the heat away from your scraper hand. A heavy glove on your scraper hand provides protection, if you are concerned.
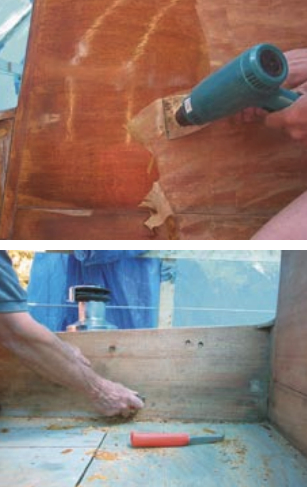
Smaller scraper
Use the smaller scraper for smaller areas, inside corners, and shaped areas. Rounds, such as the top of a coaming, require little heat. A gentle scraping with a small pull-type scraper works best on round surfaces. Apply just enough heat and pressure on the small scraper to remove the softened finish, not the wood. Generally, scrape with the grain, but scraping across with a light motion in corners is OK. The object is to remove the most amount of finish safely and quickly without damaging the wood.
In the damage-control department, remember that overheating can cause scorching. Too much pressure or too sharp an edge can damage the wood. The flatness of the broad areas and shape of the curves on the coaming must be maintained. This work can be done anytime, even during the off-season. If you live in northern latitudes, a good cover system or storage building will make this possible.
Once the old finish is mostly removed, it’s time to inspect the coaming closely. After several years — a decade is not unusual — the rich, deep, original hue of the wood may become sun-bleached and dulled. A deep-red-dish mahogany coaming may take on a blonder hay color over several years, even under a good varnish coating system. A slightly bleached, yellow-gray appearance means more surface removal is necessary if you want to achieve a new-mahogany look.
This difference is easy to see as you compare the wood. This moment is the crossroads in the brightwork job. You can skip the scraping and aggressive sanding systems that follow if you’re pleased with the appearance. If that’s the case, you can go on to finish sanding and coating. However, if you want the mahogany coaming to return to its deep-reddish luster, keep going. Proceed very carefully; you’re almost there now.
Scraping the wood
For this part of the project, the tools
nclude wood scrapers with sharp blades. You’ll need various sizes, all designed to be pulled. Also have replacement cutting blades or a file for sharpening softer, metal-bladed pull scrapers.
In the sailor’s system, I refer to this as wood planing. A wood scraper is not a planing tool, I realize, but the result I’m hoping to achieve is similar. A sharp, correctly used scraper cuts a thin layer of the remaining finish and wood off the surface. Unlike scraping paint or finish where heavy pressure is used, this is a gentle process. Imagine removing one even, paper-thin layer from the coaming. Remember that you won’t remove a thin layer often with this process. If your wood is correctly maintained, very little wood will be removed during the nenewal process. The scraping itself happens only once every five to 10 years, depending upon your geographic location and the level to which the wood is maintained.
If you are new to this sort of scraping, practice on a safe piece of wood to acquire the feel. A sharp scraper will require a light-to-medium pressure.
Imagine the widest sharp scraper, pulled along the broad flat surfaces of the coaming. Each section planed with the scraper removes the same amount of wood and overlaps the previous area planed. Resist the temptation to overscrape a discolored area. This step is meant to remove one uniform and very thin layer of finish and wood surface from the coaming.
If performed gently and uniformly, this step will remove most of the last of the finish that will otherwise gum up your sandpaper. Cut or plane one layer of the straw-colored surface. Don’t scrape the rounded areas. You can remove a layer on these areas during the sanding system. Done correctly, this step will flatten the wood’s surface and raised grain while aggressively removing a layer of the coaming. Overall flatness has to be retained.
Scraping won’t flatten previously cupped surfaces. Done correctly and gently, however, it will maintain the existing flat surface, perhaps even improve its flatness. The scraping system has one rule: leave the surface of the wood flatter than you found it.
The objective with this step is to remove the remaining finish layer and some of the sun-bleached yellow layer. Remove one even layer from the flat surface. Maintain the flatness of the wood and improve the flatness of the existing surface.
Damage control in this step is to prevent severe gouging, cupping from overscraping one area, and chipping. Avoid damaging the shape of rounds and corners. Only apply this technique to flat areas, not to rounded edges or corners.
This step can also be done during the off-season if you have a way to protect the newly exposed wood from moisture.
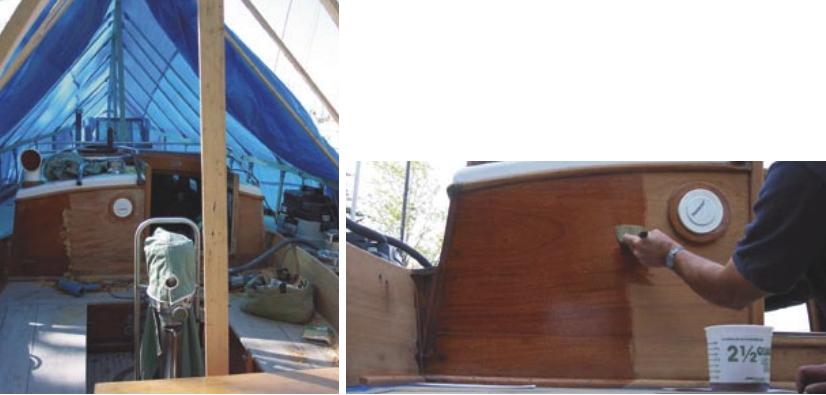
Sanding
Once you get to the sanding step you’ll need sanding blocks. When using these remember to only sand with the grain. You’ll also need a random orbital finishing sander. These sanders are designed to sand in any direction; they leave few marks if used with care. Have a range of paper grits as well.
Sanding, when done correctly, is a great technique. When done incorrectly, sanding can ruin wood. The goal is a gentle removal of a thin, uniform layer of wood and remaining finish. This step will retain and even improve the flatness of the existing surface. Make a mental picture of systematically and consistently moving the sander at the same pressure and rate over the flat areas of the wood. This goes for small hand-sanding blocks all the way up to a large random orbital electric sander. They are all flat sanders.
The size of the flat area to be sanded dictates the size of the sander to use. Even an aggressive 6-inch random orbital sander, if carefully used, can maintain or even improve the flatness of weather-damaged wood. Small sanding blocks must be used on smaller flat areas. Remember to leave the surface flatter than you found it.
Once I have scraped off a uniform layer, my coaming is looking pretty good: the old finish is gone except for what’s left in the grain. The color, while improved, is still yellower than I want, but a reddish tint has begun to emerge. I want to improve it. If you’re doing the same, start with a coarse grit: 80, even 60 if you’re careful. This is an aggressive step meant to remove a uniform surface layer. Use the sanding block on the broad flat areas or the random orbital sander, if you are comfortable using it.
Envision the sanding block or random orbital sander gently removing one uniform layer of the flat surface of the coaming. Resist oversanding discolored areas. Think: uniform layer. Think: even. Think: flat. Stay away from the rounded areas with your sanding block or orbital sander. Don’t oversand the larger flats with a large orbital sander. You have to take the same amount off the smaller areas with a small hand block.
Notice the shape of the coaming top and corners. Sand these areas with a scrap of sandpaper folded in your hand to maintain the existing shapes. Don’t over-round, just evenly remove a thin layer of wood. These come off fast. Remember to maintain the shape.
Finish-sanding
Now the heavy material removal is over. On my boat I know this because the coaming has taken on the reddish hue of new mahogany. It’s time to begin to prepare the wood by finish-sanding. There is no further attempt to remove a layer of wood. Now the goal is to smooth the coarse surface with a finer grit. This may mean going from 60-grit to 80- and finally to 100- or 120-grit. Think: even and uniform. Stop here; 120 is a good grit to prepare for your first coating.
While a cockpit coaming presents wide flat areas for this removal system, smaller parts, such as toerails and handrails, have smaller flat and round areas which can be treated the same way with smaller scrapers and sanders.
The objective during this aggressive surface removal stage is to sand off an even, thin layer of the wood with coarse-grit paper to expose the new mahogany. It is also to maintain and improve the flatness of the coaming and to maintain the shapes of all rounded edges.
Once you get to the finish-sanding stage, the goal is to sand with progressively finer grits, each time covering one even layer, and ending with 120-grit paper ready for applying the coating.
At this stage, the damage control is to avoid cupping flat areas by over-aggressive, non-uniform sanding. Also take care not to destroy the shape of any edges by rounding over them with the sanding block or orbital sander. Beware of orbital sanding marks: start and stop your sander away from the wood’s surface. Watch out for block-sander marks: always sand with the grain. And don’t go too far; finish-sanding with too fine a grit can result in poor coating adhesion. This step can also be done during the off-season if you can protect what you have accomplished by keeping it dry.
Overall, you should be happy with your wood now. You may consider using a little oxalic acid on a water or mildew stain if it is really unsightly. But it’s often better to resist the temptation as many stains become less visible under the new finish. If you do choose to go with an oxalic acid touchup, follow the instructions, use it sparingly and well diluted, and be sure to rinse it off. Follow this once more with finish sanding to smooth the water-raised grain.
Varnishing
The materials required at this stage include good-quality marine spar varnish specifically designed with a lot of UV protection for longevity and the recommended compatible thinner. You’ll also need good-quality bristle brushes designed for varnish work, long-release masking tape, and several tack rags. Have several one-quart plastic painters’ buckets and some disposable paint strainers that fit this container. Remember to have some clean rags, fine sandpaper loaded on a flat block sander, and a vacuum cleaner.
First, vacuum everything. I do this between every coat. It’s fast and helps keep wind-blown dust off the wet finish. Next, tape off the area to be varnished. I believe it’s worthwhile to leave a small exposed area untaped on the adjacent surface not receiving the varnish. This adjacent surface could be the deck or cockpit. The space I leave is around 1⁄16 inch or less. I believe this little overlap allows the varnish to penetrate into cracks, even weeping into invisible end grains for better adhesion, and may help seal out moisture. I find it worthwhile and invisible. Just before applying the coating, wipe the surface with a tack rag to remove the last of the dust.
The first coat of varnish, a base coat, is thinned with about 10 to 20 percent of the compatible thinner. Pour enough varnish into the container and add about 10 percent of the thinner. Stir it gently to keep foaming or bubbling down. Keep adding a little thinner until the varnish appears a little watery. This takes less than 20 percent unless the varnish is thickened, but it changes the viscosity significantly, as you will see. This extra thinner will deeply penetrate the grain, carrying the varnish with it. Imagine this first coat going deeply into and around the wood fibers and setting up, forming a foundation that reaches from the surface into the wood. This helps tie your coating down.
Checkerboard pattern
Apply that first coating perpendicular to the grain and then finish brushing it with long strokes with the grain. This checkerboard pattern distributes an even, thin coat. It will be flatter with fewer runs and sags. Don’t overbrush. Evenly distribute a thin coat and moving along fast enough to keep the varnish edge wet. Keep the brush in a can of clean thinner between coats.
Drying requires several hours of dry weather, usually overnight. Since you must sand lightly between coats, your surface needs to be dry and hard. This between-coats sanding is fast and easy, so don’t skip it. Visualize the flat surface you have been trying to maintain and improve from the very beginning. Visualize the block knocking down the high points of the wood grain and flattening the whole surface. Don’t go outside the flat areas. Use a scrap of sandpaper to lightly flatten the rounded areas.
This light sanding improves varnish adhesion, and the surface will become flatter still. Now you can begin to see why flat matters. Deep shining brightwork, the kind you can see your face in, starts with a flat surface. It also will hold the longest finish. Thin the second coat about 10 percent. Don’t be afraid of thinning any coating, especially varnish. If it drags on the surface, add a little thinner anytime.
Do the third coat the same as the second but with little or no thinner. A quick surface sanding makes this new layer even flatter. Time spent on this coating process is minimal. It takes less than an hour from start to finish on both of my coamings to sand lightly between coats, tack rag the dust, and apply the coat of varnish. The trick is finding the days that will allow for drying time. This is the reason the removal, scraping, and sanding are best done before good coating weather arrives.
More coats needed
I have found that fewer than five or six coats will not likely hold for even a short New England sailing season. Seven, eight, or more coats are safer and will not add much work time. But they do add drying days. The later in the spring the coatings are applied, the more likely good drying weather will prevail. Applying coatings can be worked in around other non-dust creating boat projects. A cover system that can be rolled up in the sun and rolled down late in the day extends marginal drying weather (see Tom’s enclosure article in the November 2004 issue of Good Old Boat).
Scheduling a complete removal and recoating is best done backward. Allow sufficient time for coatings, which require good drying weather to be applied. Deduct these from your anticipated launch date. This will give you an idea of when your brightwork renewal preparation needs to be complete.
The objective at the coating stage is to a achieve a flatter surface with each coat. Apply fast even coats with minimal sagging or runs, which have to be sanded out later.
Damage control in this case is avoiding varnish drips. Use painter’s tape and check it every few days. Remove and reapply this tape any time it becomes hard to remove. Avoid brushing too slowly in order to maintain a wet edge. Avoid applying varnish too late or too early in the day when moisture can damage the finish. Watch out for dust damage. Vacuum the area thoroughly and apply your coatings in little wind.
At this stage, dry warm weather is essential. Your chosen days must be as windless as possible. A good cover system can extend marginal conditions.
After seven, eight, or more coats, my coaming looks terrific. I can keep it that way for many seasons just by adding a coat or two — on my maintenance system — every season.
Maintenance system
Maintenance is simply another coat applied once or twice a year, depending upon the severity of the weather in your area. It’s a quick and easy step. Southern climes will require more maintenance coats. Even in New England, two coats are best. If this simple step is skipped, all the hard work you just did will be wasted within a year. The tools required for maintenance include a sanding block with 220-grit paper, strained varnish, a clean mixing bucket, and tape.
The objective at this point is to lightly sand and flatten the surface and to apply a renewing coat of varnish to achieve an even better level of finish than the year before.
Damage control involves keeping the area free of windborn dust, so keep the decks clean. Schedule this work for a dry, warm day with little wind.
Brightwork is an art form. There are many great books on the subject, some of which I refer to quite often. One of the best is Rebecca Wittman’s book, Brightwork. Rebecca, a professional, achieves beautiful results (see Page 61 for more information). Boatyards specializing in the art of brightwork are another good place to study the incredible results the professionals attain.
The top priority for me, a do-it-yourself owner and sailor, is developing an efficient system of brightwork maintenance that fits my schedule. After spring launch, I don’t want to think about boat work much. A beam reach across a new sound or watching the sunset in a familiar snug anchorage leaves little room for other thoughts. On the water, in the yellow light of the late-day sun, that cockpit coaming with the sparkling blue water behind it looks fine indeed.
Thank you to Sailrite Enterprises, Inc., for providing free access to back issues of Good Old Boat through intellectual property rights. Sailrite.com