What you need to know about them — and how to replace them
Issue 24 : May/June 2002
Few of us ever give a thought to Cutless bearings until it’s time to replace them. Then we wonder why the yard charged so much — and, as so often happens with boatwork, we wonder belatedly if we should have tackled the job ourselves.
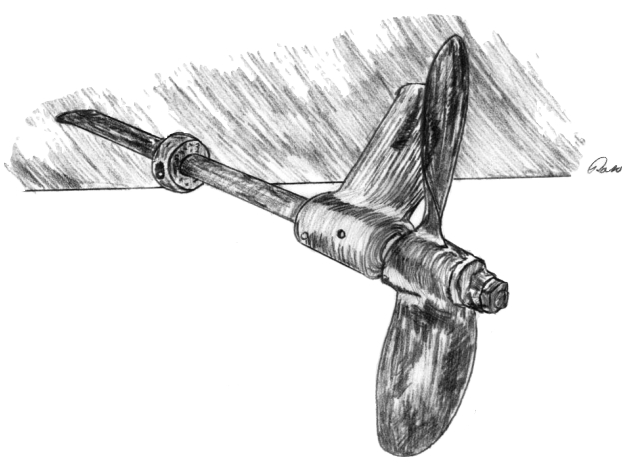
Simply put, the name Cutless bearing has become generic for any water-lubricated, rubber-based shaft bearing. Most boats, power and auxiliary sail, use them in one form or another. By that, I mean some older boats with full-keels and attached rudders use Cutless bearings at the aft end of the shaft tube to support the propeller shaft. Fin-keel boats use them in the strut that supports the shaft. I daresay all inboard-powered boats use Cutless bearings.
The history of water-lubricated bearings really starts with the introduction of steam-driven screw propellers in the mid-1800s. First they tried brass as a water-lubricated bearing for propeller shafts. This did not work, so they went to white-metal bearings; but they, too, failed. Next came lignum vitae (a very hard wood) as a bearing surface. This seems to have been a relative success. The largest ship built up until that time, the Great Eastern, was fitted with lignum vitae bearings invented by the shipbuilder, John Penn. Wood bearings were not the complete answer, however, particularly in water containing abrasive materials such as sand or dirt.
The story goes that a California mining engineer developed a rubber bearing by slitting a piece of hose after one of his mine-shaft pump bearings failed and he did not have time to get a spare. The bearing worked and had a wear rate superior to the old wood bearing. He patented the idea and formed the Oliver-Sherwood Company to promote the product. They met with limited success, and in 1922 the B. F. Goodrich Company acquired all of the patents to the application of rubber to mechanical devices, including the basic Sherwood patent and the Cutless bearing trade name, which is now a registered trademark of Duramax Marine, LLC, formerly part of the B. F. Goodrich Company.
Naval-brass tubes
The original bearings were made from a naval-brass tube in which shaped strips of rubber were inserted to serve as bearing surfaces for the shaft. On large ships, naval-brass tubes had individually inserted rubber strips that fit in a slot cast in the bearing housing. The bearing strips were inserted by several men and secured by setscrews. They were sometimes bonded to a naval-brass strip and shaped like a trapezoid. The trapezoid shape of the rubber allows a channel for water to pass through the bearing to cool and lubricate the shaft as it turns. The bearings on our boats are a miniature of the larger sizes and are molded in one piece rather than in individual pieces.
We have the U.S. Navy to thank for today’s Nitrile bearings. During the World War II Battle of Midway, U.S. Navy ships were equipped with natural rubber Cutless bearings. Due to the continuous high speed of the ships, the bearings actually overheated internally and broke down, causing severe shaft vibration and in some cases shaft failure. The Navy demanded that U.S. industry find some other type of bearing that would not break down internally under severe conditions. B. F. Goodrich developed a better bearing by making the insert out of nitrile rubber. The nitrile bearings were successful and have been the material of choice ever since.
Cutless bearings are a humble yet marvelous piece of engineering. They provide support, lubrication, cooling and a renewable wear surface. But even present-day Cutless bearings will work best when they are operated in clean water. Boats operating in silt or sandy water near shore, where propeller action can stir up mud, will find their bearings quickly wearing out. This is due to the scouring action of the particles in the water. This is less of a problem with full-keeled boats because the front of the bearing does not catch silt like a strut-mounted bearing does.
Cooling channels
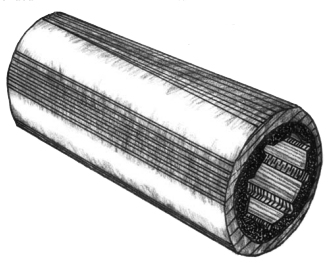
The cooling function of the Cutless bearing is easy to understand. The water passes through the channels in the nitrile rubber liner and cools the shaft. Water has twice the heat absorption of oil and is non-polluting. What is hard to visualize is that the shape of each segment of bearing allows a film of water to flow between it and the shaft. Each segment of the bearing acts as an independent wear surface. With proper loading, rotational speed and clearances, the shaft actually lifts itself up and is riding on a water wedge rather than the nitrile rubber surface itself. This is called hydrodynamic lubrication. It makes for greatly reduced friction, reduced heat, and long bearing life.
Two critical factors will shorten bearing life. As mentioned, the abrasive particles in the water will cause more rapid wear. Rubber bearings are better than anything else in this abrasive environment, but they are not perfect. The other thing that causes rapid wear is shaft misalignment. A misaligned shaft will press harder on one section of the bearing, and this high pressure will cause vibration, friction, and heat. This will cause wear, and wear will allow increased shaft motion that causes further wear. This is a cycle that ends by destroying the bearing and/or scoring the shaft. One good point about Cutless bearings, however, is that they will not wipe out all at once or fail in some catastrophic manner. Failure will occur slowly and over time except in unusual circumstances.
To inspect the Cutless bearing, try to move the prop end of the shaft up and down and then from side to side. If the shaft does not move more than 1⁄8 inch, there is not enough wear to worry about. If it moves more than 1⁄8 inch, use a feeler gauge on the top of the shaft to see how much space there is between the shaft and the bearing. More than 3⁄16 inch is too much. Inspect the ends of the bearing for cracks in the rubber and look to see if the bond between the rubber and the shell has been broken.
Don’t ignore it
There is no repair procedure for a worn bearing. If you have a worn bearing, do not ignore it. Replace it. There is a reason it is worn, and it is your job to discover why. Abrasives in the water are easy to document but rarely are the cause of sailboat bearing wear.
More likely the problem is misalignment. This is not the article to tell you how to align an engine, but be aware that a properly aligned engine is required for long bearing life. Some bearings will last 20 years if the shaft is perfectly aligned. Better to replace a suspect bearing than wait for it to score the shaft.
To replace your bearing you need to know what the shaft diameter is, the approximate bearing length and the actual outside diameter of the bearing. Bearings with the same interior diameter are available with different outside diameters. Not only that, but the outer tube can be made of various materials. Traditionally, naval-brass is the material of choice, but there are bearings made with composite shells as well.
You can take your pick, as long as the inside diameter, outside diameter, and length conform to the old bearing size. When I replaced the Cutless bearing on my Pearson Ariel I could not buy a factory-made bearing short enough to fit the boat with the correct outside and inside diameter. I ended up cutting the bearing to the correct length with a standard hacksaw.
Once you have purchased the correct replacement bearing, the real work begins.
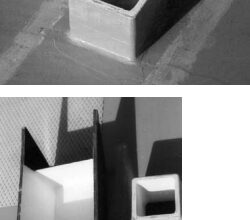
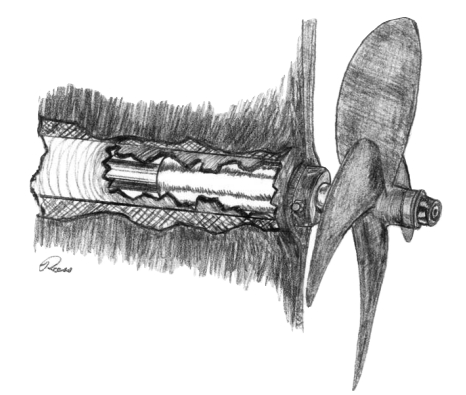
Cutless bearings can be strut-mounted, attached to the outside of the deadwood in a metal housing, or mounted inside the deadwood.
Penetrating oil
Except in rare cases where the prop will clear the rudder while the shaft is being removed, the prop must come off. This will entail soaking the prop retaining nuts in penetrating oil until they are easily removed. While you are doing it, soak the shaft on either side of the propeller and see if the penetrating oil will loosen the prop. Never use a petroleum-based product on a Cutless bearing; it can damage the rubber. A little light tapping on the prop to cause a vibration will aid the penetrating oil in doing its job. Once the cotter pin and two nuts (the prop nut and lock nut) are removed, it is time for a prop puller.
It may be possible to tap the propeller off using a piece of oak or other hardwood as an intermediate piece between the hammer and the prop. Never beat directly on the prop with a hammer or you will damage it. Usually, the tapping method is better if two people tap in time together on both sides of the propeller. Tapping on one side only tends to jam the prop tighter onto its shaft. If tapping does not work, it’s time for a prop puller.
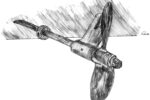
This is usually a three-armed device with a threaded center bolt. The arms fit in between the propeller blades of a three-bladed propeller, and the center bolt lands on the center of the shaft. Usually the center bolt has a raised dimple in its lower end to mate with the recessed dimple in the end of the prop shaft. This is to prevent the center bolt from slipping sideways. The way you operate this device is to tighten the center bolt slowly until it is snug and in the recess of the shaft. Then tighten it a little more if you are able. Then you tap the center bolt with a hammer. The tension that is on the center bolt should pull the prop toward you and free. If not, tighten the center bolt a little more and tap it once again.
Use the right one
Propeller pullers are available to fit two-bladed, three-bladed, and four-bladed propellers. Be sure to find the correct one to use. A three-armed puller will be unbalanced when pulling on a two-bladed propeller and vice versa. Check with your yard to see if you can borrow the correct puller or check with a propeller reconditioning shop. Sometimes an automobile supply store will have a “wheel puller” that will work, and you may be able to rent or borrow it. Have the dimensions of the needed puller with you when you ask for the tool.
Once the propeller is off, take off the shaft collar zinc if there is one, and you are ready to start on the Cutless bearing. Since the prop is now off the shaft, consider taking it to a propeller reconditioning shop for at least a check and a polish. It will make a difference. You will be able to feel it in a smoother, more powerful prop wash.
Meanwhile, we still have the problem of the old Cutless bearing being in place and the shaft going through it. If the bearing is in a strut, there are tools that can press it out without removing the shaft. These tools are expensive but may prevent you from having to remove the shaft. The difficulty of shaft removal varies, depending on whether it requires that the rudder be removed first. If you find yourself having to remove the rudder, do some measuring. Sometimes the rudder hits the ground before it clears the boat. In these cases you may need to dig a hole under the rudder or have the boat lifted by a travel lift. Look at all the options. It may be easier to unship the strut and slide it over the shaft.
If the bearing is in a housing attached to the deadwood, it may be possible to remove the housing and slide it aft over the shaft. Replacement of strut-mounted bearings and bearings in removable housings is straightforward compared to the replacement of bearings mounted in the deadwood.
Find setscrews
If the bearing is inside the deadwood, there should be Allen-head setscrews port and starboard, or maybe three at 120, 240, and 360 degrees, holding the bearing in the shaft log. Scrape the bottom paint off and find the setscrews. Carefully remove them. My old Ariel had lost the setscrews and had a crack in the fiberglass shaft log. The bearing was held in by pressure from a stainless-steel hose clamp around the shaft log where it projected from the keel molding.
There are several ways in which a bearing can be held in its shaft tube. If the bearing and tube are flush with the after end of the keel, the setscrews could be in the fiberglass molding of the keel itself. Of course, there is the possibility that the bearing was glued into its shaft log (heaven help you with that one!).
Up to this point we are assuming that the bearing will slide off the shaft and the new one can be inserted in its place. This may not be the case. If you can’t slide the old bearing out and the new one in, you need to remove the shaft. The first step is to loosen the locknut on the stuffing box and the stuffing box nut itself, and back them off, pulling them forward, away from the stuffing box housing through which the shaft passes.
This obviously must be done out of the water. You cannot change a Cutless bearing in the water without a diver and a lot of work. The shaft probably has a pressed-on coupling with a keyway on the end where it attaches to the engine. Usually there are four wired bolts holding the shaft coupling halves together. To start with, soak the bolts and shaft setscrew, if there is one, with penetrating oil. Leave it overnight if possible. Tap the shaft to vibrate the oil into the threads.
When you come back the next day, add more penetrating oil, vibrate the shaft and cut the safety wire preventing the bolts from moving. Using a socket wrench, try to loosen each bolt. Do not apply too much force. It is possible to shear off the bolt heads; then you are in a real pickle. If they are all loose and the shaft setscrew is loose, fine. If not, soak the shaft some more and wait overnight again. It can sometimes take a week before the penetrating oil will work. In extreme cases, you could buy some dry ice and, using gloves, hold it in contact with the bolts that are stuck. The cold should contract the bolt and make it more susceptible to the penetrating oil.
Same tactics
Some couplings are not threaded but have smooth holes with nuts on the engine side. The same tactics apply, only it may be easier. If conditions permit (distance from the fuel tank, for example), you could try to heat the nuts with a small torch while you cool the bolt.
Once the shaft is free, you will need to remove the coupling from the shaft. Inmost cases the coupling is pressed onto the shaft. You will need to press it off. Separate the coupling halves and place an appropriately sized nut between the coupling halves in the recess between the shaft and front coupling.
Longer bolts are then attached to the coupling faces and gently tightened to pull the faces together. Tighten the bolts a little bit at a time and in order. Try a clockwise rotation. The coupling is trying to come together, and the nut in the center of the shaft is trying to keep it from happening. If you use plenty of penetrating oil, it should all go smoothly. Once the shaft is free of the coupling, be sure to support it with a piece of blocking or a rope sling.
Remove the shaft, sliding it through the stuffing box, past the rudder, and out of the boat. Some rudders have a hole in them for this purpose. Some rudders will allow the shaft to be pulled out when the rudder is turned hard over and the shaft can be allowed to pass through the cutout in the rudder for the propeller.
While the shaft is out of the boat, be sure to inspect it for wear where the Cutless bearing rides and where the stuffing box sits. If there are marks on the shaft, take it to a machine shop to be checked and cleaned up. If the score marks are deep you may need a new shaft. A deeply scored shaft will eat up a new bearing in short order, so it is false economy to use a new bearing with a deeply scored shaft.
Try steel bar
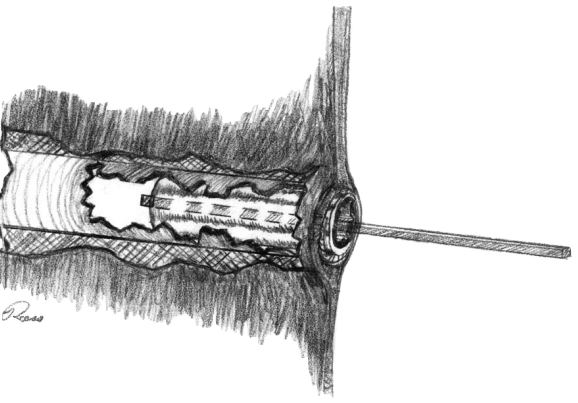
Now we have a clean field of action but the bearing is still in the hull. Try using two pieces of steel bar approximately 1⁄4 inch x 1⁄4 inch x 12 inches, bent with a 90-degree angle on one end that will fit through the bearing and lodge on its inboard side. Cut the bar so the bent part will only grip the bearing in case there is more room inside the diameter of the shaft log than the outside diameter of the bearing and you grip solid laminate. Try pulling on the metal bars by hand to remove the bearing. If you bend an eye at the outboard end of the bars, you could attach a rope and a come-along to the eye and apply additional force.
Now you have tried all the easy ways to remove the bearing. It’s time to stop being nice. Buy a fine-toothed hacksaw blade about 12 inches long. Buy a single hacksaw blade holder or a roll of duct tape. Use the hacksaw blade as a saw to make a cut in the bearing parallel to its long axis. Saw another cut 45 degrees from the first, also parallel to the long axis. Using a straight-bladed screwdriver, tap the screwdriver blade under the cutout piece and remove it from the bearing. Once the piece is out, you can collapse the remaining bearing toward the center using the screwdriver and hammer. Be sure not to damage the surrounding fiberglass, strut, or housing. Slide the bearing out and wipe the shaft area clean. Use a little mineral spirits to clean it out. If there is a little corrosion or unevenness, use a bit of fine sandpaper to fair it up to receive the new bearing.
Apply soap
Dry-fit the new bearing into the shaft log hole, housing, or strut, and onto the shaft separately. It should fit snugly in the hole and be a slip fit to tight fit on the shaft. Apply a little liquid soap to the shaft, and the bearing should rotate easily. Never use a petroleum-based lubricant on a bearing. If it fits in both places, you are ready to install the bearing.
If the bearing has an interference fit of 0.001 inch to 0.002 inch, but fits the shaft correctly, you may want to try placing it in your home freezer for 24 hours. The method of chilling should be slow and mild in temperature. If the chilling is fast with extreme temperature drops (such as by the use of dry ice to chill the bearing) the thermal shock can result in the separation of the bond between the rubber and the shell. Chilled bearings should be pressed into the shaft log, never pounded as the shock could cause separation of the bearing and shell.
If all goes well, it should contract enough to fit the hole. An extreme shrink-fit in a metal housing may be a bear to remove again when the time comes, of course, so you may want to lightly dress the bearing with fine sandpaper instead, until a slip fit is possible. If the bearing is way oversized, but fits the shaft, you bought the wrong bearing. Return it and get the correct size.
Once you have fitted the bearing into the shaft log, strut, or housing, mark the area where the setscrews, if any, contact the outer shell of the bearing. If they weren’t pre-dimpled by the factory, these areas need to be dimpled with a drill to give the setscrews a purchase on the bearing shell.
Be particularly careful not to drill too deep. Less than half of the shell thickness is required. All you want is a dimple, not a hole. Set a drill stop or mark your drill with masking tape and drill no deeper. Experiment with dimpling a piece of hardwood or aluminum. Take time to practice. When the new bearing is installed, do not use any glue on the outer shell. It goes in dry or lightly greased and is held in place by the setscrews, hose clamp, or whatever the old one had.
To reassemble, reinstall the shaft, shaft coupling, shaft stuffing box, and so forth.
Not the reverse
If you had to remove the coupling from the shaft, the reassembly process is not the reverse of the removal process. This is a case where you needed to remove the shaft to remove the bearing because it would not slide out over the shaft. When reassembling it is easier to have the shaft coupling pressed on the shaft by a machine shop before installation. The shaft will be installed from inside the boat.
In this case, do not install the bearing until the shaft is in place. Then slide it up into position on the shaft. If the bearing is not in place, there is usually room to angle the shaft to allow it to be slid aft of the engine half of the coupling and into position. Remember to reinstall the stuffing box loosely on the shaft, but not connected to the shaft log, until the shaft is reinstalled. While you are at it, renew the stuffing-box packing (see Good Old Boat, March 2002). Once the new bearing is fully installed and the setscrews are tight with a little Loctite on each one, check the coupling alignment before bolting it all together. If necessary, realign the engine.
That’s it. You are now the resident expert on a Cutless bearing job, and you deserve a pat on the back. It was a bigger job than you imagined but a worthwhile one. Best of all, you know it was done right.
Thank you to Sailrite Enterprises, Inc., for providing free access to back issues of Good Old Boat through intellectual property rights. Sailrite.com