Cutting away the stern pulpit eases the boarding problem
Issue 41 : Mar/Apr 2005
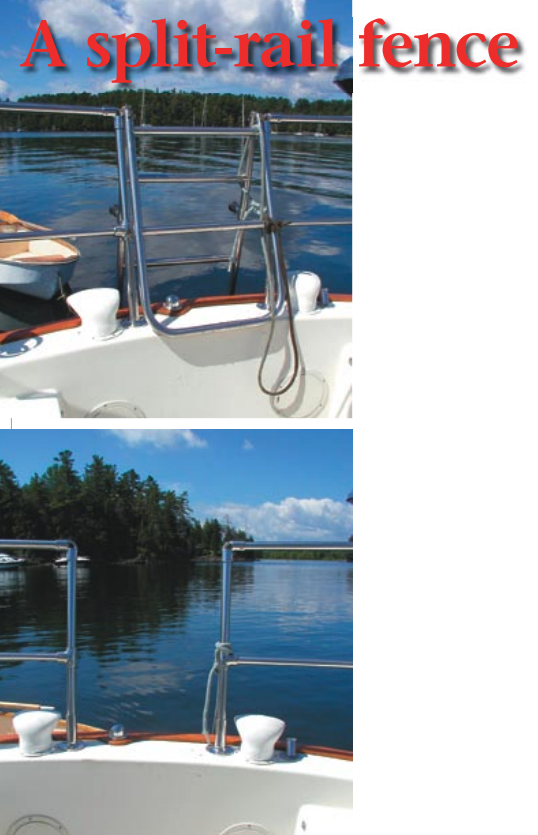
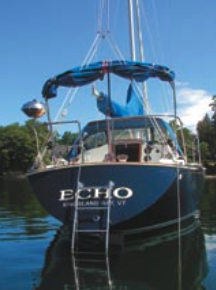
With a stern-mounted ladder and a continuous stern pulpit, climbing aboard our 1977 C&C 29, Echo, from a dinghy meant climbing up and over the rear rail, a task that required ninja-like agility. Most new boat designs solve this problem by splitting the rail, scooping out the transom, and building in a swim platform. Swim platforms are nice, but I figured that modifying the rail would satisfy both the tiniest and oldest members of my crew.
First I contacted a welder to get a price for cutting out an opening in the rail. This certainly might be a logical course for those looking to minimize the appearance of the joints, but browsing through the catalogs of a few marine suppliers made me realize that I could do the same thing with a few standard rail fittings and a length of 1-inch-diameter rail without having to remove the rail and take it to the welder. After all, I was only going to cut out an opening in the rail the width of the stern ladder, terminate the cut ends with elbow and tee-fittings, and run the new vertical legs of the rail down to new stanchion bases.
The first thing I did was to check how much cant the stanchion bases would require to match the angle of the rail. Stock stanchion bases have around 4 or 5 degrees of cant, but I needed stanchion bases that angled out 12 degrees. I used a scrap 24-inch length of 1 x 1-inch pine held against the railing, traced the angle across the bottom, cut the wood to the angle, and double-checked the fit. When it looked right, I used an adjustable drafting protractor to determine the angle I had made. At approximately three times the price of stock stanchion bases, these custom bases added considerably to the project’s overall cost, but they matched the existing boat hardware better.
Would they fit?
The next order of business was to see if I could coax the right-sized opening out of the limited space available on the stern. The existing ladder predetermined where everything should go; the question was, would the stanchion bases fit? They did, but not with much room to spare. I had planned to leave about an inch or so between the top elbow fitting and the ladder when it was folded in the up position and then figure out some hardware configuration that could be used to securely attach the ladder to the rail when it wasn’t being used. But the vents on the stern prevented this. The opening turned out to be — by necessity — exactly the width of the ladder. This was actually a blessing, because the ladder hangs over the opening with the lower end draping slightly inside the stern pulpit. The friction fit keeps it from rattling around. It’s nice not to have to tie it when we leave our mooring or an anchorage.
I got the parts from Bo’sun Supplies after doing a quick bit of research on the Internet and making a few phone calls. The parts included two custom stanchion bases, two 90-degree rail fittings, two 90-degree tee fittings, and 4 feet of 1-inch outside-diameter stainless-steel tubing to make up the two new vertical legs.
Before cutting, I placed the new fi ttings against the existing railing to verify where the cuts should be made. Then I used a hacksaw to cut out the approximately 16-inch-wide center sections of the upper and lower rails. I should note here that the lower rail section was smaller in diameter than the 1-inch diameter of the rest of the railings. Fortunately, I found that a sleeve cut from the 1-inch-diameter rail fit perfectly over the skinnier rail, so I could insert the sleeve in the tee fitting and then insert the end of the lower rail into the sleeve for a snug fit.
Plywood backing
After checking the fit and verifying the stanchion base locations, I marked where the holes should be drilled in the stern. After drilling the holes, I cut out backing plates from 3⁄4-in plywood. My boat has access ports that allowed me to reach the area underneath the deck where I was mounting the backing plates for the stanchions. After trimming the backing plates to fit and extending the holes drilled through the deck on through the backing plates, I mixed up a batch of epoxy and put the plates in position. Next I mounted the stanchion bases, using the through-bolts to hold the plates in place as the epoxy cured.
Then it was time to assemble the pieces. My initial concerns about the rigidity of the new railing were groundless. There’s a solid feel to it when we use it as a handhold when entering or leaving the boat. It looks reasonably good too. At a little less than $250 for parts and a few hours of labor, it’s probably been one of the most cost-effective improvements I’ve made on the boat.
Thank you to Sailrite Enterprises, Inc., for providing free access to back issues of Good Old Boat through intellectual property rights. Sailrite.com