Upgrading the ceiling of a Pearson 365
Issue 56 : Sept/Oct 2007
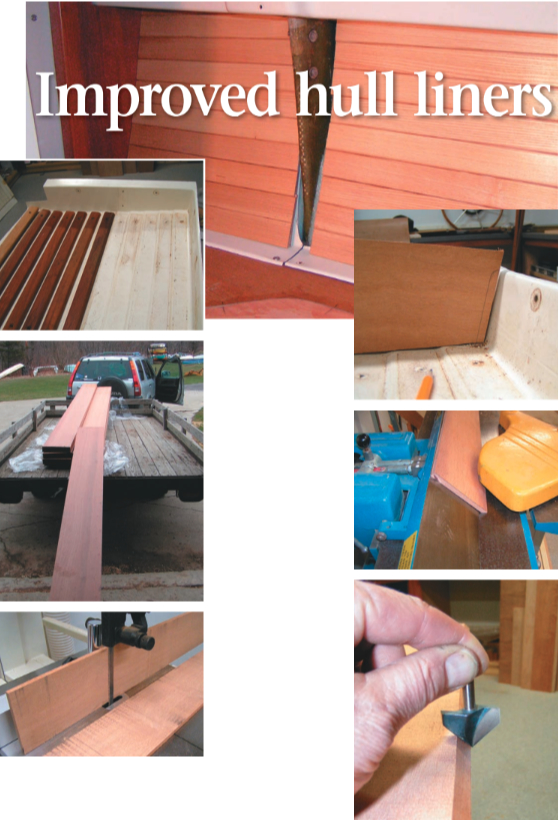
As she came from the factory several decades ago, the starboard side of Maruska, my 1976 Pearson 365, had fiberglass panels trimmed with horizontal teak strips. These panels (known for reasons beyond most sailors today as “ceiling”) lined the hull above the pilot berth. There were two panels, one on each side of the mainmast chainplate, which extended inboard through this area. The fiberglass itself was a molded affair with a sort of lapstrake-look. Each individual corrugation on that panel had a teak strip screwed to the fiberglass.
I wanted to get away from the dark teak/white fiberglass stripe look and did not like the many exposed screws that held each strip in place. I had to remove these panels anyway to provide access when I insulated the hull (see article Good Old Boat, July 2007). So I took the panels home and performed all of the modifications in my woodworking shop.
I began the project by removing the teak strips. A screw gun made this the easy part of the project. A side note: Maruska became a donor boat, as these removed strips were donated to a hard-dodger project going on nearby in the marina on a Westsail 32. The old strips were used to hold the dodger’s glass panels in place and as accenting trim.
My next step was to cover the short exposed fiberglass ends of each panel in wood. These short ends of the “L” overlapped the boat’s bulkheads on either end and acted as a trim piece to hide the fiberglass tabbing that extended from the hull onto the bulk-heads. This was applied at the factory when the interior was put in.
Thin sections
The wooden cover panels didn’t need any strength; the fiberglass panel provided that. What I wanted was the look of wood. For this, I decided to cover the end sections using thin sections of moabi, also known as African pearwood. I purchased this lumber in large planks from West Penn Hardwoods in Olean, New York. I chose moabi after making several samples of different species of wood and placing them in the boat for comparison. Moabi had the subtle grain I was looking for and the color that I liked. I was able to purchase 10-inch-wide planks. Each plank was 2 inches thick and approximately 14 feet long. These large dimensions offered a great deal of flexibility for the various pieces I would need throughout the rest of the interior.
From the large planks, I was able to resaw 5⁄16-inch-thick stock on the band saw. Once I had thin boards, I carefully marked and cut the profiles of the fiberglass end panels onto the wood cover pieces and cut them out using a jigsaw. Each of the end panel covers required an L-shaped profile to cover the fiberglass shape at each end.
To give the illusion that the thin wood cover was one solid piece, I selected pieces of wood that matched in grain and color and edge-joined them, using a 45-degree miter joint. I created the miter using my jointer, however the same joint could have been made with a 45-degree router bit or a table saw with the blade tilted at a 45-degree angle.
Removed marks
I double-checked the fit to the fiberglass structure and sanded the fi nished end caps to remove tooling marks and to blend the outside radiused corner detail. I gave each subassembly a quick coat of clear lacquer to minimize any discoloration from dirt and oil from my hands. I prefer to use lacquer because it dries quickly, sands easily to a smooth base coat, and does not add a tint to the wood. For marine applications I never leave lacquer as a top-coat, as it turns a cloudy white when exposed to water. Once I was satisfied with the fit of each cap, I glued each end cap into position using a water-proof construction adhesive. I held it in place with clamps and installed wood screws from the backside to hold them into place until the adhesive dried.
For the larger sections of panels where the teak strips used to be, I wanted a lighter contrasting accent wood for the darker moabi. I chose American white ash for its light color. Ash also works and bends beautifully and is commonly used for sled runners, baseball bats, shovel and ax handles, as well as high-end furniture and flooring. As a bonus, when you cut ash it smells a lot like cooked butternut squash. I chose to use quarter-sawn ash to provide a more uniform grain pattern. I wanted the wood look but didn’t want the grain of the wood to be overpowering. Quarter-sawn means that the face of the wood plank is cut at, or almost at, 90 degrees to the grain lines, yielding exposed parallel lines of grain running the length of the board. I used standard 3⁄4-inch thick stock and ripped the boards into 1⁄2-inch wide strips, then slit them down the center of each board on the table saw to give me approximately 5⁄16-inch thick stock.
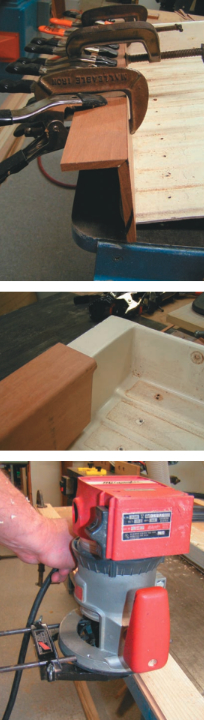
Table shaper
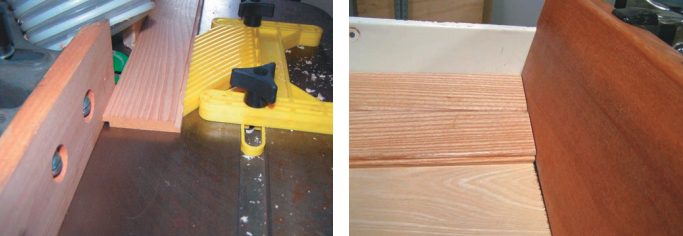
I rabbeted diagonal edges of each board using a table shaper, so the finished strips would form what is known as a shiplap edge joint. I have been a woodworker for 40 years (a good one for the last 10 of these) and have learned that almost everything one does in wood can be done several ways, depending on the level of talent and equipment available. This being said, you could also perform the same operation using a rabbeting bit in a router or create it with a couple of cuts on the table saw. The yellow device shown (in the photo on Page 55) is a fingerboard to keep my fingers at a safe distance and to maintain a constant pressure against the guide fence. The cutter, which is green, is hiding safely just under the corrugated vacuum dust hose. To soften the exposed outer edge, I cut a radius using a router and a 3⁄16-inch roundover bit. Once I Had all of the ash strips completed, I prefinished them with a couple coats of lacquer as a base coat and a satin finish polyurethane topcoat prior to final assembly.
When it came time to install the ash strips, I first had to eliminate the corrugated surface left behind on the factory fiberglass panels where the teak strips had been. The panels had to have a nice smooth front surface to adhere to. To create this surface, I covered each panel with a 1⁄8-inch thick plywood door skin. Door skin is a thin, high-quality plywood used as the outer skin on hollow-core residential doors. My local lumberyard stocks door skins for about $7 each. They’re great as a material for making cheap, durable patterns when cardboard isn’t strong enough. The door skins I found happened to be ash. You can see the difference between the look of the grain in the quarter-sawn strips that I made, and the plain-sawn plywood door skin in the photo, above right.
Set in place
I ran beads of construction adhesive on the high edges of the ribs of the fiberglass and set the door skin in place. The new ash paneling would be held in place with hidden screws from behind. This is something I could do since the panels are detached from the boat and I had access to the back of them. Each ash strip was fit into place matching the end angles where it met the moabi caps. Each was secured with screws from behind at about every 6 inches.
The end result is a handsome liner panel forward of the chainplate and a matching aft panel. I specifically say “matching” because I took the time to use the same ash strip in the same position (top to bottom) on both panels to give the illusion that the ash strips are one continuous length. Both assemblies were sanded, given two more coats of clear lacquer, and finish-sanded one last time. Then I sprayed a final coat of oil-based polyurethane.
It took me approximately eight hours to cover both panels. If you add finishing and waiting time for the glue to dry, the project took an entire weekend. Total cost for this improvement was just under $80.
Dale Tanski soloed at the age of 10 in his family’s Sunfish. Forty years and way too many boats later, he is refitting Maruska, a Pearson 365 ketch, to cruise with his wife, Sharon, and their two youngest, Alden and Morgan. Dale also races a J/22 with the oldest children, Rian and Eric, in Buffalo, New York. During several stints this summer, the whole Tanski family helped deliver a “mostly completed Maruska” (are they ever really completed?) to her new home in Buffalo.
Thank you to Sailrite Enterprises, Inc., for providing free access to back issues of Good Old Boat through intellectual property rights. Sailrite.com