A step-by-step guide to replacement
Issue 62 : Sept/Oct 2008
When the engine started and the transmission engaged, a vibration underfoot told the skipper he had a problem. Experience offered a suspect: his propeller shaft Cutless bearing had exhibited a little play when checked during the last haulout. He’d made a mental note to replace it next time. But now it was dark, an unfamiliar harbor entrance was ahead, and he had limited engine availability.
Once the boat was safely tied up in the marina, a quick dive confirmed that the Cutless was shot — the shaft could be moved almost a quarter inch from side to side. After 13 years and several thousand hours, the bearing had failed. Operating in this condition would likely lead to prop shaft damage or failure. With judicious use of the engine, the skipper limped into several foreign ports before sailing back to Florida, where he commissioned a tow into Marathon to do a haulout. I offered to help him replace the bearing.
Let’s take a look at his problem. A Cutless bearing is located at the outboard end of the propeller shaft. It supports the shaft and minimizes wear on the shaft and shaft housing. The bearing is commonly made of rubber, although other synthetic materials are used (the early bearings were made of wood). The Cutless is lubricated by water flowing through the bearing via a series of longitudinal slots spaced around the outside of the shaft surface. This creates a thin water film on the shaft as it rotates, minimizing contact and wear. If you block this water flow, you are guaranteed to have a short service life.
While the Internet provides a variety of manufacturers, the most convenient source for a bearing is your local marine hardware supplier. You’ll need to know the bearing style, overall length, shaft diameter, and outside diameter to purchase the proper replacement.
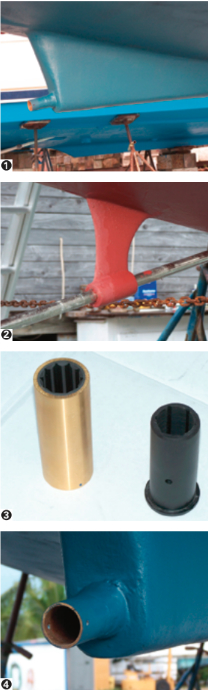
With that background, let’s return to the skipper’s problem. Once the boat was hauled out, visual inspection confirmed that the Cutless bearing was essentially gone. As the shaft was supported by a bronze tube molded into the hull (as opposed to the more common strut configurations) and because we lacked drawings of the assembly, we had to assess the damage and figure out what size bearing we needed. That meant removing the propeller shaft to determine where there was physical damage, what parts were needed, and the procedure to use for installing a new bearing.
Removed coupling
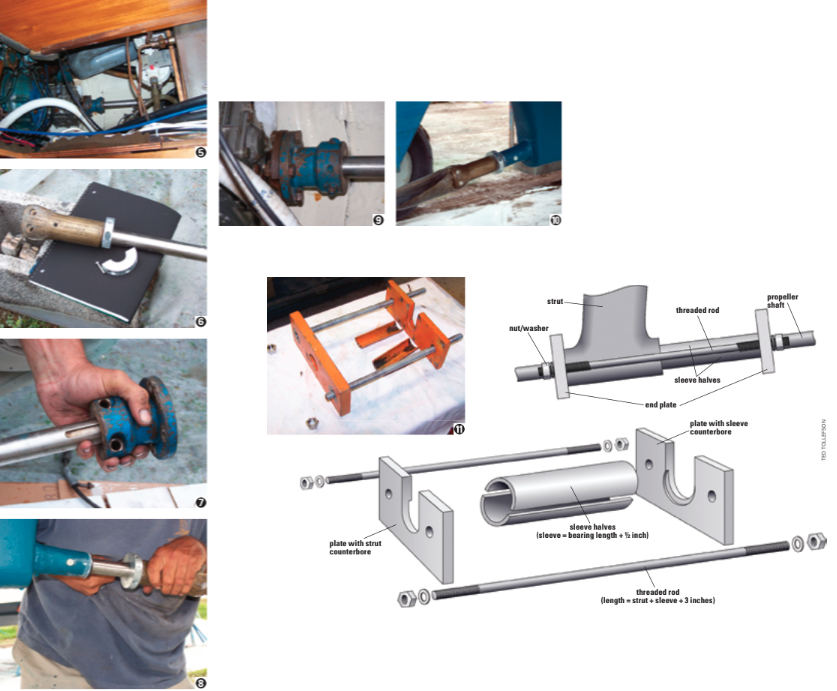
Step one was removal of the couplingat the transmission. The bolts securing the two halves of the coupling came out easily. It took a wheel puller, penetrating oil, and lots of sweat to get the shaft end of the coupling off. I was reminded of the reason for annually spraying preservative on the coupling in my boat, as I once had to cut one off an older boat.
When we extracted the shaft, we found a small piece of the Cutless bearing in the tube. All the bearings I’d previously worked on had a rubber composite bonded into a bronze sleeve. This bearing had no sleeve, so the sleeved bearing we’d bought wasn’t going to work. A phone call to sailboat builder Beneteau USA in Marion, South Carolina, confirmed that we needed a flanged composite bearing with no sleeve; the company overnighted one to us.
The bearing arrived as promised and we compared it to the one we had. The difference was obvious. The sleeved bearing was designed to be inserted into a strut. I’d dealt with this before and had built a tool for pressing the old sleeve out of the strut, as it often corrodes into place. We didn’t have to worry about the old bearing in this case — it had removed itself.
We slid the new flanged bearing into the tube after we checked for damage and foreign material in the sleeve. The tube has a water pickup that floods the tube and the bearing. We didn’t want the slots for the cooling/lubricating water blocked when the new bearing was seated. Then we polished the propeller shaft with emery cloth to remove scaling and inserted it through the bearing and the dripless packing gland. While the coupling was being reinstalled, we checked it with a feeler gauge to ensure that the engine was still in alignment. We then tightened the two plastic machine screws that retained the bearing at the outboard end of the tube. We mounted a zinc anode on the shaft, sliding it tightly against the propeller to ensure that we weren’t blocking water passage out of the bearing. The job was done.
Barry Hammerberg rebuilt a wooden Snipe and learned to sail while in high school. He and wife, Ruth, owned a charter boat in the Florida Keys, sailed the British Virgin Islands and Leeward Islands, and now live aboard their 43-foot sailboat on the East Coast.
Thank you to Sailrite Enterprises, Inc., for providing free access to back issues of Good Old Boat through intellectual property rights. Sailrite.com