Here’s a $5 propeller puller you can build yourself
Issue 62 : Sept/Oct 2008
We wanted our own propeller puller but it had to fulfill the following requirements:
- It must be simple to work with.
- It must be cheap.
- It should be easy to make at home
by ourselves. - It should store easily and compactly
on our boat. - It should assemble and disassemble
easily.
As a result, we created a design that needs only the following tools for construction: a hacksaw, an electric drill, a 9⁄16- or 17⁄32-inch drill bit, and a 17⁄64- or 1⁄4 -inch drill bit.
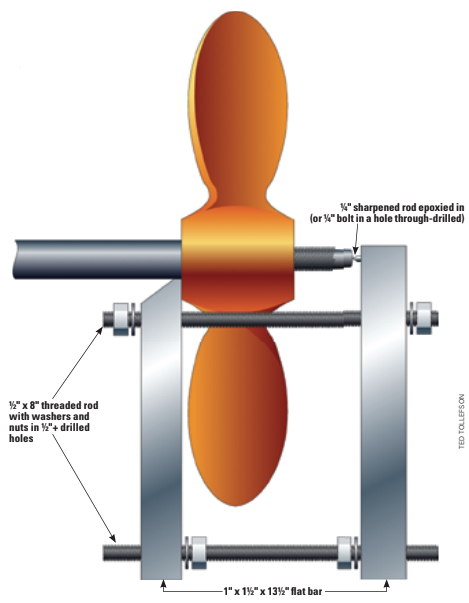
The materials needed are: two pieces of 1-inch x 1 1⁄2 -inch x 13 1⁄2 -inch flat bar, two pieces of 1⁄2 -inch x 8-inch threaded rod, four 1⁄2 -inch nuts, four 1⁄2 -inch flat washers, one 1⁄4 -inch x 2-inch bolt, and one 1⁄4 -inch nut. The material can be regular steel. There is no necessity for stainless steel or bronze. Aluminum may be considered if weight is a major concern, and dimensions may be altered or tailored for a specific boat’s needs or if available materials dictate the need to do so.
The flat bar is available from steel- supply companies, machine shops, or welding shops, and any of these places can cut the steel to size. In fact, if desired, they can also drill the holes. The threaded rod, nuts, and bolt are available at hardware stores.
The holes for the threaded rods are 9⁄16-inch but could also be 17⁄32-inch. The holes are oversized to accommodate sloppy drilling technique, to allow for easy assembly or disassembly, and to allow for misalignment of the sides of the puller during use without distorting the threaded rod.
The hole for the 1⁄4 -inch bolt is drilled 17⁄64-inch to allow for easy access for
the bolt, but 1⁄4 -inch could also be used. Alternatively, a 1⁄4 -inch sharpened rod can be epoxied into place, as shown in the diagram below.
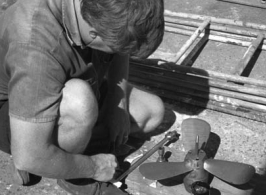
To use the puller, remove the shaft nuts and place the side of the puller with the 1⁄4 -inch bolt against the end of the shaft. The sharpened point on the bolt should fit into the dimple machined into the end of the shaft and keeps this side of the puller centered on the shaft.
The other side of the puller fits against the forward face of the puller hub. The threaded rod at the top of the puller fits between two of the propeller blades.
Once the puller is in position, tighten the nuts until the puller is snug on the propeller hub. Once snug, continue turning the nuts on the upper threaded rod to pull the sides of the puller together. The force created will pop the prop loose from the shaft.
The puller is very successful on a 15-inch propeller on a 1 1⁄4 -inch shaft. It can also be used on larger or smaller props. It performs wonderfully, especially when you consider that the total cost of all materials is only $5.
Rudy and Jill Sechez have lived aboard and cruised for 10 years, beginning with a 36-foot wooden cutter they built and currently with a 34-foot sail-assist troller yacht they designed and built. They finance their cruising by working when funds run low, mostly on boat-repair projects. They write for pleasure.
Thank you to Sailrite Enterprises, Inc., for providing free access to back issues of Good Old Boat through intellectual property rights. Sailrite.com