Creating stowage for volumes and tools
Issue 66 : May/Jun 2009
The only thing I can compare to spending a rainy night reading while rocking at anchor in some distant, seal-haunted cove, is stretching out, book in hand, on the leeward cockpit cushion while my mate is at the helm, steering us to parts unknown. Nothing stokes the imagination and fosters close concentration like the cozy solitude of a small yacht as it heaves on the swell of the sea.
My wife, Ruth, and I sail the length of the New England coast from New Haven, Connecticut, to Vinalhaven, Maine, staying aboard for weeks at a time. Because we’re editors and writers by trade, we’ve no choice but to take a lot of books along with us — books for reference, books for our freelance jobs, books to stir the blood, books to quiet the mind. The problem was finding a good place to put them all.
Our Catalina 36, Sea Change (so named because we bought her to launch my retirement in 2006), has a great deal more organized stowage on board than did our first boat, a Jeanneau 34. By organized stowage, I mean drawers, cabinets, and lockers where things can be put away in an orderly fashion and readily retrieved when they’re needed. While the Jeanneau had considerable volume for stowage, most of it was tucked away in odd-shaped bins under the settee, under the two double berths, behind the seat cushions, and under several sole plates. Invariably, the item we’d be looking for would have gotten lost in the amorphous amalgam of gear, squashed under bottles of wine, or soaked through and through with bilge water.
A shortage of shelving
Aboard the Catalina, however, most of our clothes, gear, and provisions can be organized rationally, stowed securely, and accessed quickly. Yet, despite the abundance of drawers and cabinets that make this possible, there wasn’t enough open shelving on Sea Change to hold the essential cruising guides, tide tables, chart books, owner’s manuals, and seamanship handbooks. Sobering experience aboard our first boat had taught us that it’s a bad practice to store manuals and guides haphazardly where they can’t be found fast when the clogged head needs disassembling or when that “isolated” anchorage turns out to be chock-a-block full when you arrive at sunset. So our cruising guides and handbooks filled up the two dedicated bookshelves on board. These are located in the usual space under the midships portlights. We also filled a whole cabinet with the manuals for all the boat’s systems and components. This meant that our “non-essential books” wound up being stuffed in drawers beneath our clothes or crammed in lockers already crowded with provisions and cruising gear.
The day after Sea Change was finally commissioned, we took her on a three-week shakedown cruise. That was all the time we needed to decide that — for the kind of cruising we wanted to do and for the kind of reading we needed to do — nothing less than a right and proper bookcase would suffice. During this “maiden voyage,” a number of other stowage problems came to light as well, the most notable among these being the need for a serious tool chest and a way to store the dining table against the forward bulkhead without triggering a lumbar event or scarring the woodwork. After a lot of thought and discussion, we figured we could solve all three problems with one not-so-simple project.
An overage of berths
The brochure for the Catalina 36 Mk II touts berth space for seven adults. Two of those spaces are provided by the dining table, which can be set on cleats level with the port settee and topped by a huge cushion to become a double berth. Executing our not-so-simple solution would eliminate these two spaces and possibly decrease the resale value of our boat. But on reflection, we just couldn’t imagine many cruisers who’d want to sacrifice good stowage for the frightening prospect of hosting five other people as cruising companions on a 36-foot sailboat. There are much safer ways to strain the bonds of kin and friendship. So we gave ourselves permission to do away with the capability of converting the port settee into a double berth.
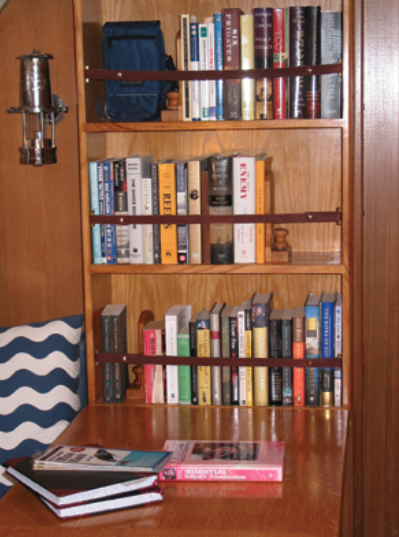
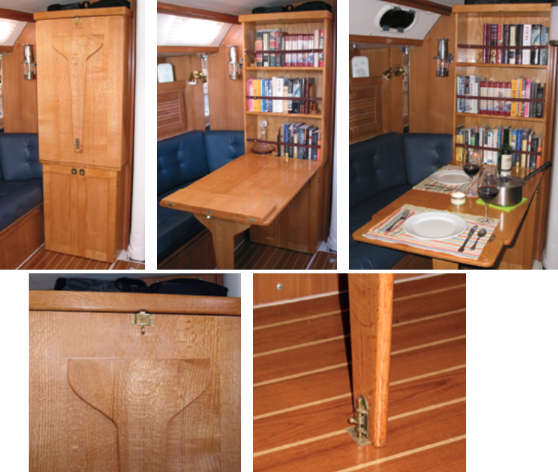
This decision cleared the way for building the visual and functional centerpiece of the saloon. It would be a large sole-to-ceiling cabinet bolted to the forward bulkhead where the original dining table mounted. The upper case would provide secure shelving for up to 50 books and would have a new tabletop hinged to its bottom shelf. The lower cabinet would be devoted to organized stowage for tools and supplies for repair and maintenance.
The basic concept for this kind of bulkhead-mounted table/cabinet is nothing new. Several high-end production boats have them, Island Packets and Caliber LRCs (Long Range Cruisers) being two. But the cabinets I’ve seen have no lower case. Moreover, the upper case in these designs is fairly shallow, about 4 inches or so deep, and meant for storing dishes, glassware, and bottles of rum . . . definitely not for shelving books with their spines facing out. We needed an 8-inch deep bookcase on top with a case of equal depth behind a pair of doors on the bottom. I worried that something this massive would steal needed sitting space from the settee, interfere with normal movement, and crowd the saloon visually. To make sure I wasn’t making a mistake, I decided to build a full-size cardboard mockup, put it in place, and see how it looked and “felt.”
Testing the concept
Making a cardboard mockup is an essential step to retrofitting anything in the way of joinery on a boat. While it’s true most production boats are designed to appeal as broadly as possible within their class, resulting in inevitable compromises, these designs are carefully thought out, especially from an aesthetic standpoint. That makes it important to test the concept of a proposed addition by making a model of it and putting it in place on the boat. I’ve tested more than a few ideas this way and discovered that once moved from the drawing pad into three-dimensional reality, they were either ugly in the overall scheme of things or ergonomic failures.
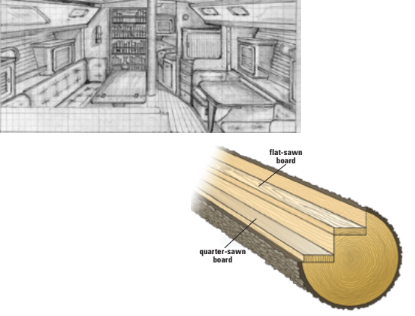
Even if the idea proves to be a good one, before I go cutting into premium materials and ordering expensive hardware, I need a precise pattern for each part and component. I begin by taking measurements of the space where the “furniture” will go and then sketch the piece in its setting using a photo of the area, if possible (I used the wide-angle shot from the Catalina brochure). The sketch can be hugely helpful in scaling, proportioning, and harmonizing a proposed addition with its surroundings, and it’s worth grinding a pencil or two down to a nub to get it right. The next step is to make plan and elevation drawings, with sectional drawings where necessary. Then I lay out the parts on large, clean, panels of cardboard (mattress cartons work well, if you can find them) and start cutting, using an aluminum straightedge and a sharp utility knife. For curves, I just freehand the cuts on the bandsaw.
Putting it together
Assembly can be more involved. I use wooden laths to stiffen shelves and panels, wooden blocks for brackets to strengthen corners, as well as triangles of plywood for gussets. Hot-melt glue is great for sticking all these elements together and makes fast work of the job.
It’s easy to get fussy with models because the neater they are, the likelier they are to give you a reliable sense of what the finished product will be. But this approach can be risky: if you invest too heavily in it, you may resist making appropriate alterations once you’ve seen it in place. It wasn’t easy for me to tear up and remake the model for the base cabinet once I discovered that it was an inch too wide for the lower space and would overlap a bilge board and crowd the settee cushion. I could have just made the correction during actual construction, but I’m glad I remade the model because when I test-fit the whole shebang a second time, I realized the base would look much better if I overlaid the doors on the case rather than setting them inside it as I’d planned at first.
Finally, I was confident that the concept was workable and the piece would be a good fit for the space, so it was time to bring the boards I’d selected into the shop. Using the model as a precise guide, I laid out the parts for the case, doors, and tabletop.
A case for oak, not teak
Boat interiors can become pretty monotonous when finished out with a single species of wood, especially when that wood has fairly uniform, undifferentiated grain characteristics (often called “figure”), as plantation-grown teak typically does. That’s one of several reasons I chose quarter-sawn red oak (Quercus rubra) for the bookcase project. The process of quarter-sawing yields material that has the tree’s growth rings running vertically through the thickness of the board. As a rule, quarter-sawn planks are stronger and more dimensionally stable than flat-sawn boards of the same species. Though quarter-sawn oak has been much prized for its strength and stability, its beauty also is a thing to cherish.
Quarter sawing exposes oak’s unique medullary rays, which seem to crawl across the surface of the wood, giving its figure an active luminescence, which can seem almost holographic in its visual effect. The French-derived word chatoyant, “like a cat’s eye,” describes this enchanting optical quality in certain gemstones and in some woods.
From a woodworking point of view, there’s nothing remarkable about how this piece of casework went together. The shelves fit snugly into dadoes in the case sides and are secured with 2-inch #8 screws and Titebond III, a brown, water-proof glue with superior strength and gap-filling ability. The counterbores for the screw heads are plugged. It’s important to me to make plugs disappear altogether. I find pieces of scrap whose grain closely matches the wood around the counterbore and cut a plug using a 1⁄2-inch cutter — available at Lee Valley Tools — that puts a 2-degree taper on the plug so that, when it’s driven home, it wedges itself seamlessly into the hole.
Solid-wood panels
The door frames are grooved to accept the 5⁄16-inch-thick solid-wood panels, and the frame members are joined up using 8 mm separate tenons. I use a slot mortiser to cut mating mortises on both rails and stiles. Because I keep a lot of wood on hand that’s planed to 8 mm (and to other standard tenon thicknesses, as well), all I have to do before assembly is cut the tenon stock to width and length, apply the glue, insert the tenons into their mortises, insert the panel into its grooves, and pull the whole assembly together in a pair of sash clamps. Compared to traditional mortise-and-tenon joinery, using separate tenons can provide equally precise alignment for frame members, save time and material, and make for a connection that is at least as strong (some would argue stronger).
Because boatbuilders don’t generally install conventional bookcases on board, it’s hard to find proven ways to keep books from falling over sideways when the boat heels and to prevent them from tumbling out of the case altogether when the boat hobby-horses into a head sea.
Packing the shelves full end-to-end is one solution for the side-to-side problem, but it’s not a realistic one since it means bringing exactly the number of books aboard to fill out the shelves. The fore-and-aft problem could be solved with the usual fiddle bar, but then the books are locked in unless the shelf above them is high enough for the biggest hardcover book to clear the bar. This was not a good choice for us since it makes for an unacceptable waste of space. My challenge was to make adjustable, lock-in-place bookends to address the first problem and flexible restraints across the face of the cabinet for the other.
Locking bookends
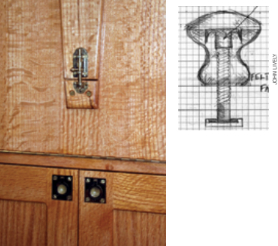
Woodworkers lie in bed at night figuring out how to make jigs and fixtures for various machine and router operations. The slide-and-lock system is a commonplace feature on many jigs, and I decided to try it for bookends. Basically it involves routing a T-slot along the length of the shelf. The slot engages a T-bolt that’s threaded into a T-nut embedded in a knob atop the base of the bookend. Once the T-bolt and slot are lubricated with a candle butt, the bookend slides easily from side to side and locks in place where needed with a twist of the knob.
For the front of the case, I considered using removable fiddle bars or bungees, but concluded these were either impractical or inelegant. Then one night the idea of using leather straps popped into my head. I got out of bed, searched online for leather suppliers, and found that leather and leather-working tools for small projects can be bought inexpensively. I ordered a 5-pound bag of “strap leather strips” from Leather Unlimited for $6, along with 50 leather fasteners known as “Chicago screws,” which are commonly used on gun slings and binocular straps. I also bought a cheap set of leather punches to make clean holes for the fasteners. To fix the straps to the sides of the case, I fashioned some hardware from solid-brass door hinges. It’s interesting what you can do with only a hacksaw and a couple of files.
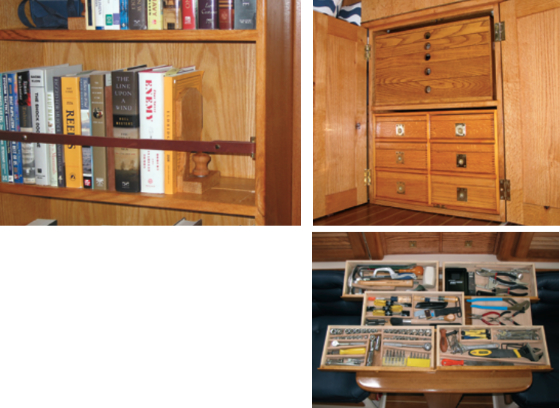
I tensioned the straps just until they were taut but still had enough flex to allow even the taller books to be withdrawn easily. After two years of stretching from use and wear, the straps have had to be re-tightened only once (I punched new holes on the back side and reset the screws).
The tabletop puzzle
The original tabletop stowed against the bulkhead with its bottom edge resting on a cleat about 11 inches off the sole and its top edge, secured by a thumb bolt, just shy of the overhead. Dismounting it and setting it up in a seaway was something of a wrestling match, and getting around it to take your seat required a lot of ungainly sideways scooting on your backside. This little problem was happily (and accidentally) solved as a result of mounting the new tabletop to the bookcase at eating height.
But hinging the table at a fixed position 28 inches above the sole presented a major problem of its own. In order for it to clear the overhead when stowed vertically against the case, the new table would need to be at least 16 inches shorter than the original (recall that its stowage cleat was 11 inches above the sole). However, I was able to keep the overall loss of length to only 8 inches (the depth of the bookcase) by hinging a folding leaf to the end edge of the tabletop. Because the leaf is 2 inches narrower than the rest of the table, it nests neatly inside the case when the top is folded up and stowed.
The card-table hinges I used have a positive stop at 180 degrees. I used three of them to make sure the leaf would stand up to heavy conversation. With the table deployed and the leaf folded back, we don’t feel so bad about asking Ruth’s mother to scooch around the L-shape to take the far seat.
Where’s my wrench?
Which is worse: not having the tool you need or not being able to find one you have? It’s a moot question because the net result is the same, though losing track of a tool is definitely more irksome. This is a frustration I share with many of the cruisers we’ve met. The five-drawer chest I made holds almost twice as many tools as I could cram in our previous plastic toolbox, the biggest one I could find that would fit in the cockpit locker. Where possible, I partitioned the drawers to accommodate individual tools or sets of tools. Because the drawers are shallow, only one tool deep, everything is visible at a glance and nothing gets lost. The chest itself is a separate case with leather handles, so it can be removed if need be.
The drawer sides are grooved and slide on battens let into the sides of the case. This method eliminates drawer dividers (as in the chest below the tool box) and saves considerable space. The drawer fronts are too narrow for mounting hardware, so I bored holes in them large enough for a fat finger. On a mindless whim I used ash for the tool chest, which is a choice I regret. But it is behind closed doors.
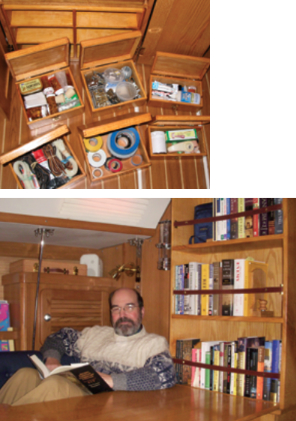
Who took the rigging tape?
The answer to this question was always the same. I did. Only I forgot where I had put it or something else had been stuffed in on top of it. This story applied to myriad things: sealants, glue, fasteners, wire, spare parts, rigging hardware, hose clamps, cable ties, and tape of every kind.
In my basement woodshop, tools and supplies are well enough organized that I can find what I need in the dark (not that I have ever needed to). On a sailboat, having ready access to your tools and supplies is often a more urgent proposition.
On our first boat a few years back, a nasty jibe sheared the clevis pin on the traveler. The preventer saved us from disaster, and we could have kept sailing had I been able to locate the spare shackle we had on board. As it was, we doused the main, secured the boom, and motored home. But if we’d been cruising instead of daysailing, not being able to replace that piece of broken hardware could have been one of those little mishaps that sets off a chain of ever-worsening consequences. On Sea Change, I was determined that we’d have the spares and supplies we would most likely need and would store them securely and rationally.
Instead of regular drawers, I opted for lidded boxes that work like drawers. Boxes can be carried around a pitching boat with less danger of the contents spilling out, and they’re less liable to get jammed in the case because some item wedges itself against the shelf above. This can really happen.
Double-espresso morning
From start to finish, this project took about a month to complete, excluding design and drawing time. It was a double-espresso morning when finally I loaded it into my truck and drove off to the marina. Because the cabinet consisted of two units, getting them on board and through the companionway was fairly easy. Once they were in position, I attached the upper case to the lower with a pair of 5⁄16 bolts. Then I fixed the entire cabinet to the bulkhead, using four 1⁄4 x 20 bolts in each unit. Each bolt engages a barrel nut embedded in a shelf, which makes for a very secure connection. The tabletop is installed using a brass 3/4-inch continuous hinge, and is at least as sturdy and as stable as the original table. The Phillips bolt heads are dressed with finishing washers and are visible in the head, except for those that hide behind the mirror.
We’ve sailed for two long seasons with these improvements on board. At anchor, after dinner, Ruth knits, or reads, or works away on her laptop sitting at a small table in the starboard nook. I stretch out on the port settee, wedged between the seatback cushion and the side of the bookcase, where I can read comfortably. (This works even on a port tack if the table is down.) Sitting here with a dram of bourbon at hand, a nor’easter howling outside, and a bridle snubber on the bow cleats, I can fully plumb the wisdom of L. Francis Herreshoff:
“The cabin of a small yacht is truly a wonderful thing; not only will it shelter you from the tempest, but from the other troubles of life, it is a safe retreat.”
John Lively was for many years editor-in-chief at The Taunton Press. He and his wife, Ruth, spend as much time as possible aboard Sea Change, trying to stretch New England’s sailing season past five months. Otherwise, they are traveling or he’s making custom furniture in his home shop.
Thank you to Sailrite Enterprises, Inc., for providing free access to back issues of Good Old Boat through intellectual property rights. Sailrite.com