Eliminate overheating in 12 easy steps
Issue 68 : Sept/Oct 2009
Ask any owner of an auxiliary diesel sailboat what his or her most common engine-related problem is and chances are the answer will be, “Overheating!” It’s a common malady, one that’s likely to become a frustrating and recurring nightmare unless you understand how your engine is cooled and learn some simple steps to keep it running cool.
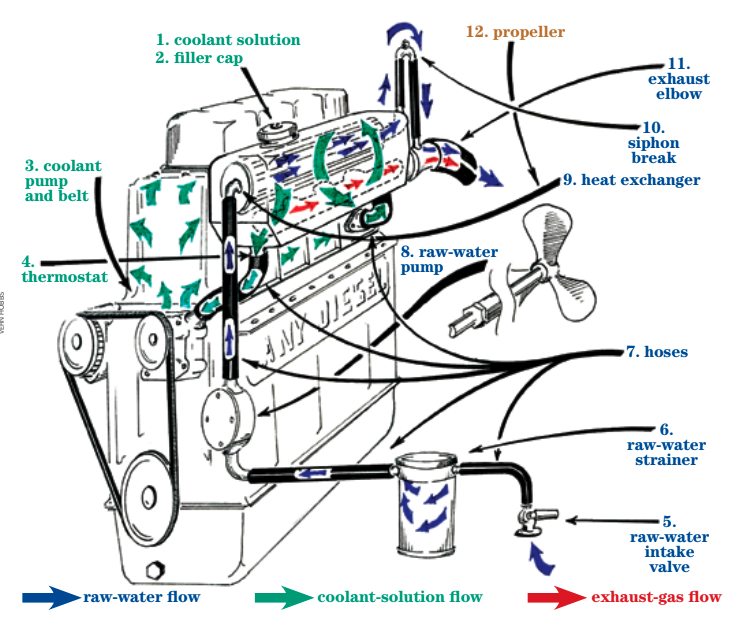
Even the greenest nimrod on the dock knows that sea or lake water is used to cool a marine diesel, but exactly how that happens is often misunderstood. Long ago, marine engines were typically cooled by pumping seawater around the cylinders and discharging it overboard. This method, while simple and effective, introduced a number of elements that greatly reduced engine life. Modern auxiliaries employ dual-circuit cooling systems that provide efficient cooling without the harmful side effects. These modern cooling systems have two halves, or circuits, that are completely separated from one another, although they do share a common component.
Dual-circuit cooling
The freshwater circuit, sometimes called the closed circuit or the coolant circuit, actually cools the engine. It’s very much like the cooling system of most automo- biles: an engine-driven pump continuously circulates a coolant solution, typically glycol, around the internal parts of the engine to carry away heat. The second half of the system, the raw-water circuit, cools the freshwater circuit. This circuit uses a second engine-driven pump to draw water from outside the boat — raw water — and pass it through a device called a heat exchanger, a component that both circuits share.
The heat exchanger serves the same purpose as the radiator of a car — it reduces the temperature of the coolant solution before it’s re-circulated through the engine. The car radiator does this by directing airflow over small tubes through which the coolant solution is flowing. The heat exchanger accomplishes the same task by pumping the coolant solution around small tubes through which the raw water is flowing.
Unlike the coolant solution, the raw water is not re-circulated. It’s discharged overboard, usually after being pumped into the engine’s exhaust, where it further serves to rapidly cool the exhaust gases and the exhaust pipes inside the boat.
This basic explanation of how a diesel is cooled sounds simple; so why are so many sailors plagued with overheating woes? To work reliably, the dual-circuit cooling system, like everything else aboard, requires periodic maintenance. Unfortunately, many skippers neglect this important system until it literally screams for attention by setting off that pesky over-temp alarm. By conducting the following 12-point check, once every six months in the colder climates and every three months in tropical waters, you will help keep things cool.
Freshwater circuit
Faults in the freshwater (or coolant) circuit are comparatively rare, but four items should be checked.
1. Coolant solution
This is elementary, but essential: ensure the coolant holding tank is adequately filled. The solution should be uniform in color, usually green or blue. Muddy, rusty, or oily colorations are signs of trouble.
2. Coolant-tank filler cap
Trivial? Not at all. An incorrect or faulty filler cap may contribute to overheating. (See “Losing Engine Coolant,” March 2008.) The freshwater circuit is sealed and designed to operate at a specific pressure that is maintained by a relief valve in the filler cap. Consult your engine’s operator’s manual to determine if the correct cap is installed. Ensure that the cap is corrosion-free, the gasket is pliable and not torn, and the spring-loaded valve moves freely.
3. Coolant pump and belt
Check the belt for tension by placing downward pressure at a point midway between the pump and the drive pulley. It should flex no more than about 1/2 inch. Next, examine the pump itself. Any evidence of coolant leakage indicates a faulty pump.
4. Thermostat
Rapid overheating after startup or unusually long run times before reaching the recommended operating temperature are indications of a faulty thermostat. A healthy thermostat allows the engine to reach operating temperature quickly and stabilize there. To be properly tested, the thermostat must be removed from the engine. This may or may not be a simple job. The good news: most (but not all) thermostats are cheap. Many mechanics recommend simply replacing them each time the coolant is changed — annually — as good preventive maintenance.
Raw-water circuit
Most overheating problems arise from shortcomings of the raw-water circuit. There are seven likely trouble spots.
5. Raw-water intake valve (seacock)
Ensure that the intake seacock operates freely and is fully open while the engine is running. Inspect the intake screen outside the hull and clear away any obstructions or marine growth. This may require a swim.
6. Raw-water strainer
Close the raw-water seacock and open the strainer. Remove any debris or marine growth, then flush the strainer basket with fresh water and reassemble the strainer.
7. Hoses
The raw-water circuit will typically have four or five sections of hose that allow the water to flow successively to each component in the system. Close the raw-water seacock, then visually trace these hoses through the entire system. Check for and eliminate any kinks or pinches. If, because of a weak or irregular water discharge through the exhaust, you suspect inadequate raw-water flow, disconnect each hose section and check it for clogs.
Ensure all hoses are of the proper size. Any hose that appears to sharply reduce or expand in diameter at a connection point may be incorrectly sized. Replace any hoses that are cracked, bulged, abraded, or of the wrong size. Re-open the seacock, start the engine, and observe all hoses in the raw-water circuit while operating the engine at full rpm. If any hose appears to collapse, even partially, replace it with a wire-reinforced hose. Check for leaks. Shut down the engine, close the seacock, and repair any noted deficiencies after the engine has adequately cooled.
8. Raw-water pump
Close the raw-water seacock. Place a bucket directly beneath the pump, remove the faceplate, and inspect the impeller for broken, nicked, or gouged lobes and any other obvious damage. If the impeller is damaged, or if it is more than two years old, replace it. If this process seems too mechanically challenging, consider following the instructions presented in Troubleshooting Marine Diesels, by Peter Compton, or hire a pro.
9. Heat exchanger
The heat exchanger is the heart of both cooling circuits. These devices are delicate and expensive so consult a professional before proceeding with anything more in-depth than the two basic procedures described here.
First, if the end caps are removable and accessible, take them off, remove any visible debris, and visually check for blockages or mineral buildup. Some sources recommend using a small-diameter wooden dowel to swab out the tubes, but be careful. Don’t force the dowel and don’t be tempted to use harder or stiffer cleaning devices. Check the heat exchanger visually once more and reinstall the end caps.
A less-invasive way to remove mineral buildup is with a vinegar bath. Isolate the heat exchanger by disconnecting the hose coming from the raw-water pump and the hose leading away from the heat exchanger toward the exhaust elbow. Elevate the open ends of both hoses above the level of the heat exchanger and pour white distilled vinegar into one of the open hoses until it runs from the open end of the other hose, filling the heat exchanger. This mild acid will remove minor mineral deposits. Even a thin film of such contaminants will significantly degrade the heat exchanger’s efficiency. Let the vinegar stand for 30 minutes then drain it into a bucket and reattach the hoses. Flush the system with raw water by running the engine. If more vigorous cleaning is required, remove the heat exchanger and take it to the professionals at a radiator shop.
10. Siphon break
The hose section connecting the heat exchanger and the exhaust elbow should incorporate an elevated loop. The top of this loop may incorporate a U-shaped fitting with a small nipple. This is an anti-siphon valve; it’s important because it prevents water from backing into the engine’s cylinders. You can check the valve for restrictions by removing the nipple and blowing through it in both directions. If it’s clogged, clean or replace it.
11. Exhaust elbow
This component may not be considered part of the cooling system, but a partially restricted exhaust elbow is a sure formula for overheating. Carefully remove the exhaust hose at the outlet of the elbow and check inside for excessive carbon (soot) buildup. If the elbow appears to be partly clogged, have someone experienced in performing this sort of job clean or replace it.
Beyond the engine
When both of the cooling circuits are in good order but overheating persists, there is one more place to look.
12. A surprise
The 12th common culprit of overheating may come as a surprise. It’s the propeller. A prop that is even slightly fouled with marine growth will markedly reduce the engine’s efficiency, resulting in higher-than-normal fuel flows to achieve any given rpm setting and, in turn, excessive heat buildup. A good scrubbing at least once a season is imperative. Tropical sailors may find it necessary to scrub their props every month or two.
Making these 12 checks part of your regular maintenance routine might just prevent that temperature needle from creeping up the scale, offer your engine a longer life, and cause you fewer of those troublesome recurring nightmares.
Vern Hobbs and his wife, Sally, sail a 1974 35-foot Bristol cutter along Florida’s Atlantic coast and the Intracoastal Waterway. Their day jobs pay the rent, but money for boat projects comes from Vern’s work as an artist — he specializes in maritime subjects.
Thank you to Sailrite Enterprises, Inc., for providing free access to back issues of Good Old Boat through intellectual property rights. Sailrite.com