A wood-burning cabin heater beats the chill
Issue 68 : Sept/Oct 2009
We sure do love a warm fire in the cabin when it gets chilly in the evening and early morning, so when we take our good old Pearson 28 on late fall, winter, and early spring overnights, our wood-burning heater adds a lot to the experience. After a few years with it, I can certainly say it meets our needs. Whether it will meet yours depends on what you need from a cabin heater and the space you have for a heater, flue, and fuel.
When you look into shorepower-independent, permanently-installed cabin heaters, the wood-burning cabin heater can be toward the cheaper end of the price spectrum and, unlike liquid-fuel heaters, it doesn’t require plumbing to a fuel supply. But, on a small boat, it has some drawbacks and limitations that should be taken into account by anyone thinking of adding cabin heat.
The flue is bigger than those for liquid- or gas-fueled heaters, which means you might have to get creative when routing it and, as with any combustion heater, installation locations are strictly limited by ventilation needs, clearances from flammable surfaces, and non-interference with normal vessel operation.
The fuel is bulky, and you can get a lot more calories for the bulk from propane, diesel, or kerosene. BTU heat-output ratings for wood-burners are about half those of similarly sized liquid-fuel heaters. An efficient wood-burning heater burns wood fairly quickly. If you were going to be doing lots of cruising in Alaska on a small boat, the stowage requirements of wood fuel might well be a deal-breaker.
We sail in coastal North Carolina, which means we sail all year long. Our winters are mild and, for much of the year, it’s quite comfortable during the day but chilly at night when the sun goes down. Our need for a cabin heater, therefore, falls under the manufacturer’s definition of “casual use.” Typically, we’ll fire it up after we drop the hook and leave it on until bedtime. (I would never go to sleep or sail with it lit.) While it’s not easy to stow much wood on a small boat, it doesn’t take much to heat it up; our heater gets the cabin toasty in just a few minutes. If the outside temperature is in the low 40s, it’ll be in the high 60s below. We never sail when the temperature falls much lower than that. I can’t speak to the efficacy of the wood-burner in cold locales.
Wood-burning cabin heaters are analogous to wood-burning fireplaces in houses; there are much more efficient and easy ways of heating. We have fireplaces because we just enjoy them.
Rite of combustion
I’ve got “boat fires” down to a system and, following the manufacturer’s directions exactly and using the right combination of fuel, I’m able to make a one-start fire every time.
Safety first – I go on deck to make sure there’s nothing touching the Charlie Noble — the chimney — and that I remembered to take its cover off. Then I check below to make sure nothing’s touching the flue and that the baffle on the deck vent near the heater is open. Then I open the damper, build the fire, open the firebox grate door, and sit back. (Once things have heated up, I need a mitt to open the door to add fuel or adjust the fire-door opening or damper.)
Fuel – The firebox is small, so I can’t just cram it full of big wood. I’ve found that 3- to 4-inch seasoned oak, cut with a chain saw into chunks 4 to 6 inches long, works great. I keep a crate of it in my shed. For tinder, I use scrap paper, twigs, and dry pine cones. For kindling, I add small scraps of untreated wood from the shop. The tinder goes in first, the kindling on top of that, and then just one or two chunks of oak. I don’t want to pack it in, I want to keep it loose. Once the fire’s going, I add another chunk or two. In one evening, I may go through six or seven chunks of oak. For a weekend, I bring aboard a plastic container about 24 x 24 inches full of heater fuel and stow it on the cabin sole in the forepeak, under the V-berth insert.
Fuel safety – I do not use chemically treated wood, wood covered with paint or glues (this includes plywood), or glossy paper. By using hardwood as my main fuel, I avoid excess resin buildup in the heater and flue. Well-dried wood makes for easier starts, with less popping and much less smoke.
A safe installation
It should go without saying that you must adhere strictly to the manufacturer’s instructions for installing something that involves making fire on your boat. Whoever installed the heater on my boat, however, apparently felt differently, and left me with some head-scratching and work to do.
If you’re considering a wood-burning heater, or a boat that already has one, the first thing to do is to get your hands on a copy of the owner’s manual. Make sure that the heater and its flue have been, or can be, installed according to the directions. The heater must be placed on a bulkhead a certain distance from anything flammable on the sides and low enough that, when combined with the height of the Charlie Noble, there will be adequate draft in the flue (determined by the length of the flue and how vertical it is). If the flue is too short, the heater will never work properly.
There must be a heat shield behind the flue where it passes close to the bulkhead and anywhere it’s exposed. These things get HOT — I tried wrapping a section of mine in Tetraglas exhaust-elbow wrap, which is rated at 1,000°, and the stuff started turning brown, smoking, and giving off acrid fumes.
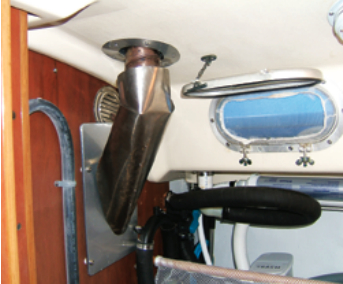
The flue cannot have more than a 45-degree bend in it or it won’t draw properly. This is where the previous owner had gone wrong — the flue had a 90-degree bend in it when I bought the boat.
There must be a source of fresh air within a specified distance of the heater and it needs to admit a certain amount of air. This could be a portlight, mushroom or Dorade vent, forced-air duct, or anything else that meets the air-volume delivery requirement. In my case, it was a Nicro passive vent in the coachroof, which also serves to put some light on the dining table if the sun’s up.
Bulkhead surgery
I can see why the previous owner installed the flue with a 90-degree bend in it; it was easy. Fixing it required some thinking, drawing, and careful measuring. I then had to perform surgery on the bulkhead. Why didn’t I just run it straight up the bulkhead and through the coachroof? There was deck hardware in the way. So it goes when adding big gear to small boats.
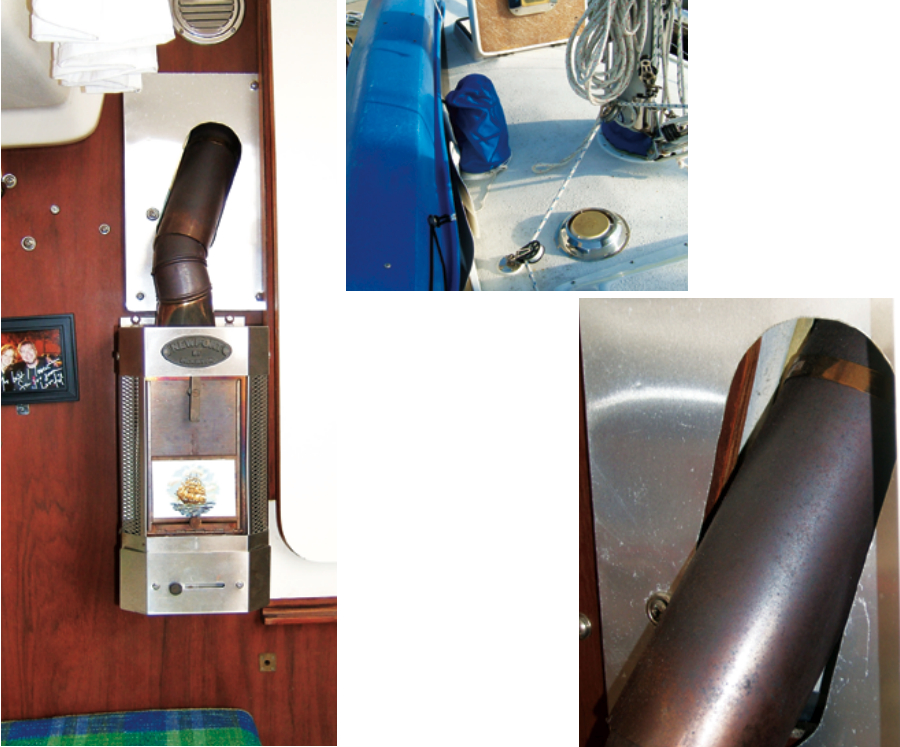
The round, stainless-steel louvered vent outboard of the flue in my setup shows where the flue ran through the bulkhead when I bought the boat. In order to get it to run at no more than a 45-degree angle, I had to run it through at a much lower point and cut an oblong hole to get enough clearance around the flue pipe. These pipes have universal elbow joints in them. That allowed me to offset the run of the flue from the heater somewhat. This was important in getting the flue where it needed to be without moving the heater, which could only go exactly where it was.
The heat shield directly over the stove was simple and cheap to make. It’s a tile backer board covered in aluminum flashing — inexpensive items that are available at the home-improvement or hardware store. Copper flashing might look really cool on a classic boat. I used pieces of plastic tubing to space the back of the shield off the bulkhead and provide the air space stipulated by the owner’s manual (these don’t get hot, but for looks you could use scraps of copper tubing with the edges dulled).
Be careful when working with flashing; the edges are as sharp as blades. When you’re done cutting it, fold up some medium-grit sandpaper into a thick piece and run it over the edges until they’re dull. I folded the edges of the flashing over the backer board and put a crease along the edge by lightly hammering it.
A scorcher in the head
The flue ran into the head compartment and looked well positioned to sear the scalp of anyone standing before the throne, so I made a heat shield for it out of a scrap of stainless-steel sheet metal that once was part of a refrigerator. It cleaned up nicely with polishing rouge. I cut it with tin snips and was able to bend it around a log. (If you use a power tool on metal, be sure to wear eye protection.) To attach it to the flue, I cut some strips and used a hammer and vise to bend them into brackets. I attached the brackets to the flue with stainless-steel hose clamps and fastened the shield to the brackets with sheet-metal screws. The system holds the shield off the flue with enough air space that, even with the heater going full blast, we can touch the shield without burning ourselves. It looks pretty decent too.
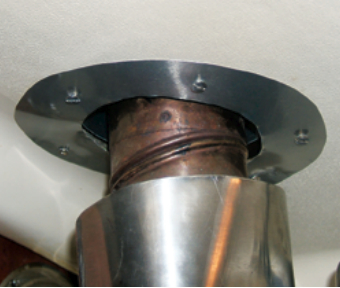
Where the flue passed through the deck, I originally had a plastic trim ring around the hole. Later I had a stinky-goo trim ring around the hole. You’ll want a metal one. I made one in two parts out of aluminum flashing. The first part is just a ring, made of a strip, that covers the (epoxied) deck core with just spring tension. I cut the flat trim piece against the overhead so its inside cutout is slightly smaller than the hole, preventing the upper trim ring from falling out. These trim rings would also look nice in copper.
The Charlie Noble should have a line guard over it to keep it from snagging sheets.
Sharing the heat
As a bonus, the flue in the head compartment makes that area very toasty. We open the head door to share that heat with the rest of the boat.
If you install a bulkhead fan near the heater, you can point it upward to circulate the hot air that otherwise collects at the overhead. (The effect is dramatic; someone standing in the galley will have a hot face while someone sitting on the settee won’t feel it.) Caframo makes clever fans, called Ecofans, that are activated solely by heat and can be mounted on a heater to circulate air.
Give the heater air
We always use an upper dropboard with ventilation slits or full-length screen doors in the companionway. Fires use lots of air and, if they don’t have enough to burn and draw the exhaust out, you’ll wind up with smoke and carbon monoxide in the cabin. We do not get smoke from our heater in the cabin. It burns so efficiently there’s very little smoke from the Charlie Noble. You cannot have a wood fire in winds above about 20 knots without getting downdrafts, however. You’ll find that in any owner’s manual.
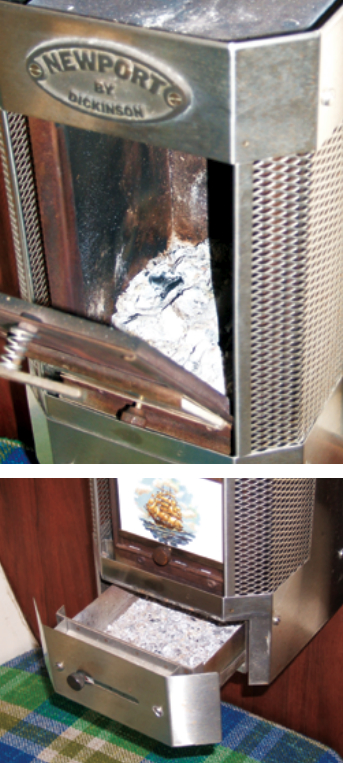
To turn the fire off, we close the fire-grate door and damper. With no air, the fire dies quickly. The ash drawer underneath is convenient; the heater contains its ashes when under way so they don’t spill onto the upholstery.
You can get a nicely made wood-burning cabin heater for less than $300 new, and the stainless-steel flue piping and Charlie Noble won’t break the bank either. You should be able to fashion the rest from humble materials. It might be worth the thought, work, and money. On a chilly evening, it sure is nice to sit in your cozy cabin by a real wood fire with a tot of good Scotch at your elbow.
Phillip Reid and his wife, Andie, sailed their 1977 Pearson 28, Miss Bohicket, out of Wilmington, North Carolina, for several years before donating her to the Chapman School of Seamanship last February. When not sailing, writing, or boat-grubbing, Phillip teaches a college history course.
Thank you to Sailrite Enterprises, Inc., for providing free access to back issues of Good Old Boat through intellectual property rights. Sailrite.com