An internal transducer eliminates a through-hull
Issue 85 : Jul/Aug 2012
Signals from a depth sounder will pass through a fiberglass hull that is not too thick and has no delamination problems. The owners of most small to medium-sized good old boats could therefore install an internal transducer to eliminate transducer fouling, to reduce by one the number of holes in the hull, and to extend transducer life. The downside is that the transducer will be unable to measure with precision depths deeper than about 150 feet, but this is of little concern to most sailors.
If you’re considering installing an internal depth sounder, first consult the sounder’s manufacturer regarding the maximum hull thickness the signal can penetrate and still be effective.
There is also a question of hull deadrise (the angle in cross section of the hull to the horizontal). A depth sounder’s effective signal is in an arc of about 20 degrees. If a transducer is bonded directly to the hull square to the deadrise, the deadrise angle can be no greater than half that arc, or 10 degrees. If, however, the transducer is mounted vertically, the angle of deadrise is not critical as long as the signal can penetrate the extra thickness of the bonding material.
There are two methods of installing an internal transducer: direct bonding and using a wet box.
Direct bonding
Direct bonding allows a transom-mounted transducer to be used if preferred. Regardless of transducer type (transom-mount or through-hull style), the bonding material must be free of air bubbles. The best bonding materials for the purpose are thickened epoxy or silicone rubber. Before committing, test the viability of the location you selected by placing the transducer in a water-filled plastic bag and holding it close to the hull. Alternatively, you can press it into a wad of plastic modeling clay or chewing gum. If the deadrise in your chosen location is greater than 10 degrees, make sure the signal remains viable when you hold the transducer vertically using either one of these tests.
Using a wet box
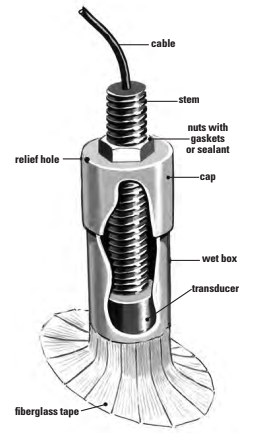
The oil-filled wet-box system is the most efficient with a normal through-hull type transducer placed in a vertical position on a greater angle of deadrise. If the manufacturer does not supply an optional wet box with your transducer, you can make one easily using thick-wall PVC pipe with an internal diameter greater than the transducer’s head and a matching PVC pipe cap. The dimensions of the wet box will be relevant to the transducer’s overall length and diameter. The oil must be able to fully engulf the transducer’s head.
Cut the bottom end of the pipe to meet the hull at whatever angle will keep it vertical. The pipe’s cap should hold the transducer firmly with glue or nuts inside and out. Include a small compression-relief hole in the cap. For future removal, grease the inside of the lid with silicone paste and it can be easily removed if the transducer ever needs to be replaced (this is very rare with a wet box). During final assembly — when the PVC unit has been mounted on the hull — you will fill the unit with vegetable oil and slip the transducer and cap assembly inside this tube.
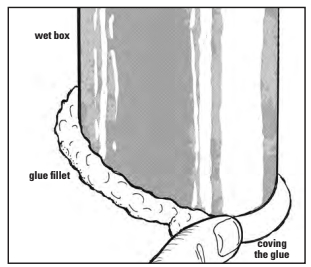
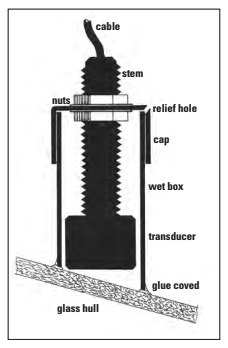
To start, use epoxy thinner to thoroughly clean the location you have selected for your internal transducer. Now, using epoxy, spot glue the empty PVC pipe into place on the hull. When the initial glue spots harden, cove more glue into and around the joint between pipe and hull and allow this to harden. Sand the coving fair and add short lengths of well-resined fiberglass tape around the joint, radiating outward and laminated three or four times in each wet-out.
The total number of laminations need only be around three to six, depending on tape thickness and whether or not the wet box is exposed to potential physical damage. When the laminations have cured, sand the laminate smooth and apply one final coat of resin. Use only epoxy glue and resin and make sure the wet box is leak-proof.
Once the PVC unit has fully cured and is ready to receive the transducer, pour in light vegetable oil, press the transducer and cap assembly into place, and the job is done.
Calibrating
Whether it’s direct-bonded or immersed in an oil-filled wet box, you need to know the transducer’s depth below water in order to interpret the soundings data. This can be difficult because you can’t see the sounder’s location from outside the hull. If you don’t have access to your vessel’s plans, use the following simple method.

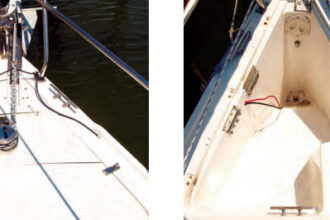
Anchor fore and aft over a hard sand bottom at slack water and stand on deck athwart of, and on the same side as, the wet box. From that position, sound with a lead line or a soft-plastic builder’s tape weighted with a big sinker. With the help of a friend, simultaneously check the depth sounder against the lead line. To obtain the offset, subtract the depth- sounder reading from that of the lead line. For example, if the sounder shows 6 feet of water and the lead line shows 8 feet, the transducer must be 2 feet below the waterline. You can now program the sounder accordingly.
Alan Lucas, an Australian, is trained in commercial art. He moved aboard his home-built ketch in 1960. Seven yachts and 51 years later he is still living aboard and cruising. In addition to many magazine articles, he has written 17 do-it-yourself books and six cruising guides.
Thank you to Sailrite Enterprises, Inc., for providing free access to back issues of Good Old Boat through intellectual property rights. Sailrite.com