Wood is practical and attractive
Issue 89 : Mar/Apr 2013
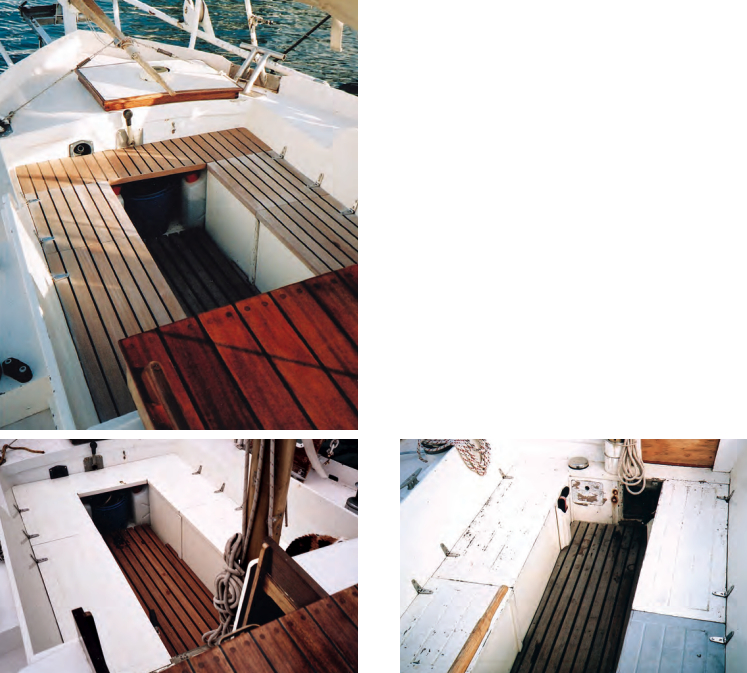
In 2002, Magali and I totally redesigned and rebuilt the cockpit of Sigfrid, our 34-foot 6-inch ketch. Where before we had nothing more than a deep well with one seat, we put in long side benches, proper coamings and a slatted floorboard. The benches (that also formed cockpit lockers) were made from plywood, the coamings iroko, and the slatted board from reclaimed mahogany.
The new cockpit transformed our boat, proving to be efficient and practical when we were at sea and also comfortable for relaxing or entertaining guests. It did, however, have one drawback. The plywood cockpit seats were painted. They looked smart at first, but in no time at all — this being such a high wear area — the paint became chipped and damaged. The paint also made them slippery when wet.
We could have solved both of these problems by replacing our plywood seat tops with teak decking. This would neither chip nor show its age, like the paint, and the rubber caulking compound between the planks would provide an effective non-skid surface. Unfortunately, getting ready-prepared teak delivered to Gibraltar turned out to be prohibitively expensive and, as we did not have machining facilities for cutting our own, we put the project on a back burner.
Material choice
We started to think seriously about our cockpit seats again after a visit to a local builder’s merchant. We saw a selection of moldings there made from what they called “dark hardwood.” On closer inspection, these appeared be a type of mahogany; our guess is sapele. In the selection, they had some door stops 1 3⁄4-inch wide and 3⁄8-inch thick.
Teak is hard wearing and possesses natural oils that make it extremely durable, and many people think it is the only wood that’s proper to use for decking. After a bit of thought, we decided these sapele strips could make a practical, and cheaper, alternative.
In the past, the decks of working vessels were made from the most suitable timber that was readily available. Edith, a gaff-rigged fishing boat from southwest of England that I owned in the early 1990s, had a deck made from larch. Sapele has a reputation for not being very durable in the sun, but a very skilled and knowledgeable boatbuilder we consulted before using it for our sliding hatch advised us to go ahead. He pointed out that many of the classic yachts sailing today have coachroofs and decklights made from sapele. I also had my own experience to guide me: some sapele gunwales I had fitted to a small fiberglass dinghy had been left untreated for years without showing any signs of degradation.
We decided to use the sapele and started to make a more detailed plan. We would make our new cockpit seats by gluing the 3⁄8-inch-thick strips onto 1⁄2-inch-thick plywood bases, resulting in a finished thickness of 7⁄8 inch. This was a little thicker than the existing seats, but we felt that anything less than a 1⁄2-inch base would make them too flimsy. We then carefully measured the desired width and found that if we left a 1⁄4-inch caulking seam between the strips, our seats would be exactly seven planks wide. Had it been necessary, we could have adjusted the caulking seam by about 1⁄16 inch either way to achieve a good fit without affecting the look of the finished product.
Initial construction
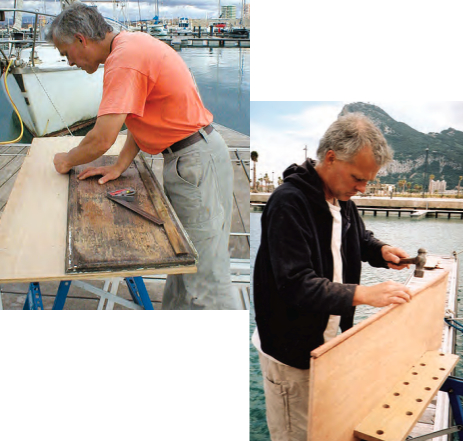
Our original seats were simply made from 3⁄4-inch plywood with a 1-inch-wide solid wooden strip screwed to the outer edge. This strip projected below the lower surface of the plywood by 1/4 inch so that it lapped over the fronts of the cockpit lockers. Over the years, the other edges of the plywood had started to degrade, so we decided to protect our new seat bases by fitting sapele covering strips all around.
The first step was to remove the old seats and take off the wooden edging strips. We then laid the seats on the new plywood and drew around them to transfer the shapes. The final step before cutting them out was to reduce the size by 3⁄8 inch on each side and 5⁄8 inch on the back. The 3⁄8 inch was to allow for the edging strips, while the extra reduction on the back was to allow for the slope of the cockpit sides. If the back had been reduced by only 3⁄8 inch, we would have gone right through the edging strip, exposing the raw edge of the plywood when it was planed to the correct angle.
We glued the edging strips along the backs and sides of the seats with epoxy and nailed them in place using the small brass panel pins. We did this on the first couple of seats and allowed the epoxy to set before we went any further. On subsequent seats, however, we found that all the gluing could be undertaken in one go.
Throughout the job, we did all the gluing in the same way. We first used a simple resin-and-hardener mix to wet out both surfaces, then added microfibers to the mix until it had a consistency resembling mashed potato or cake mixture and applied a second coat to one surface. We aimed to apply enough glue to ensure that some squeezed out all around the joint, but not so much as to create excessive waste.
Fitting the planks
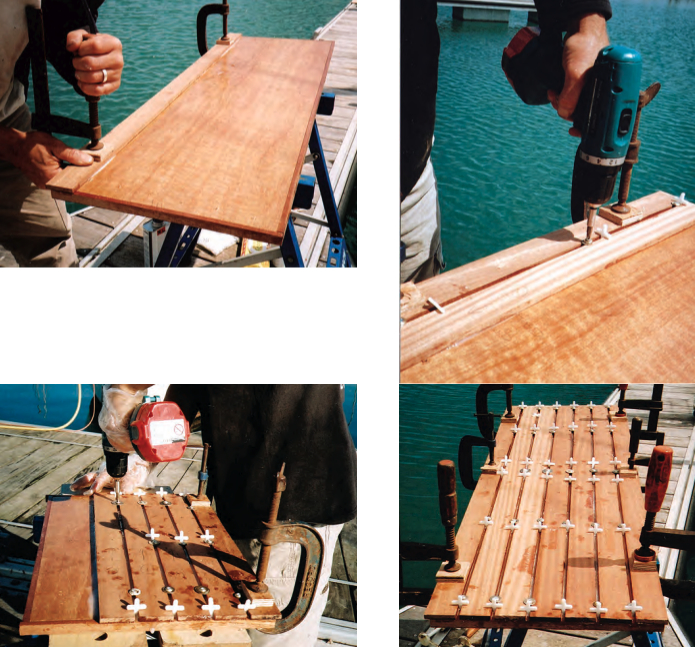
Once the edging strips were done, we started cutting and dry-fitting the planks, starting from the front of the seat. We held the first plank in place with C-clamps and positioned it carefully so it overlapped the edge of the plywood by 3⁄8 inch to allow for the final edging strip that would be fitted later. Then we placed the second plank next to it and inserted the tile spacers. (The number of tile spacers varied depending on the length of the seam. At the most we used five, at the least, two.)
We positioned the plank so the spacers were held firmly between it and the neighboring plank and inserted a screw into the caulking seam. We fitted each screw with a fender washer that was big enough to bear on both of the planks and a small washer that prevented the screw head from pulling through the fender washer. Tightening the screw held both planks down on the plywood.
We fitted subsequent planks in the same way until we reached the final one. This one we also held in place with C-clamps. We cut all the planks a little long to allow for final trimming later. Once we had dry-fitted all the planks, we removed them and laid them out in order. Using a paintbrush, we coated the entire face of the seat and the bottom sides of all seven planks with unthickened epoxy. We then reassembled the seat, applying a coat of thickened epoxy to each plank before laying it in place. Once again, we held them in place with screws and washers. Since we had to work rather quickly to ensure that the whole seat was assembled before the glue started to go off, it was very important to be organized. A small battery-powered drill fitted with a screwdriver bit was an invaluable aid.
If we had not been confident of gluing the seat in one go, we could have glued it plank by plank, although that would have been time-consuming.
Clean-up and trimming
When the glue was dry, we removed all the screws, washers, and clamps. We sanded off excess glue with 80-grit sandpaper and also sanded areas where the seams between the planks had become overfilled with epoxy. A small amount in the bottom of the seams will not cause problems but, in areas where they were more than about half full, we sanded the glue back to leave room for the caulking compound. We had to do this very carefully so as not to remove wood from the edges of the planks, which would have made the caulking seams uneven.
Next, we had to trim the plank ends so they were perfectly flush with the edging strip. This was a time-consuming process as I used a sharp chisel and took great care not to split the plank ends. It is important to work inward, from the plank edge toward the center, and to remove only a small slice at a time.
Finally, I planed the bevel on the back edge of the new seat so it matched the angle of the cockpit sides. We simply copied this from our existing seats, but it would have been equally easy, using a sliding bevel, to measure the angle directly from the cockpit.
Fitting and adjustment
As we had decided to use 1⁄2-inch plywood for the seat bases, our new seats were a little thicker than the old ones. This left us with two choices: we could either move the hinges that connected the seats to the cockpit sides or we could leave the hinges in place and cut shallow rebates around the seat edges so that, when they rested in place, the seat tops were at the original height.
Although it was slightly more work, we opted for the second choice and avoided making extra screw holes in the cockpit sides. Had a router been available, we could have cut the rebates quickly and easily. Instead, we cut ours using a rebate plane and cleaned them up with a small shoulder plane.
We had not been able to obtain true marine ply for our seats, so instead used WBP (water- and boil-proof). This meant that, once the outer veneer had been removed when we cut the rebates, we exposed various voids and defects in the interior layers. To create a good finish, and to ensure the plywood did not weather and deteriorate, we filled the voids with epoxy mixed with low-density filler before painting the undersides of the seats with two coats of un-thickened epoxy. (Low-density filler is a brown powder additive that is mixed into the epoxy until it resembles chocolate mousse. It’s easily sanded and ideal for filling and fairing in areas where loads and stresses will not be too high.)
We had decided to leave a gap of 3⁄32 inch around each seat. This served two purposes. First, and most important, it ensured that our seats would not jam or rub against each other when they were opened. Second, it helped disguise any slight discrepancies between adjacent seats. If two pieces of wood fit tightly side by side, the slightest error is obvious, but even a small intentional gap makes small errors nearly invisible. Should our seats not have fitted as well as we had hoped, we could have easily increased the gap between them to 3⁄16 inch or slightly more. As long as the larger gap was even, it would not have been offensive.
To mark out and check the gaps around our seats, we used a 3⁄32-inch spacer as a scribing block and feeler gauge. Ours was a plastic spacer used by window fitters, but any scrap of material of the right thickness will do.
Caulking and finishing
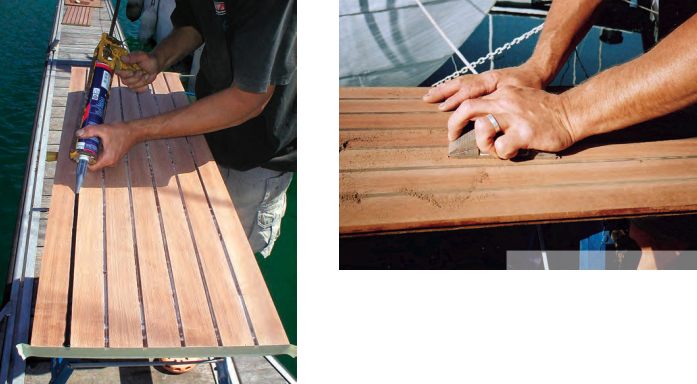
Once we were happy with the fit, the seats were ready for caulking with Sikaflex 290DC. We closed the ends of the seams with a piece of masking tape and aimed to fill each seam completely. We cut the tip of the plastic nozzle on the sealant tube at approximately 45 degrees and so the diameter of the opening matched the 1⁄4-inch width of the seam. We used an ordinary caulking gun to apply the sealant.
On the following day, when the sealant had cured, we trimmed the excess with a chisel and thoroughly sanded the seat tops with a sanding block, first with 80-grit paper and then with 120-grit paper.
Finally, we fitted the last of the edging strips to the fronts of the seats. These were wide enough to project about 3⁄8 inch below the bottoms of the seats so they lapped over the cockpit locker fronts to create a neat finish. We glued and screwed the strips in place and, because they were visible, plugged the screw heads.
Conclusion
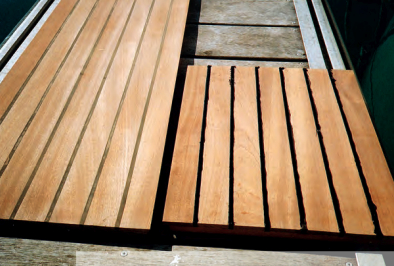
We are delighted with our new seats. After a season of use they are looking as smart as when they were fitted and, as we had hoped, the rubber caulking compound makes them non-skid.
Richard Toyne and his partner, Magali Bellenger, live aboard Sigfrid a 34-foot 6-inch steel ketch. To finance their voyages in and around the western Mediterranean, Richard writes for magazines and does carpentry work, ashore and on boats, and Magali makes and sells jewelry.
Thank you to Sailrite Enterprises, Inc., for providing free access to back issues of Good Old Boat through intellectual property rights. Sailrite.com