Hand-crimped terminals make for easy DIY
Issue 94 : Jan/Feb 2014
Rust-colored stains in the cracked vinyl-coated lifelines on Galilean, our 1984 Islander 30, signaled corrosion at work. Vinyl-coated lifelines are smooth to the touch and nice to lean against, but moisture becomes trapped between the cable and the vinyl and the cable corrodes underneath and out of sight. By the time the brown stains appear, the cable is already compromised.(See also, “Maintain Your Perimeter” by Don Casey, November 2009.) Given that our lifelines probably dated to 1984, it was clearly time to replace them.
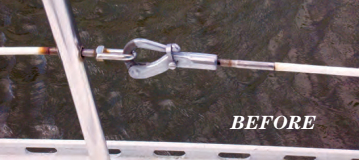
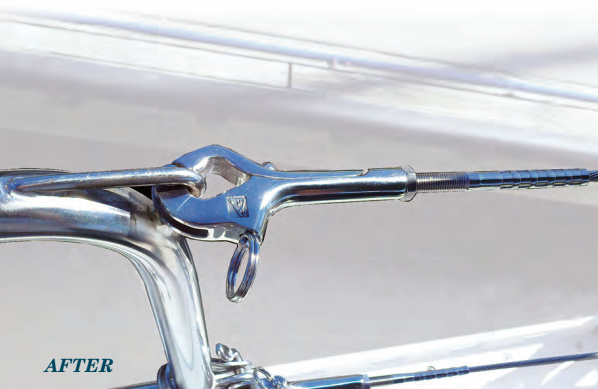
Our boat was built with gates in the lifelines, but the Bimini frame that had been added later made it impossible to use them. The pelican hooks, being of the “classic” design, were difficult to open because the tension of the lifeline was on the moving lever rather than the fixed hook.
I had read about sailors who dispensed with the gate entirely. Some connect the pelican hook to the pushpit and run a continuous cable all the way to the pulpit. This way, releasing the pelican hook lets the lifeline droop the length of the boat and you can make a temporary gate wherever you want it. Reconnect the pelican hook from the comfort of the cockpit and you’re back in business. This design also eliminates much of the (expensive) hardware for making a traditional lifeline gate as well as the labor of installing it. Dispensing with the gates was an easy decision. While I was at it, I decided to replace the old pelican hooks with the newer “over the center” design that takes the stress off the lever.
Lifeline anatomy
Lifelines have three basic components: the cable, the connectors at the ends, and the fittings. The connector is called a terminal because it terminates the cable and provides a way to attach it to the fittings.
Cable comes in a choice of diameters (1⁄8 inch and 3⁄16 inch are the most common for lifelines) and wire patterns, which include 1 x 19 (one group of 19 wires), 7 x 7 (seven groups of seven wires), and 7 x 19 (seven groups of 19 wires). I also had a choice of vinyl-coated or bare. The consensus for our 30-foot sloop was to use 3⁄16-inch 1 x 19 Type-316 stainless-steel uncoated cable.
The most common terminal is a stud, a threaded bolt with a hollow end just big enough for the cable. After the stud is attached to the cable it will still fit through the holes in the stanchions.
Fittings connect the stud to the boat. This is where both the variety and expense increase. Common types of fittings include turnbuckles, gate (or pelican) hooks, toggle jaws, gate eyes, and deck toggles. These fittings screw onto the stud and then fasten to a stanchion, pulpit, pushpit, or the deck. (These parts are illustrated in “Lifelines 101,” May 2010).
Since a turnbuckle has screws on both ends that turn in opposite directions, I had to make sure that if the stud on a cable had a right-handed thread, the stud on the other side of the turnbuckle had a left-handed thread, and vice-versa.
Terminal attachments
Friction keeps the cable from sliding out of the terminal, and that friction can be achieved in three ways: machine swaging, mechanical terminals, and hand crimping.
In machine swaging, the cable is inserted into the terminal (stud) and a hydraulic press squeezes the living daylights out of the assembly, forming a nice tight bond between the terminal and the cable. The surface of the terminal is left smooth and shiny but smaller in diameter. This is not a do-it-yourself option. You have to buy the completed swaged lifelines from a rigging dealer. A well-known marine retailer quoted a price of $700 for the four lifelines (without gates).
Several manufacturers, such as Sta-Lock, offer mechanical fasteners you assemble using wrenches after you unravel the end of the cable and insert a metal cone (see “Where There is no Rigger,” September 2011). You have to assemble these terminals after passing the cable through the stanchions. This is the most expensive option.
Hand crimping uses a special hand tool to pinch the terminal against the cable in a series of indentations about 1⁄8 inch apart. This is the least expensive option. Being a die-hard do-it-yourselfer, I chose hand crimping.
Measure once, but order extra
While the old lifelines were still in place on the boat, I measured each one from the tip of one terminal to the tip of the terminal on the other end by pinching a tape measure against the lifeline every foot or so as I shuffled my hands along the cable. Since I was just looking for an estimate of how much new cable I needed, I didn’t bother to subtract the length of the threads of both terminals. I didn’t see any point in trying to cut it too close just to save a buck.
Since studs are not reusable, I needed two for each of the four new lines. My new pelican hooks came with their own studs, so I ordered only four new studs along with the cable and crimping tool. The studs for hand crimping differ from those used for machine swaging; I had to be sure to order the right ones. When the parts arrived, I removed the old lifelines and labeled each one, e.g., “port upper,” so I could match them to their new counterparts when measuring the new cable for length. This would be particularly helpful if I had different fittings for different lifelines, but in my case everything was symmetrical.
Tools and techniques
To hand crimp lifelines, I needed a few common tools and one I didn’t have: a hand crimper for stainless steel. The manufacturer made it abundantly clear that crimpers for other materials, such as aluminum or copper, simply won’t work. Stainless steel is very hard to crimp and requires a tool built specifically for that purpose.
C. S. Johnson makes a lever-type model and a bolt-type model. I chose the bolt-type hand crimper (part number 53-210) that runs about $50. I used a 1⁄2-inch socket wrench to tighten the bolts. The crimping tool has an opening for 1⁄8-inch terminals and one for 3⁄16-inch terminals. It comes with the bolts straddling the 3⁄16-inch side. To crimp 1⁄8-inch terminals, you will need to move the outside bolt to the other side.
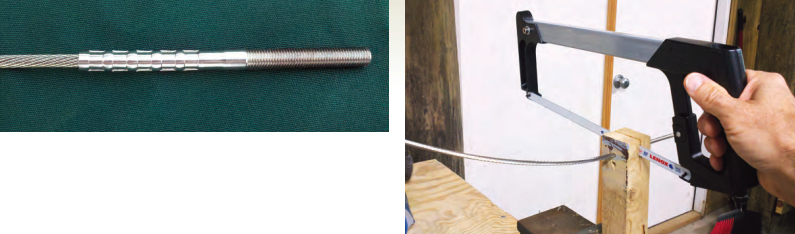
I could have bought a special tool for cutting the cable. Instead, I used an ordinary hacksaw. A bolt cutter will not work. (Don’t ask me how I know.)
Sawing stainless-steel cable presents a couple of challenges. The first is that the sawed ends tend to fray just like a rope cut with a dull knife. The individual wires bend and don’t spring back and the frayed ends that result don’t fit well into tight-fitting terminals. The second problem is that the cable flexes back and forth as you try to saw it, making it difficult to cut it cleanly.
People typically suggest wrapping electrician’s tape around the cable where it is to be cut. This will reduce, but not eliminate, fraying but does absolutely nothing to keep the cable from bending and rolling as it’s being sawn. I couldn’t figure out how to put the cable in a vice or clamp it down close enough to the cut on both sides to hold it firmly, so I made a simple jig that solved both problems.
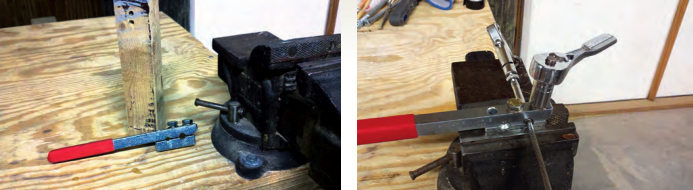
I found a piece of wood about 2 x 2 x 6 inches and drilled a 7⁄32-inch hole all the way through one of the shorter dimensions about 1 inch from the end and centered. I wanted the hole slightly larger than the 3⁄16-inch cable so it would allow the cable to slide through easily but hold it tightly once it was inside. I stood the block in the vise with the hole parallel to a long wall so I’d have plenty of room to stretch out the cable. Using an ordinary hacksaw, I made a cut perpendicular to the hole and deep enough to pass through the hole.
The hole in the jig holds both sides of the cable firmly so they don’t move or fray while the pre-cut slot, or kerf, guides the hacksaw as it does its work. The jig doubles as an extra pair of hands to tame the cable, which is inclined to coil up. (Note: While it is possible to cut stranded wire with a hacksaw, another way is to use a Dremel or other rotary tool with a cutoff wheel. Tape the wire and cut through the tape. The cut will be clean, with no burrs or distortion to the strands. –Eds.)
I used a handsaw and drill to make the sawing jig. A vise or clamp is essential for holding the crimping tool and the sawing jig.
Rather than cutting all the lengths of cable at once, I found it easier to work on each lifeline one at time. That way I didn’t have unruly pieces of cable getting in my way while I was crimping on the terminals. As insurance against a measurement error, I started with one of the longer lifelines so, if I cut the cable too short, I could turn it into one of the shorter lifelines.
Crimp, measure, cut, crimp
My basic procedure was to crimp on a terminal, mark the new cable for length, saw it, and crimp on the other terminal. A friend told me to lubricate the bolt threads of the hand crimper to make it easier to tighten and loosen the bolts. This was helpful advice, since I had a lot of cranking to do on those bolts.
First, I passed a couple of feet of cable through the jig and set the jig aside. Then I put the lower (smaller) jaw of the hand crimper in the vise with the upper jaw (with the handle and the bolt heads) on top and free to move up and down. I loosened the bolts enough to accommodate the stud terminal, inserted the terminal from the back until it was flush with the front side of the tool, and gently tightened the bolts with my fingers until it held the terminal in place. I then inserted the cable into the terminal as far as it would go and held it in place with one hand while tightening the bolts with the socket wrench. Switching back and forth between the bolts, I tightened each one about a half a turn.
How tight is tight enough? I read about one guy who wanted to make sure the crimps would really hold so he just kept tightening the bolts. He ended up stripping the threads and the manufacturer had to send him a new tool. The rule is to stop tightening the bolts when you can’t see a gap between the jaws of the tool. The crimp can’t get any tighter than when the jaws touch.
After making the first crimp, I loosened both bolts, again alternating between them, enough to slip the terminal out a little more, so the back edge of the crimp I had just made was even with the front side of the tool, and finger-tightened the bolts to hold it. As I started tightening the bolts on the second crimp, I tried to hold the cable perpendicular to the crimp tool so the crimps would be straight and parallel.
After crimping the terminal the recommended five times, I removed the completed terminal from the crimper tool and removed the crimper tool from the vise. With the cable still through the hole, I put the sawing jig back in the vise.
To determine where to cut the new cable, I pulled it through the jig for the approximate length of the lifeline I was replacing. With the end of the new terminal matched up with the end of the terminal on the old lifeline, I taped the ends together. I used the pinch-and-shuffle method to keep the cables parallel until I reached the end of the old lifeline.
Normally, the carpenter’s adage to “measure twice and cut once” is good advice, but in this case, due to a minor bout of paranoia, I measured four times. Holding the end of the new terminal even with the end of the old terminal — the old and new terminals were different lengths — I used a Sharpie pen to mark where the cable would end inside the new terminal.
Since the cutting mark would be hidden inside the sawing jig, I needed another reference mark. The cutting slot in my jig was 3⁄4 inch from the edge, so I made a large mark on the cable 3⁄4 inch from where I actually wanted to cut it. Aligning this mark with the edge of the jig put the cutting mark directly in the kerf for the hacksaw.
Several light strokes of the hacksaw made a clean cut through the cable. After pulling the cut piece out of the jig and to prepare for the next one, I shoved another couple of feet of newcable through the jig before removing the jig from the vise.
I put the crimping tool back in the vise and crimped the terminal for the pelican hook on the end of the cable I had just cut to length. I loosely coiled the completed lifeline and marked it as an upper lifeline.
I followed the same procedure for the other lifelines. Each took about an hour to complete. My concentration and vision tended to falter after a couple of hours, so I took a break each time I finished two lifelines. I didn’t want to zone out and start crimping with the cable only halfway in the terminal or make shallow crimps because I didn’t feel like bending over to see if the jaws were touching.
I threaded the completed lifelines through the stanchions and screwed on the fittings. The old lifelines couldn’t be tightened all the way because the studs had been screwed unevenly into the turnbuckle bodies and one stud would hit the center post of a turnbuckle while the other was only partway in. Not wanting to make the same mistake, I detached each turnbuckle from the boat so I could thread the body evenly onto both studs before reattaching the turnbuckle to the boat. By holding the cable terminal while tightening the turnbuckle, I was able to prevent the cable from twisting.
The bottom line
The new “gateless” lifelines look great and function better with the new pelican hooks. The uncoated cables permit easy inspection and promote worry-free sailing. Hand crimping the lifelines was about half the cost ($380) of sending them out to be machine swaged and twice as rewarding. I might even recover some of the cost of the crimping tool by posting it for sale on a certain well-known auction site.
Part of the joy in owning a good old boat is fixing it yourself and making it a better old boat. Whether repairing something broken, improving the boat’s seaworthiness, or enhancing safety, doing the work yourself brings a great sense of accomplishment. Achieving all three in one project is a good old boat grand slam.
Gary Pardun and his wife, Carol, after 10 years of the pleasures of fickle-wind lake sailing, now navigate the tidal waters near Beaufort, South Carolina. Since Carol is at heart a “big boat” girl, they have also enjoyed chartering in the Mediterranean around Italy and Greece. Their boat provides plenty of opportunities for Gary to meet his goal in life: “Make everything better.”
Thank you to Sailrite Enterprises, Inc., for providing free access to back issues of Good Old Boat through intellectual property rights. Sailrite.com