A shady, rain-proof whole-boat shelter
Issue 107 : Mar/Apr 2016
A few years ago, I spent a rainy season in Trinidad with my boat hauled out while I did a major refit. As most of the work on my old 25-foot Laurent Giles Vertue involved cladding the wooden hull with fiberglass and epoxy, I needed to keep things dry. Because of the intense heat, shade was also a necessity.
Chaguaramas is a popular place for yachts to spend the hurricane season and the boatyards cater to owners who leave their boats on the hard and fly home for the northern summer. Those who can afford it have their vessels professionally shrink-wrapped to protect them from the torrential rain and tropical heat. I had a careful look at how it was done and decided to adapt the technique to my own requirements and pocket. What I needed to do was protect the boat from the weather in a way that allowed air to circulate and also provided enough sheltered area around the boat for me to work outside through the daily rain showers.
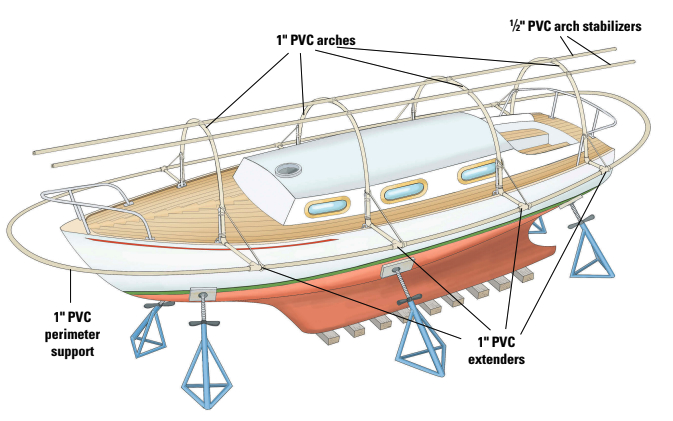
The first step was to construct a sturdy framework capable of supporting a weatherproof tarp that would extend 2 feet beyond the toerail all round the boat. It had to give me enough space to stand on scaffolding so I could reach every part of the hull while under the protection of the canopy.
The professionals use PVC plumbing pipe, which is readily available from most hardware stores. The standard 1-inch pipe is sturdy enough, but can still be made to take a curve. Luckily for me, a few big boats had recently been relaunched and had their covers removed. The PVC pipes that had formed their frameworks had been dumped and I was allowed to scavenge what I needed.
An arch design
My 25-foot boat has three strong stanchions on each side. I planned to form an arch of PVC pipe from port to starboard fastened to each pair of stanchions plus an arch at the bow and another at the stern. You could do without an arch at the stern if you have a “goalpost” for solar panels, but you’ll still need short uprights for attaching the 2-foot extensions.
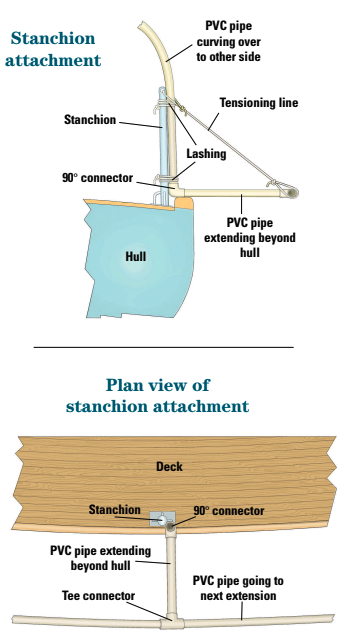
I used a salvaged length of 1⁄2-inch pipe, which was easier to work with, to form a temporary arch so I could get the height right. From that, I measured how long the thicker pipe would need to be. (On a bigger boat, you may need to join more than one piece of PVC to achieve your desired span.) I used a hacksaw to cut the required lengths and, with some help from a friend, lashed each one first to one stanchion, then formed an arch across the boat and lashed the other end to the matching stanchion on the other side. I used odd bits of line for the lashings, but heavy-duty cable ties might work just as well.
Next, I cut 10 2-foot lengths of pipe (two for each arch), and used 90-degree PVC elbow connectors to attach them at right angles to the hull at the base of each side of the arches. I glued the connectors to the pipes with PVC cement. Ideally, the connectors would rest on the toerail to give them additional support.
To the outer end of each 2-foot extension pipe I glued a PVC tee, being careful to keep the sockets horizontal. When the glue was dry, I began fitting and cementing the long surrounding pieces of pipe that connected to each of the tees to complete the perimeter support. I found it easiest to measure and cut each one in turn, rather than trying to measure accurately enough to cut them all in advance.
To stabilize the arches and help spread the tarp more effectively, I lashed a length of 1⁄2-inch pipe about a third of the way down from the top of the arches on each side, running the full length of the boat. It helped to keep the tarp from drooping between the arches.
Coverup
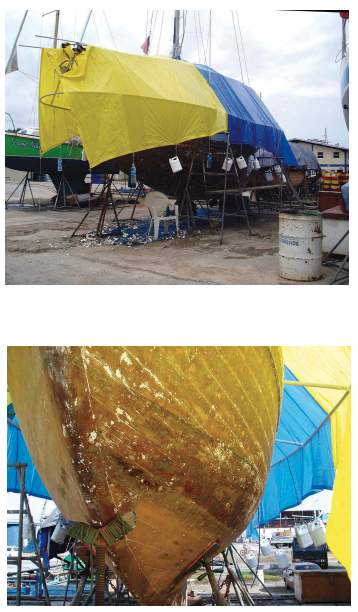
I could now unfold the tarp and spread it over the framework. If the boat had been standing on unpaved ground, I might have been able to use rope and tent pegs to hold it down and stop it from blowing away. Since it was on a concrete platform, I used string to suspend a 1-gallon plastic container filled with water from each grommet hole along the bottom of the tarp. This, very effectively, kept everything in place, even in strong winds. If you need more than one tarp to cover the framework, you will have to overlap and tape them together to keep things watertight. It’s possible to find special tarp tape to do the job, but ordinary duct tape works quite well and is much cheaper.
In the illustration on the facing page, the mast is out, but my mast was actually still up, so I had to cut a hole for it and tape it snugly closed. I also had to accommodate the standing rigging, and that took some patience. This is where the more expensive tape might be worth the investment.
I found that, with the heavy water jugs weighing down the tarp, the outer part of the framework sagged too much. To counteract this, I tied a piece of line around each outer tee with a bowline and took it back to the head of the stanchion at that point to tension it. This solved the problem. I left the covering open at both bow and stern to allow for some airflow, but made sure there was sufficient overhang for me to close it if the wind started blowing rain inside. If you’re planning a job that will take more than three months, buy the best-quality tarp you can afford, as the cheap variety tends to suffer from UV degradation and starts to fall apart after this time.
Quick and convenient
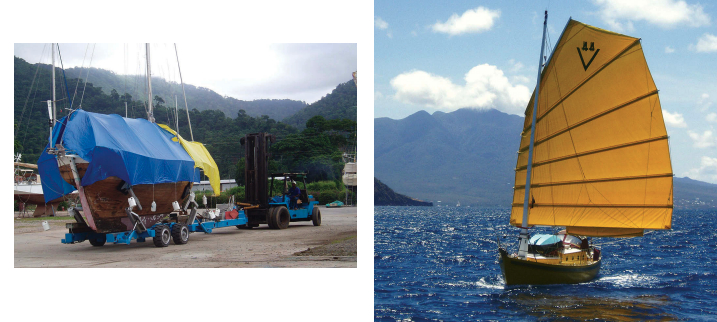
It took one helper and me only two days to build this awning and it made working under very difficult conditions quite pleasant. As I was living aboard without air-conditioning while doing all this, the awning made a big difference. At one point, when the boatyard management decided to move Speedwell to a different spot, it was possible to leave everything just as it was while they used their fancy equipment to transport the whole setup. On another occasion, a very strong wind was forecast as Hurricane Ivan passed fairly close by. All boats in the yard were required to reduce windage by removing awnings. It was a relatively easy job to take down the tarp, leaving the framework intact, and replace it when the danger was over.
Shirley Carter sailed away from Cape Town, South Africa, in March 2002 on Speedwell of Hong Kong, a 25-foot Laurent Giles Vertue, a wooden boat built in 1952. Two years later, she fiberglassed the hull and converted Speedwell to a junk rig. Shirley lives aboard and cruises singlehanded. Her travels have taken her up and down the coasts of North and South America.
Thank you to Sailrite Enterprises, Inc., for providing free access to back issues of Good Old Boat through intellectual property rights. Sailrite.com