Using à la carte components to make a watermaker
Issue 114: May/June 2017
Living aboard almost full time as we do, what a treat it is to have an endless supply of fresh water we make ourselves. With a watermaker, we didn’t need to ration water during our recent Atlantic crossing from France to the U.S. East Coast. We’ve since spent weeks at anchor without having to go to marinas. We can shower as often as we want (which, despite what you Americans think, we French like to do more than once a month). While at anchor in George Town, Exuma, Bahamas, we smugly sipped wine in our cockpit while watching fellow cruisers queue up at the only water tap so they could lug heavy jerry cans back to their boats in dinghies.
Since we could not afford the commercially available watermakers, none of this joyful self-sufficiency might have been possible. But my wife and I built Noulica, our 43-foot sailboat, ourselves, so it didn’t seem like too daunting a task to make our own watermaker. It is, after all, simply an assembly of pipes, filters, pumps, and valves.
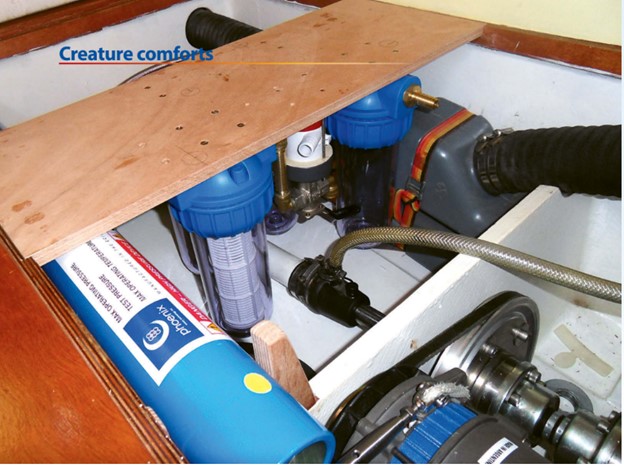
After we told our American friends Sandy and John Larson we wanted to build a watermaker, they sent us a copy of a two-part Good Old Boat article about doing just that (“How to Make a Watermaker” by Randy Baker, May 2010 and July 2010). This article laid out the project quite simply. We just had to find providers for all the parts we’d need. I decided to install the watermaker aft of the engine, under the berth in the aft cabin, where we have good access to the propeller shaft and there was plenty of unused space.
A watermaker that works by reverse osmosis (RO) is quite simple. At its heart is a semipermeable membrane (commonly called a reverse-osmosis membrane) that allows only water molecules to pass through it. When seawater is pushed at high pressure against one side of the membrane, molecules of water pass through but molecules of sodium chloride, or salt, do not. Thereafter, it’s simply a matter of collecting the fresh water and discarding the residual brine.
The natural propensity for water that contains no solutes is to pass through a semipermeable membrane to reduce the concentration of solute on the solution side of the membrane. This process, called osmosis, proceeds even against high pressure. To get a decent flow in an RO system, by forcing water molecules in seawater to pass through the membrane against the osmosis that wants the water to flow in the other direction, requires pressure of about 800 pounds per square inch.
That pressure is easily achieved with a high-pressure pump, but we first had to decide on a means of driving the pump, as that would determine the type of pump we needed to buy. High-pressure pumps can be belt-driven off a boat’s auxiliary or by a dedicated electric motor. Using the diesel engine would have required us to lift the engine and build a special support for the pump. We preferred the simpler solution, which was to use an electric motor.
After securing parts and deciding on a location, the rest of making a watermaker is plumbing. The best way to explain the system is to follow the water circuit, from where the seawater enters the boat to where the fresh water produced by the watermaker enters our tanks.

Intake through-hull
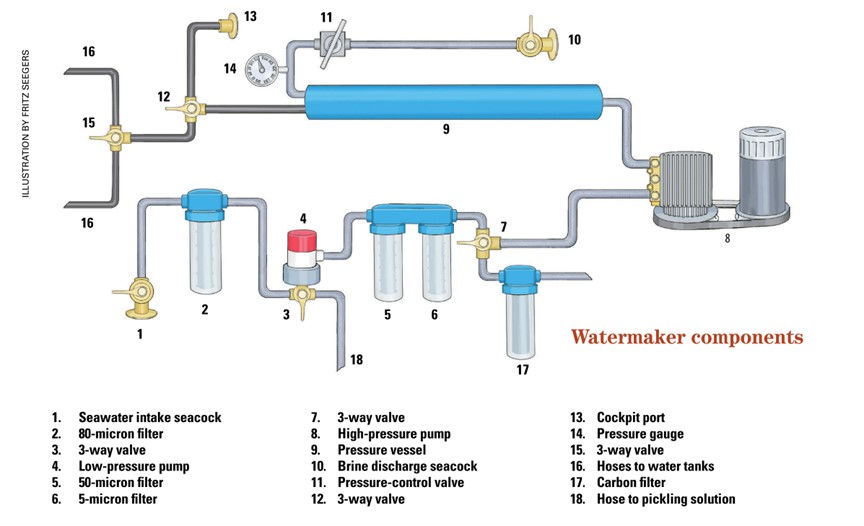
The through-hull via which seawater is drawn for the system must always be under water when the watermaker is operating, because it is not safe to send air through the high-pressure system. I installed our seawater intake through-hull at the bottom of the hull, behind the engine, where it stays immersed even when the boat is heeled. It is fitted with a seacock.
80-micron filter
Seawater making contact with the reverse-osmosis membrane must be free of oil and solid particles. After entering the through-hull, seawater passes through an 80-micron mesh filter, the first of three filters.
Low-pressure pump
Next, the water enters via a 3-way valve into a low-pressure pump, a 360-gallons-per-hour Rule bilge pump. Because the bilge pump is designed to suck water from the floor of a bilge, and not a hose, I machined a plastic adaptor to fit around the base of the pump and sealed it in place with epoxy. The adaptor has an intake pipe, which I connected to the 3-way valve. The low-pressure pump is there to pull seawater through the 80-micron filter, push it through the subsequent filters, and deliver it to the intake of the high-pressure pump. If the high-pressure pump can be installed deep enough below the waterline that it always has adequate pressure on the intake side, the low pressure pump is not necessary.
50-micron and 5-micron filters
From the low-pressure pump, water is piped first to a 50-micron filter and then to a 5-micron filter. Note that the 80-, 50-, and 5-micron filters are all mounted in like canisters of a type that’s available in hardware stores worldwide. The filters, which are used in swimming pool filtration systems, are also widely available, though at prices that vary dramatically!
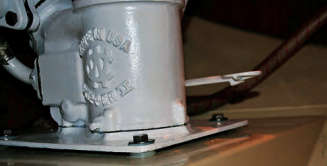
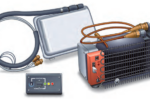
High-pressure pump
We were in France when I sourced all of these parts and built my watermaker, and I could not find a French company that sells a high-pressure pump. The pumps are commonly used in pressure washers but, in France, all pressure washers run on 220 volts AC and their pumps are directly coupled to the motors. Through an internet search I finally found Pressure Washer Authority in Texas, which offered free delivery of its TT951 pump to any address in the U.S. “Sorry, we don’t deliver to Europe, but we can send your pump to any UPS center in the U.S. and you can arrange with them to forward the pump to France.”
Instead, I asked our friends Sandy and John, who live near Minneapolis, to order the pump for me. They got a call telling them that the pump was not in Texas but, to their surprise, Minneapolis. It was delivered fast! They forwarded it and I had it a few days later. Then I learned that this pump was made in Italy. It had crossed the Atlantic Ocean twice before I’d even used it! There’s globalization for you.
Electric motor
Noulica’s electrical system is 24 volts DC. As I’m unwilling to run an inverter, I needed a 24-volt 600-watt (3/4-horsepower) motor to drive my high-pressure pump. I wanted a permanent-magnet motor for its efficiency, and chose the Transtecno EC 600-240 motor, also made in Italy but available in France. I connected the motor and pump with a belt and used pulleys with diameters calculated to give the reduction ratio of 2.4:1 needed to drive the pump at the right speed.
Pressure vessel
The high-pressure pump delivers the filtered seawater to the pressure vessel that houses the membrane. I purchased the 2.5E1000N pressure vessel from Phoenix Vessel Technology, a British company. It’s a big fiberglass tube (2 1/2 inches in diameter and 40 inches long) rated to withstand 1,000 psi and designed to fit the reverse-osmosis membrane I planned to buy. The pressure vessel has two discharge ports, one for the fresh water ready to go into the tanks (this is at low pressure) and one for the brine, or wastewater (this is at high pressure).
Reverse-osmosis membrane
There are not a lot of suppliers for this part. We use a Dow FILMTEC SW30-2540 membrane.
Brine discharge
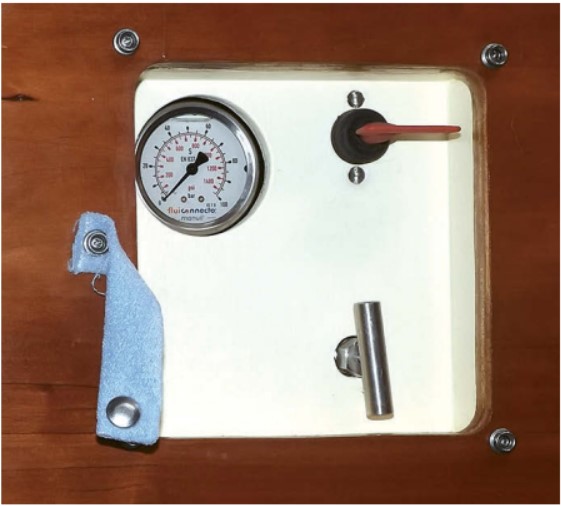
On its way to being discharged overboard via a through-hull above the waterline, the brine passes through a valve we use to control the system pressure, which is measured with a pressure gauge. As the flow from the high-pressure pump is constant, reducing the flow through the valve raises the pressure in the system. I usually maintain pressure at 50 bar (725 psi), a little less than the nominal pressure for the membrane, which is 55 bar (800 psi).
But beware! The brine-discharge through-hull must be open before the watermaker is turned on or pressure will build in the system and something will explode!
We found a company close to our marina that stocked all the high-pressure plumbing, the pressure-control valve, and the pressure gauge. I mounted the valve, the pressure gauge, and the pump’s switch on a control panel.
Freshwater discharge
The fresh water that is the desired product of this system exits the pressure vessel at low pressure. A 3-way valve allows me to direct the fresh water either to the water tanks or to a port in the cockpit.
When we turn on the watermaker, we direct the water to the cockpit so we can see that it’s flowing and we can taste it. When we are sure it is actually fresh, we switch the valve to direct the water toward the tanks. Another 3-way valve allows us to select which of Noulica’s two freshwater tanks will receive it.
Electrical
Except for the one electrical switch used to power the two pump motors, there are no electronics.
Simple and inexpensive
The total cost of our very simple design and very international watermaker was roughly $2,100, about one-fourth the price of a commercial watermaker that offers the same output of 60 liters, or about 15 1/2 gallons, per hour.
We had our first opportunity to test our new watermaker while at anchor in Ponza, a pretty Italian island in the Mediterranean Sea. It worked right away! That was three trouble-free years ago. Today, we can’t imagine sailing aboard Noulica without it. Maintenance is easy (see “Operating the Watermaker,” below). This year we plan to replace all four watermaker filters for the first time.
Operating the watermaker
Patrick and Françoise follow a set sequence of steps when operating and shutting down their watermaker. They flush the system with fresh water after each use and, when they don’t plan to use the watermaker for an extended period, pickle the system with a solution of sodium metabisulfite, a chemical that’s easy to find and commonly used to stop fermentation in wine or beer making. Pickling prevents bacteria from growing.
Starting
- Open the seawater intake seacock (1 on the diagram above).
- Check that the 3-way valve (3) is open between the 80-micron filter (2) and the low-pressure pump (4).
- Check that the 3-way valve (7) is open between the 5-micron filter (6) and the high-pressure pump (8).
- Open the brine discharge through-hull valve (10).
- Check that the pressure valve (11) is fully open.
- Check that the freshwater-output 3-way valve (12) is directing fresh water to the cockpit port (13).
- Flip the power switch to start the low-pressure and high-pressure pump motors.
- Check that seawater is flowing out the brine discharge (10).
- Slowly close the pressure valve with an eye on the pressure gauge (14), stopping when the pressure rises to 50 bar (725 psi).
- Taste the fresh water exiting the cockpit port (13). It should be fresh.
- Select a tank using the 3-way valve (15)
- Change the freshwater output 3-way valve (12) to divert water to the tanks.
Shutting down
- Change the freshwater output 3-way valve (12) to divert water to the cockpit port (13).
- Taste the water (it should still be fresh).
- Fully open the pressure-control valve (11) and watch the pressure fall on the gauge (14).
- When fresh water is no longer flowing from the cockpit port, flip the power switch to turn off the low-pressure and high-pressure pumps.
- Follow the steps below to either flush or pickle the system.
Flushing
Note: the purpose of the carbon filter on the freshwater flush circuit is to prevent any chlorine that might be in the freshwater tank from reaching (and destroying) the membrane in the pressure vessel.
- Make sure the pumps are not running.
- Change the 3-way valve (7) near the 5-micron filter so that the valve is open between the carbon filter (17) and the 5-micron filter (6).
- Use the boat’s pressurized fresh water to push water into the system in the direction of the seawater through-hull inlet, thereby flushing the 5-micron, 50-micron, and 80-micron filters as well as the low-pressure pump.
- Wait about 20 seconds.
- Close the seawater intake seacock (1) so water flows in the direction of the high-pressure pump (8), thereby flushing the pump and membrane before fresh water exits the brine discharge through-hull (10).
- Wait about 5 seconds.
- Change the 3-way valve near the 5-micron filter (7) so that the valve is open between the 5-micron filter (6) and the high-pressure pump (8).
- Close the seawater intake and brine discharge seacocks.
Pickling
Pickling is only necessary when the watermaker will not be used for a fairly long period.
- Attach a hose (18) to the 3-way valve at the base of the low-pressure pump and lead it to a container of 20 liters (5 gallons) of a 1 percent (by weight) solution of sodium metabisulfite in water.
- Change the 3-way valve (3) at the base of the low-pressure pump so that it is open between the container of sodium metabisulfite solution and the low-pressure pump.
- Check that the pressure valve (11) is open.
- Check that the 3-way valve for the freshwater output (12) is open between the pressure vessel and the cockpit port.
- Check that the brine discharge seacock is open.
- Start the watermaker pump motors.
- Just before the tank of metabisulfite solution is empty (don’t allow air to enter the system), turn off the pump motors and close the brine discharge seacock.
Patrick Bouchet and his wife, Françoise, have owned four boats since they began sailing in 1978. They built their current boat, Noulica, from the ground up over a period of four years. They’ve cruised extensively in the Mediterranean and more recently the Atlantic Intracoastal Waterway and the Bahamas. They’ve crossed the Atlantic three times.
Thank you to Sailrite Enterprises, Inc., for providing free access to back issues of Good Old Boat through intellectual property rights. Sailrite.com