A single digit now does a two-person job
Issue 101 : Mar/Apr 2015
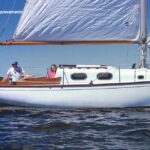
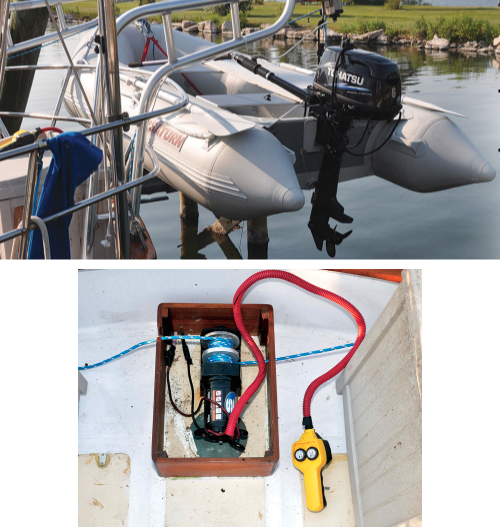
It’s slightly more than 8 feet from the water to the head of the davits on the raised aft deck of my Down East 45 schooner, Britannia. Hauling the dinghy up, even with its multi-part tackles, required two people, was hard on our hands, and took a long time, while the dinghy sometimes swung wildly on the tackles.
Running the lines to our sheet winches didn’t improve the situation at all because it still meant two people had to wind and hoisting was even slower. I considered mounting two hand-operated trailer winches, one on each davit, but the result would be the same: winding the dinghy up evenly would involve two people and, because of the high gearing of the winches, would have been slower than pulling the tackles.
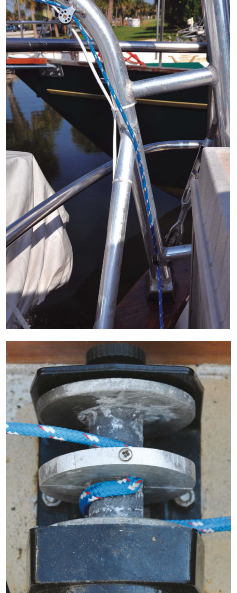
I had watched people at boat ramps hauling speedboats onto their trailers with the help of electric winches mounted on their vehicles. I found a 12-volt drum winch (Superwinch LT2000) with a 2,000-pound pull rating and a wired waterproof remote up-and-down button at Northern Tool for $106. They had one with a wireless remote, but I liked the direct wire connection so I wouldn’t have to worry about batteries going flat when the dinghy was halfway up. We are talking about boats, after all.
This winch now effortlessly hauls my 100-pound dinghy and a 55-pound outboard to the head of the davits in 28 seconds. The down button lowers the boat slightly quicker and could be operated by a child. It is now really that effortless.
When I tested the new setup with the outboard still attached to the dinghy, the winch never even hesitated. I was so astonished and excited by the ease of the lift, the outboard nearly hit the davit. We don’t hoist them together when making passage, we bolt the outboard to its bracket on the stern rail, but we often lift them together at night when at anchor, mainly to prevent theft. Judging by the power of this winch, I believe the model I bought should handle almost any size dinghy and outboard.
I made all the parts for the adaptation myself, using only hand tools that most do-it-yourselfers have. It was not difficult and it is certainly one of my better inventions. My wife and I agree it has been a most worthwhile addition to our boat.
Adapting the winch
Normally, a winch only handles one line, but this adaptation enables a single winch to handle the lines from both davits simultaneously.
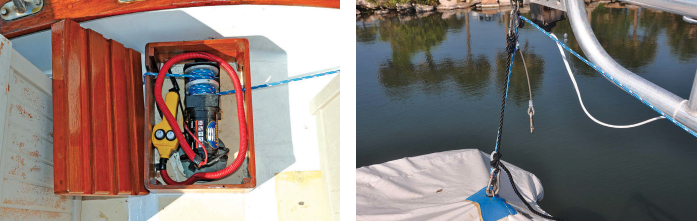
The lines, which are the two ends of a continuous rope that feeds onto the winch drum from opposite directions, lead from the winch, through blocks to the ends of the davits, and down to the lifting attachments on the dinghy. How many blocks are needed depends on the type of davits and the route the lifting line must take.
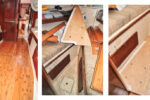
To prevent the lines from overlapping and tangling on the winch drum, I divided the drum in half with a circular aluminum collar bolted in the middle.
I made the collar of 3⁄8-inch-thick aluminum plate and the same diameter as the outside of the winch’s winding drum. For the LT2000 winch that I used, the collar is 3 1⁄2 inches in diameter, and it needed to be in two halves so I could clamp it around the winding drum.
First, I marked the center of the plate, then sawed it in half. I used a miter saw fitted with a 10-inch-diameter, 60-teeth-per-inch carbide-tipped blade. This cut through the 3⁄8-inch-thick aluminum like butter, but a hacksaw would also work.
I cut the plate in half first, because if I had cut a circular hole while it was in one piece and then sawed it in half, the hole would not have been circular due to the material taken out by the cut. The diameter of the winding drum on the LT2000 is 1 7⁄32 inches, or just 1⁄32 of an inch less than 1 1⁄4 inches.
I clamped the two halves of the plate together and scribed a 1 7⁄32-inch-diameter circle with a compass. Then, using a 1 1⁄8-inch hole cutter in my bench press, I carefully cut a hole in the middle of the plate to make the initial hole. I shaped it to the exact diameter using drum disks on a Dremel tool. Great accuracy can be achieved by repeatedly offering the two halves to the winding drum and grinding a little bit at a time wherever needed.
The two halves of the dividing collar now had to be fastened to the winch drum. Unfortunately, a steel shaft runs through the middle of the drum on the LT2000 and prevents bolting the halves of the collar straight through the drum. That made it necessary to fasten each half separately by drilling and tapping a thread into each side of the drum.
By clamping each half of the divider collar vertically in my bench press vice, I carefully drilled a 3⁄16-inch hole down the center of each collar to carry the fasteners. These do not have to be symmetrical since each half is held in place separately.
I held one half collar in place in the middle of the winding drum and, using the 3⁄16-inch drill as a pilot through the hole previously drilled, I made an indentation in the winding drum. This ensured the tapping drill was dead centered in the hole. I then drilled a 5⁄32-inch hole into the winding drum, threaded it with a 3⁄16-inch tap, and bolted the divider half in place using a 1 1⁄4-inch machine screw. I repeated the operation with the other half of the collar. I put a drop of Locktite on these fasteners to prevent them from coming loose over time.
An alternative to tapping a threaded hole in the winding drum would be to drill a suitable-size hole and secure each collar half with a 3⁄16-inch self-tapping screw. The collar carries little load when in use, it just separates the two sides of the lifting lines.
Before bolting the second half collar in place, I drilled a 1⁄4-inch hole (the diameter of my lifting line) near the edge of the inside of the collar. This hole allows the lifting line to be continuous, as it can pass from one side of the collar to the other. I then secured the other half collar to form a completely round divider.
Setting up the lines
I tried to use the 1⁄8-inch flexible wire rope that came with the winch, but it was far too stiff and would not wind evenly in both directions off the drum. Braided line was much more suitable and, with a breaking strength of more than 1,400 pounds, it is considerably stronger than the weight of my dinghy and the outboard combined.
I centered my winch motor between both davits and bolted it through the deck, but it doesn’t have to be located at a center point. If it is more convenient to install the winch to one side, it is only necessary to run a longer line on one side of the drum than the other. Both will still wind in and out at the same rate.
I threaded the lifting line through the hole in the divider collar until it was of an equal length on each side. Then, by operating the winch, I could wind or unwind the line around both halves of the drum according to the rotation of the winch. If the lines are long enough that, when they are fully extended, a few wraps remain on the drum, it’s not necessary to tie knots in the line where it passes through the divider collar. The wraps prevent it from slipping.
The method of routing the lifting lines will depend on how a particular boat is configured and the design of the davits. My installation was very simple. I used 3⁄16-inch stainless-steel pop (blind) rivets to attach stainless-steel eye straps to my tubular aluminum davits, then shackled 1⁄4-inch blocks to the eye straps to ensure a clean lead for the lines to the heads of the davits.
Since the single line leading down to the dinghy in the water below did not have the weight of a multi-part block and tackle, it was necessary to weight the lines so they would self-feed off the winch. I drilled out the center holes in two fishing weights and half-hitched one to each lifting line. These easily weighted them down to the water.
Finishing touches
I’m sure that, left exposed to the elements on the stern of my boat, the winch would not have looked good for very long, so I encased it, along with its remote control, in a nice teak box with a sturdy removable lid. Slots in the sides of the box allow the lifting lines to pass in and out.
I swaged two short stainless-steel wire strops with thimbles and snap shackles and attached them to the ends of the davits. These are for hooking to the attachment rings on the dinghy as a second safety measure when the dinghy is fully hoisted. The winch can then be backed off slightly to take the load off the lifting lines.
I also fitted an additional snap shackle on a longer line to the davit that supports the stern of the dinghy. This enables the stern to be angled lower when rain is expected or when the boat is unattended for an extended period so rainwater will run out the aft drain.
What if the power fails or the winch breaks? I kept the original blocks and tackles. These can be shackled to the davits as before to haul the dinghy up or down by hand. But until that happens, we definitely have one less struggle and the dinghy can now be hoisted effortlessly by just one person.
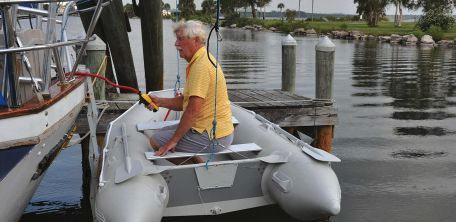
Raising the dinghy is another job my wife can now do on her own, one that always catches the interest of onlookers and fellow yachtsmen. Apart from the winch, the only material cost was for the electrical cable, lifting line, a small aluminum plate, pulleys, and eye straps. The total cost was about $250 — and worth every penny.
Roger Hughes has been sailing for nearly half a century as a professional skipper, charterer, restorer, and occasional imbiber aboard lots of boats, including square-riggers. His latest project is refurbishing Britannia, a once rundown Down East 45, and re-rigging it as a brigantine schooner with a unique roller-furling square sail on the foremast and other “inventions,” like his over-the-top blocks (see January 2015) and a hot tub in the owner’s head. Roger’s website is: www.schooner-britannia.com.
Thank you to Sailrite Enterprises, Inc., for providing free access to back issues of Good Old Boat through intellectual property rights. Sailrite.com